How to stream from OBS studio and multi stream to Twitch, Youtube and Facebook at the same time

In this tutorial, we will show you how to multi stream from OBS Studio to popular streaming platforms at the same time. We will use Twitch, Youtube and Facebook to illustrate the basics of re-streaming. Get ready, you’re in for a ride! Before we begin, make sure that you have:
1. OBS Studio (with a connected camera or any prepared material you’d like to share with the world). You can also use other programs that can stream video over the SRT protocol. In this article we will explain how to set up OBS Studio as an SRT stream sender to the server.
https://obsproject.com/
2. A server that can receive SRT stream and re-stream it to social platforms, in our case Callaba Cloud Live Streaming. Subscribing to our service will take no more than 5 minutes. Read our step-by-step manual: Launch Callaba Cloud
3. Registered accounts on social platforms, where you want to stream. You’ll have to generate streaming keys in order to stream the video to your account/channel.
Twitch : https://dashboard.twitch.tv/
Youtube : http://studio.youtube.com
Facebook : https://www.facebook.com/live/create
For the sake of this tutorial, we assume, that you already have configured OBS Studio and subscribed to the Callaba Cloud Live Streaming.
Now let’s begin:
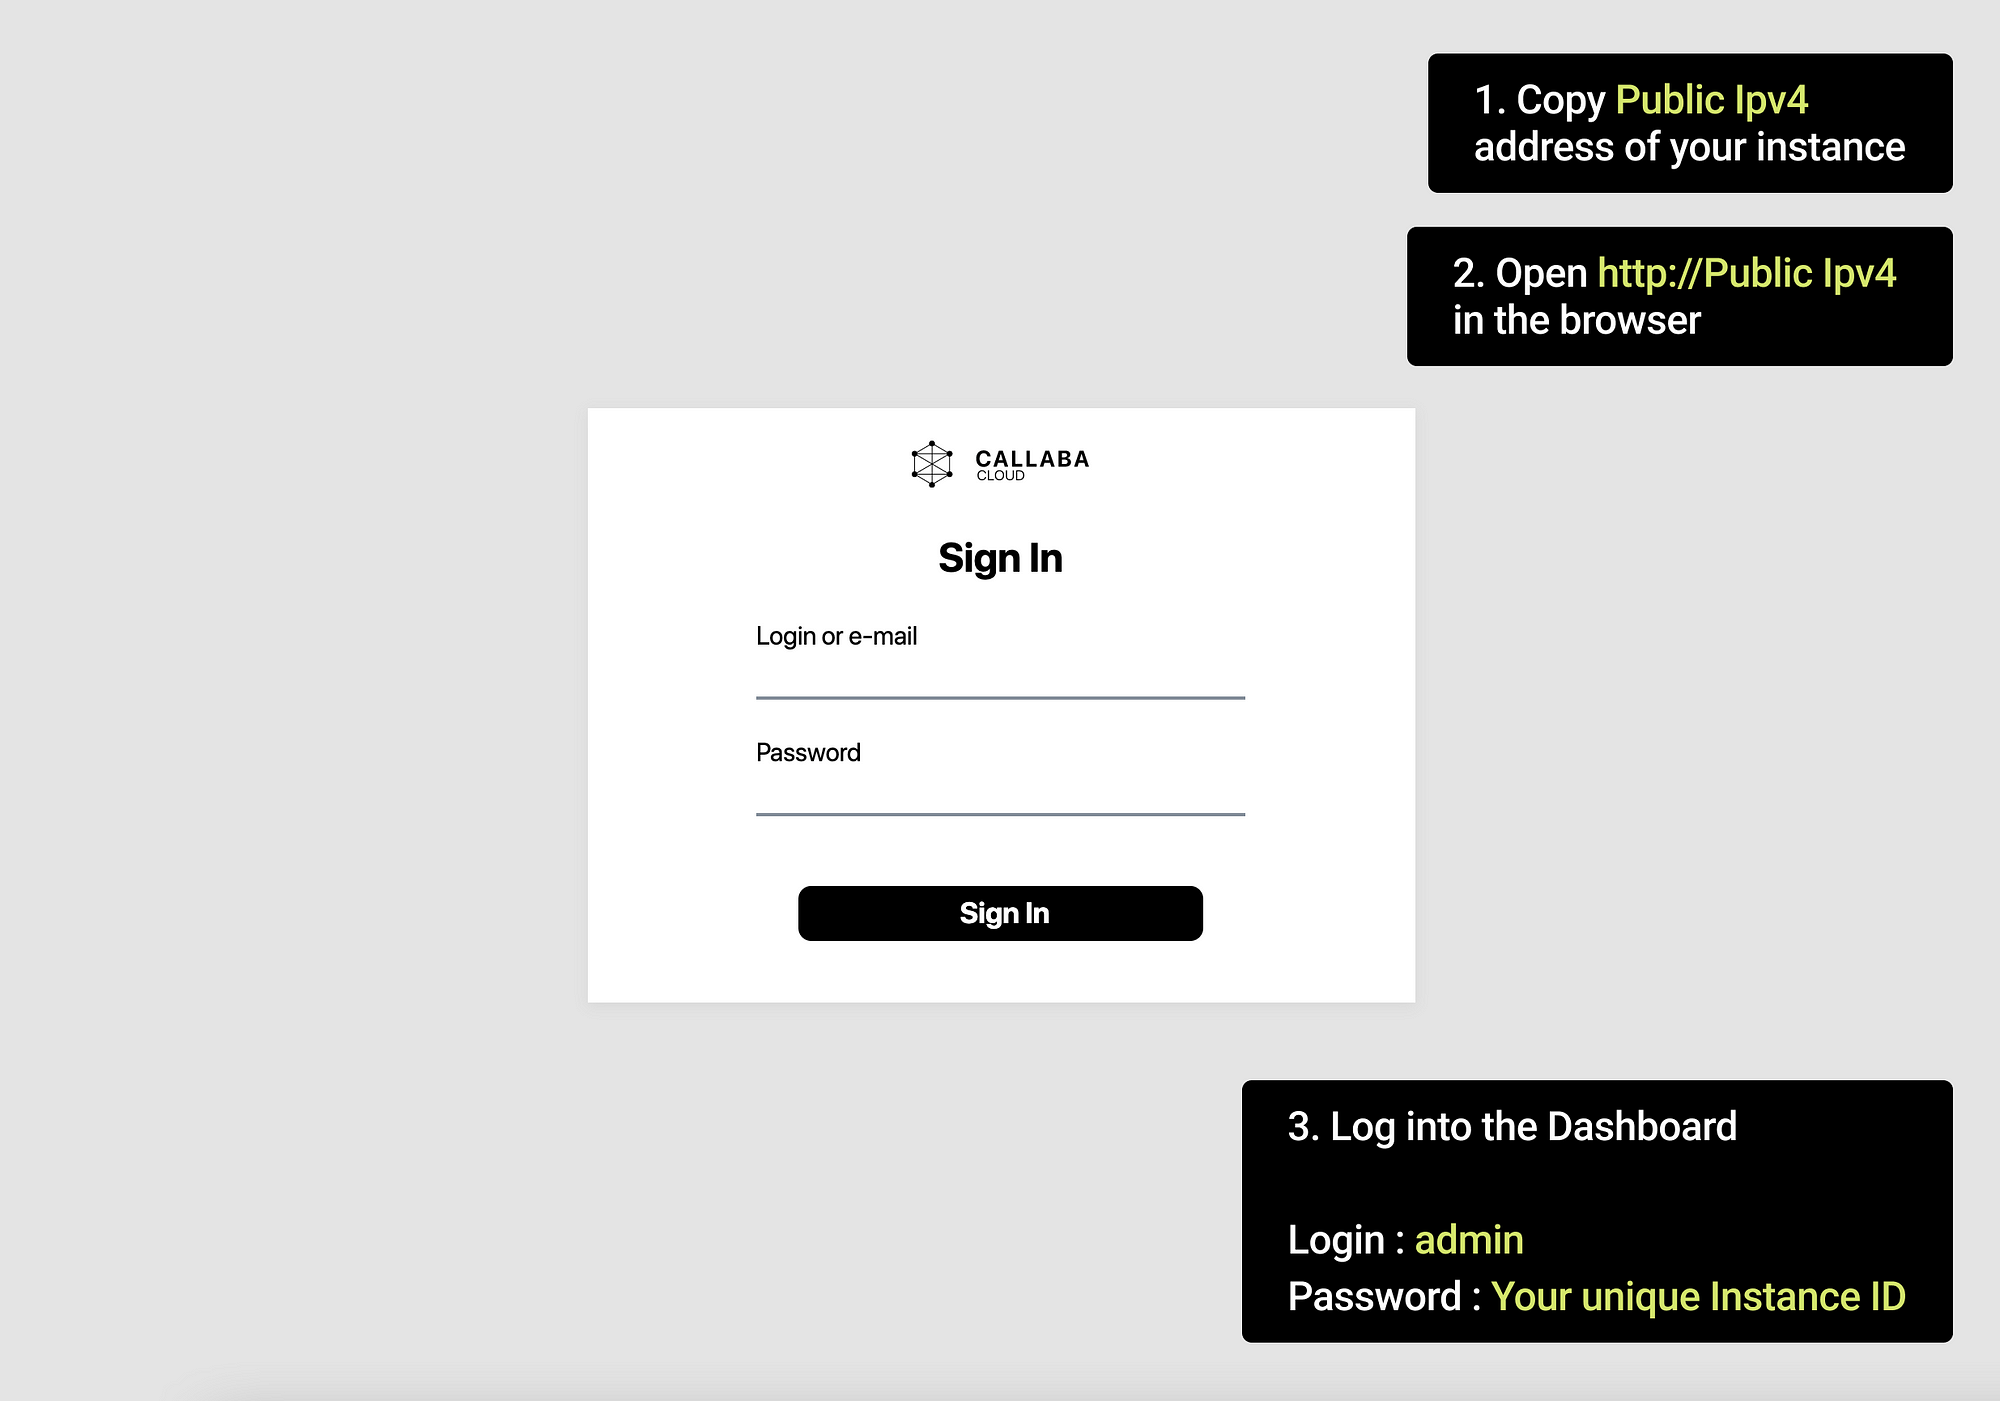
1. Open Callaba Cloud Live Streaming dashboard and log in.
To open it, go to http://YOUR-PUBLIC-IPV4. By default, the dashboard address is the Public IPv4 address of your Amazon Web Services instance.
Login : admin
Password : your unique Instance ID
If you are having difficulties with this step, check out our step-by-step manual: How to launch Callaba Cloud Live Streaming.
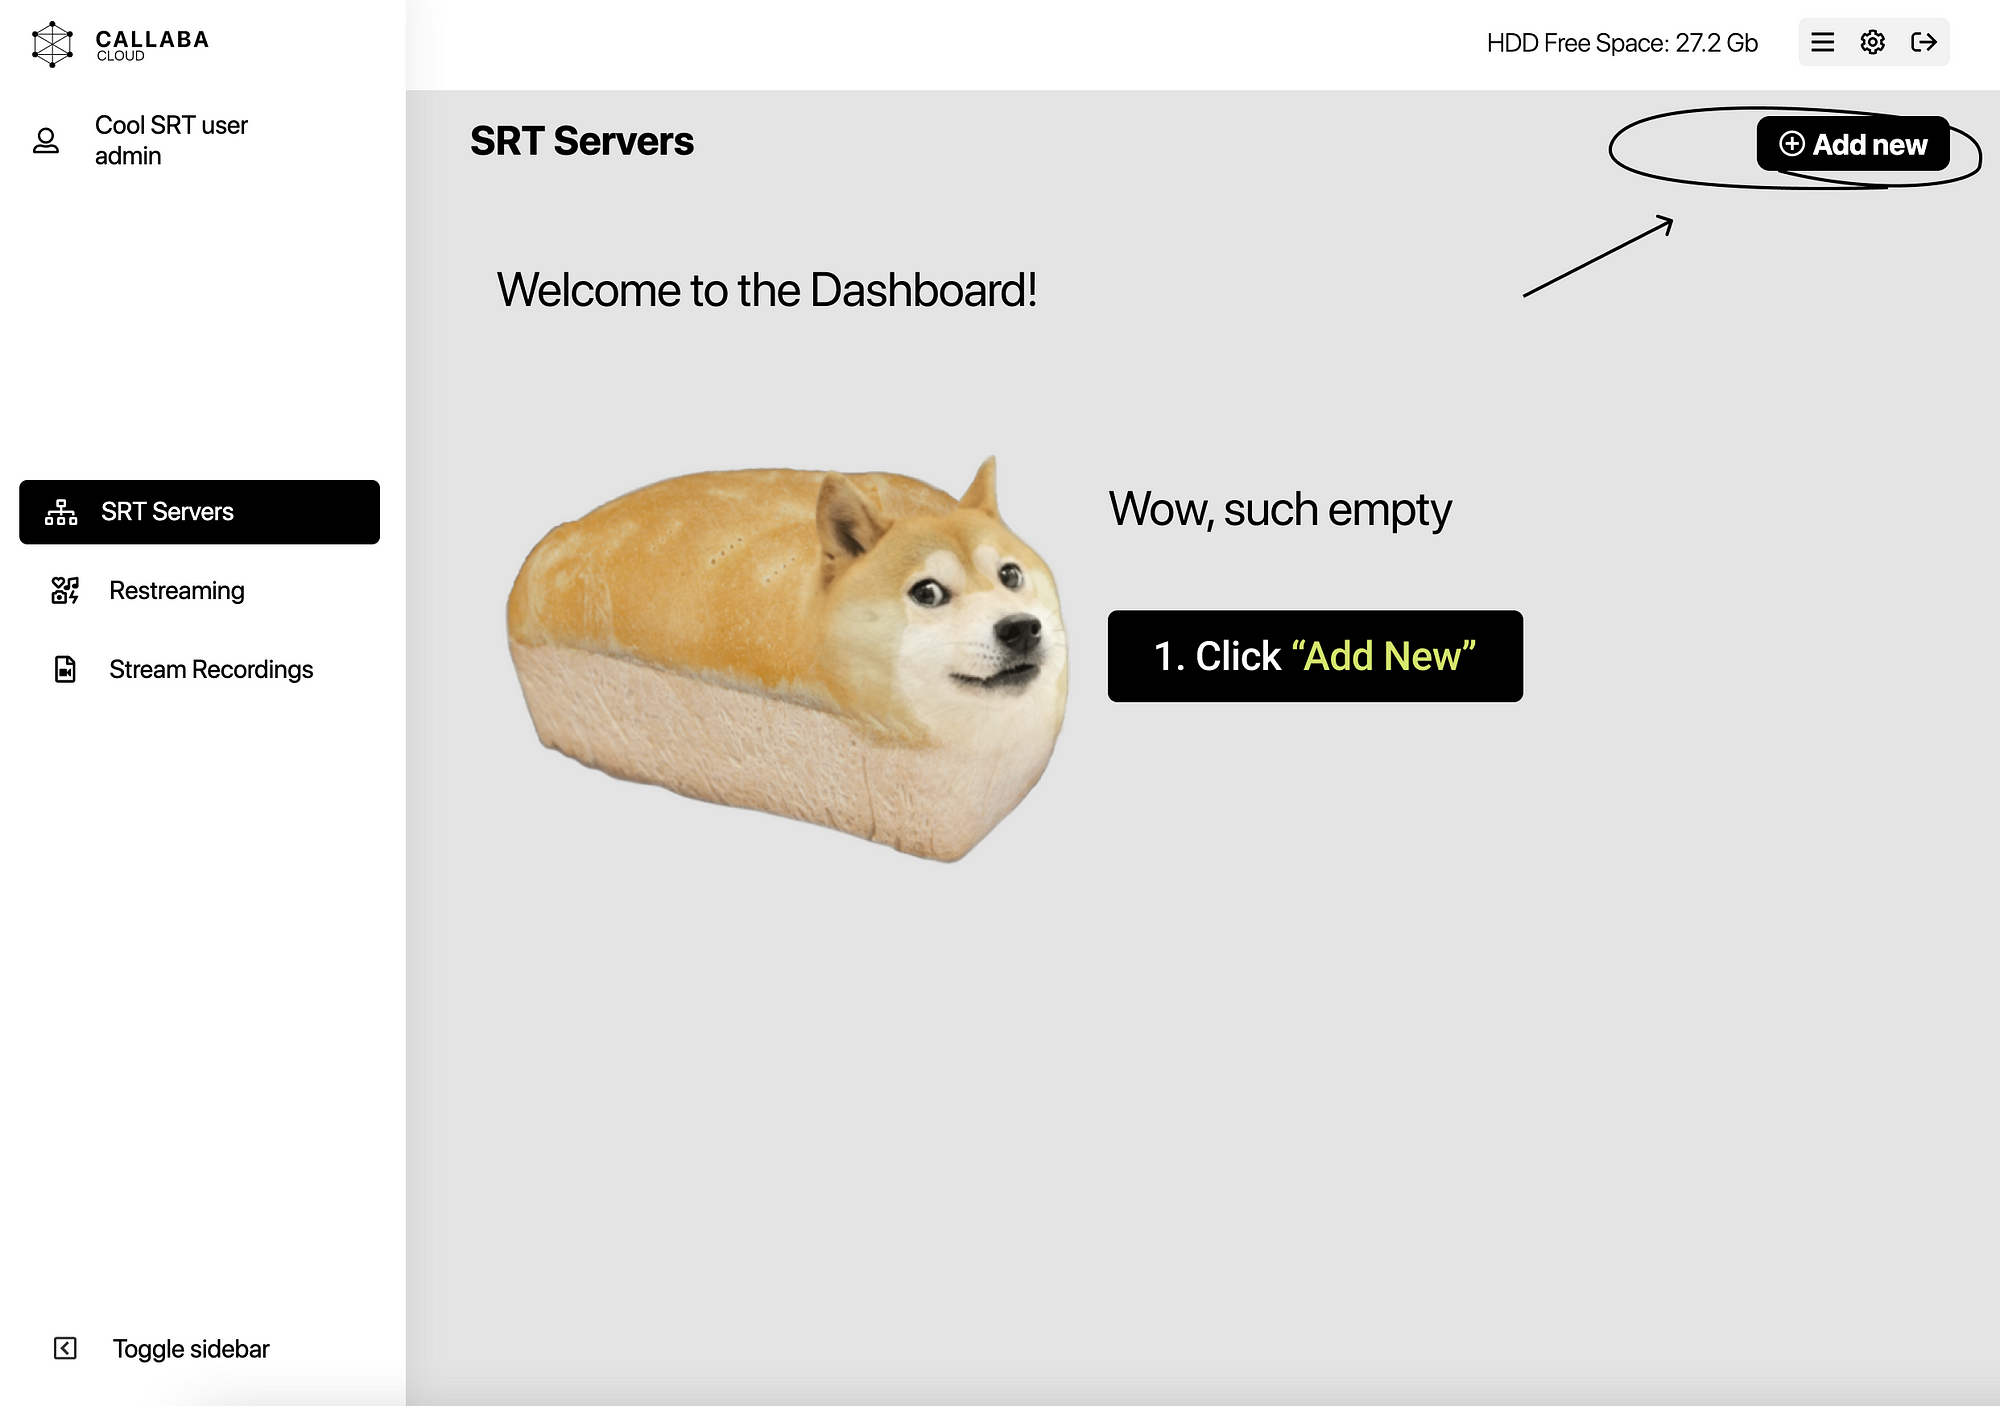
2. Go to SRT Servers tab, click “Add new”.
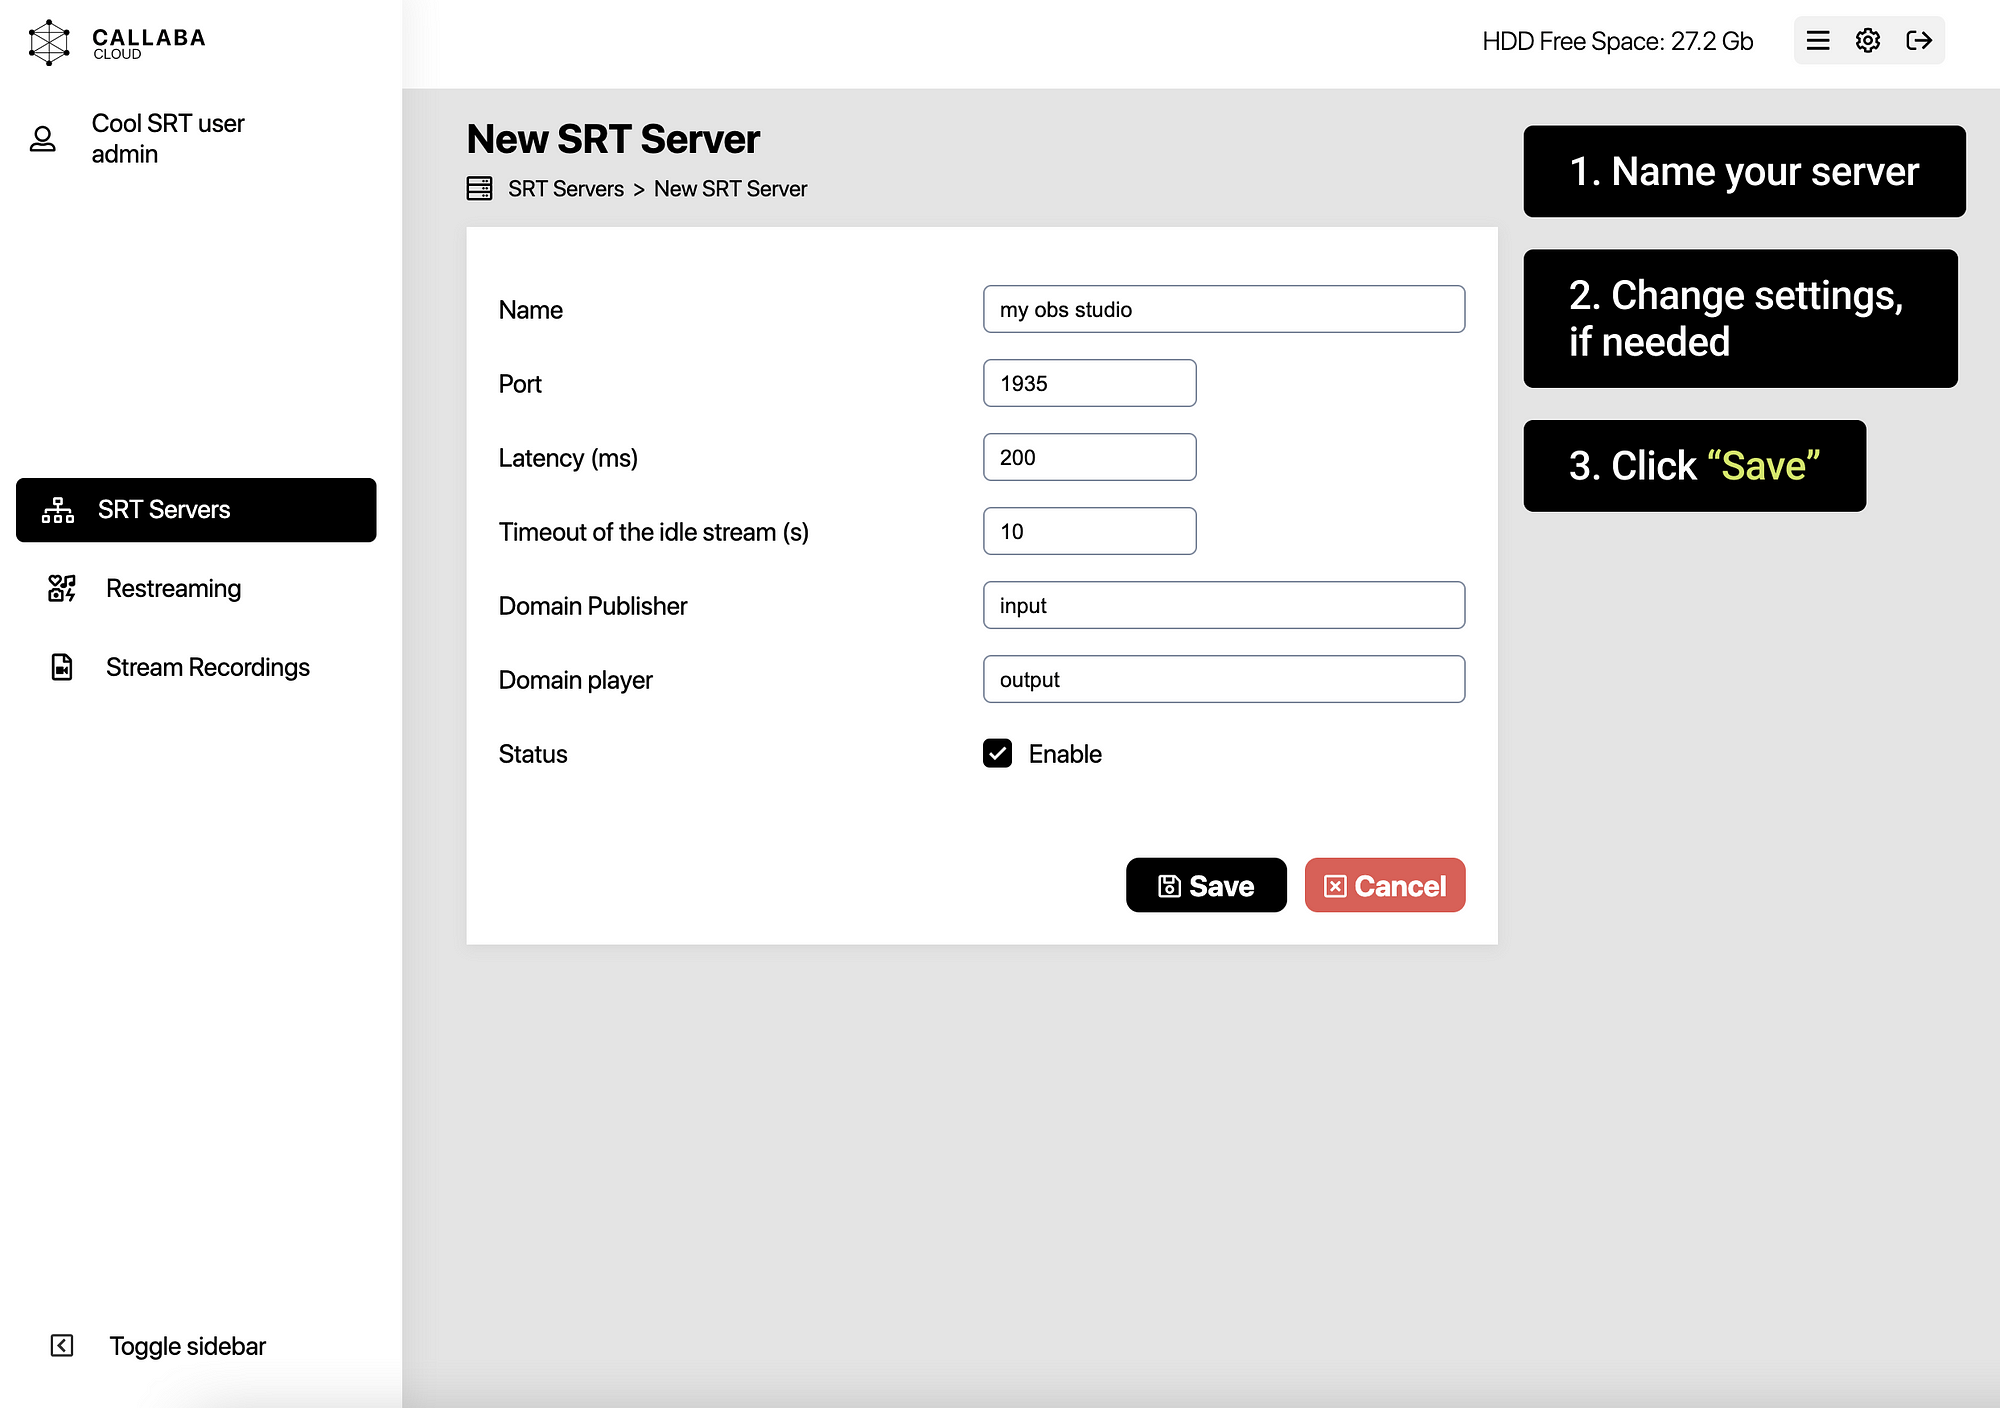
3. Name your SRT server. Click “Save”.
You can also modify server settings according to the SRT protocol specification.
Attention! Change these settings only if you fully understand what they do.
If you are a beginner, we strongly advise keeping default settings unchanged.
4. SRT Server is ready. Now we are going to set up connection between OBS Studio and this SRT server.
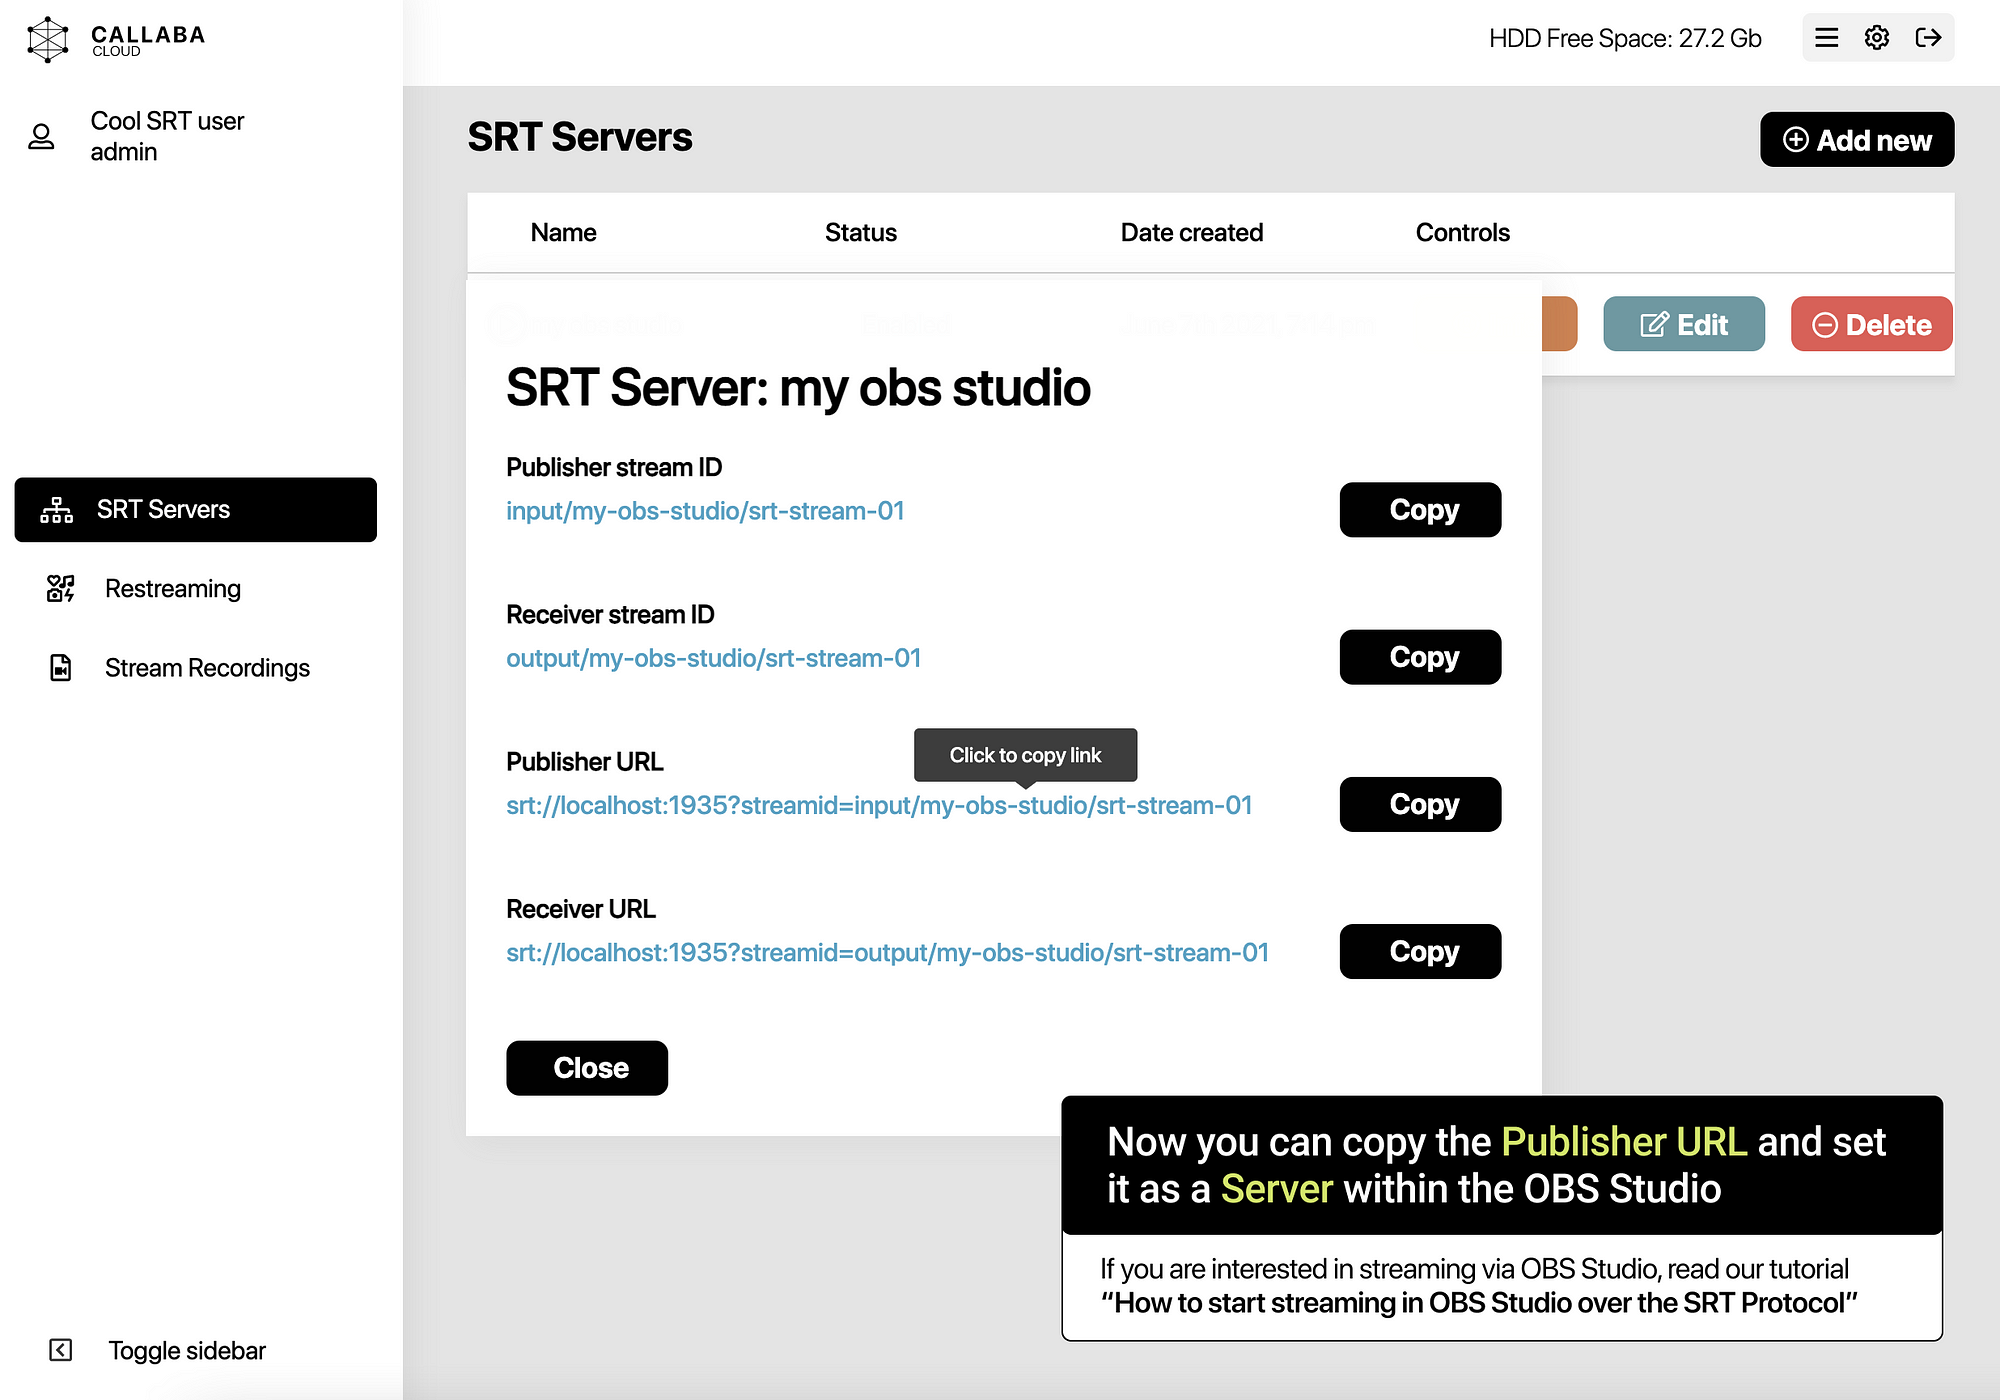
On the SRT Servers listing page, click “Info”.
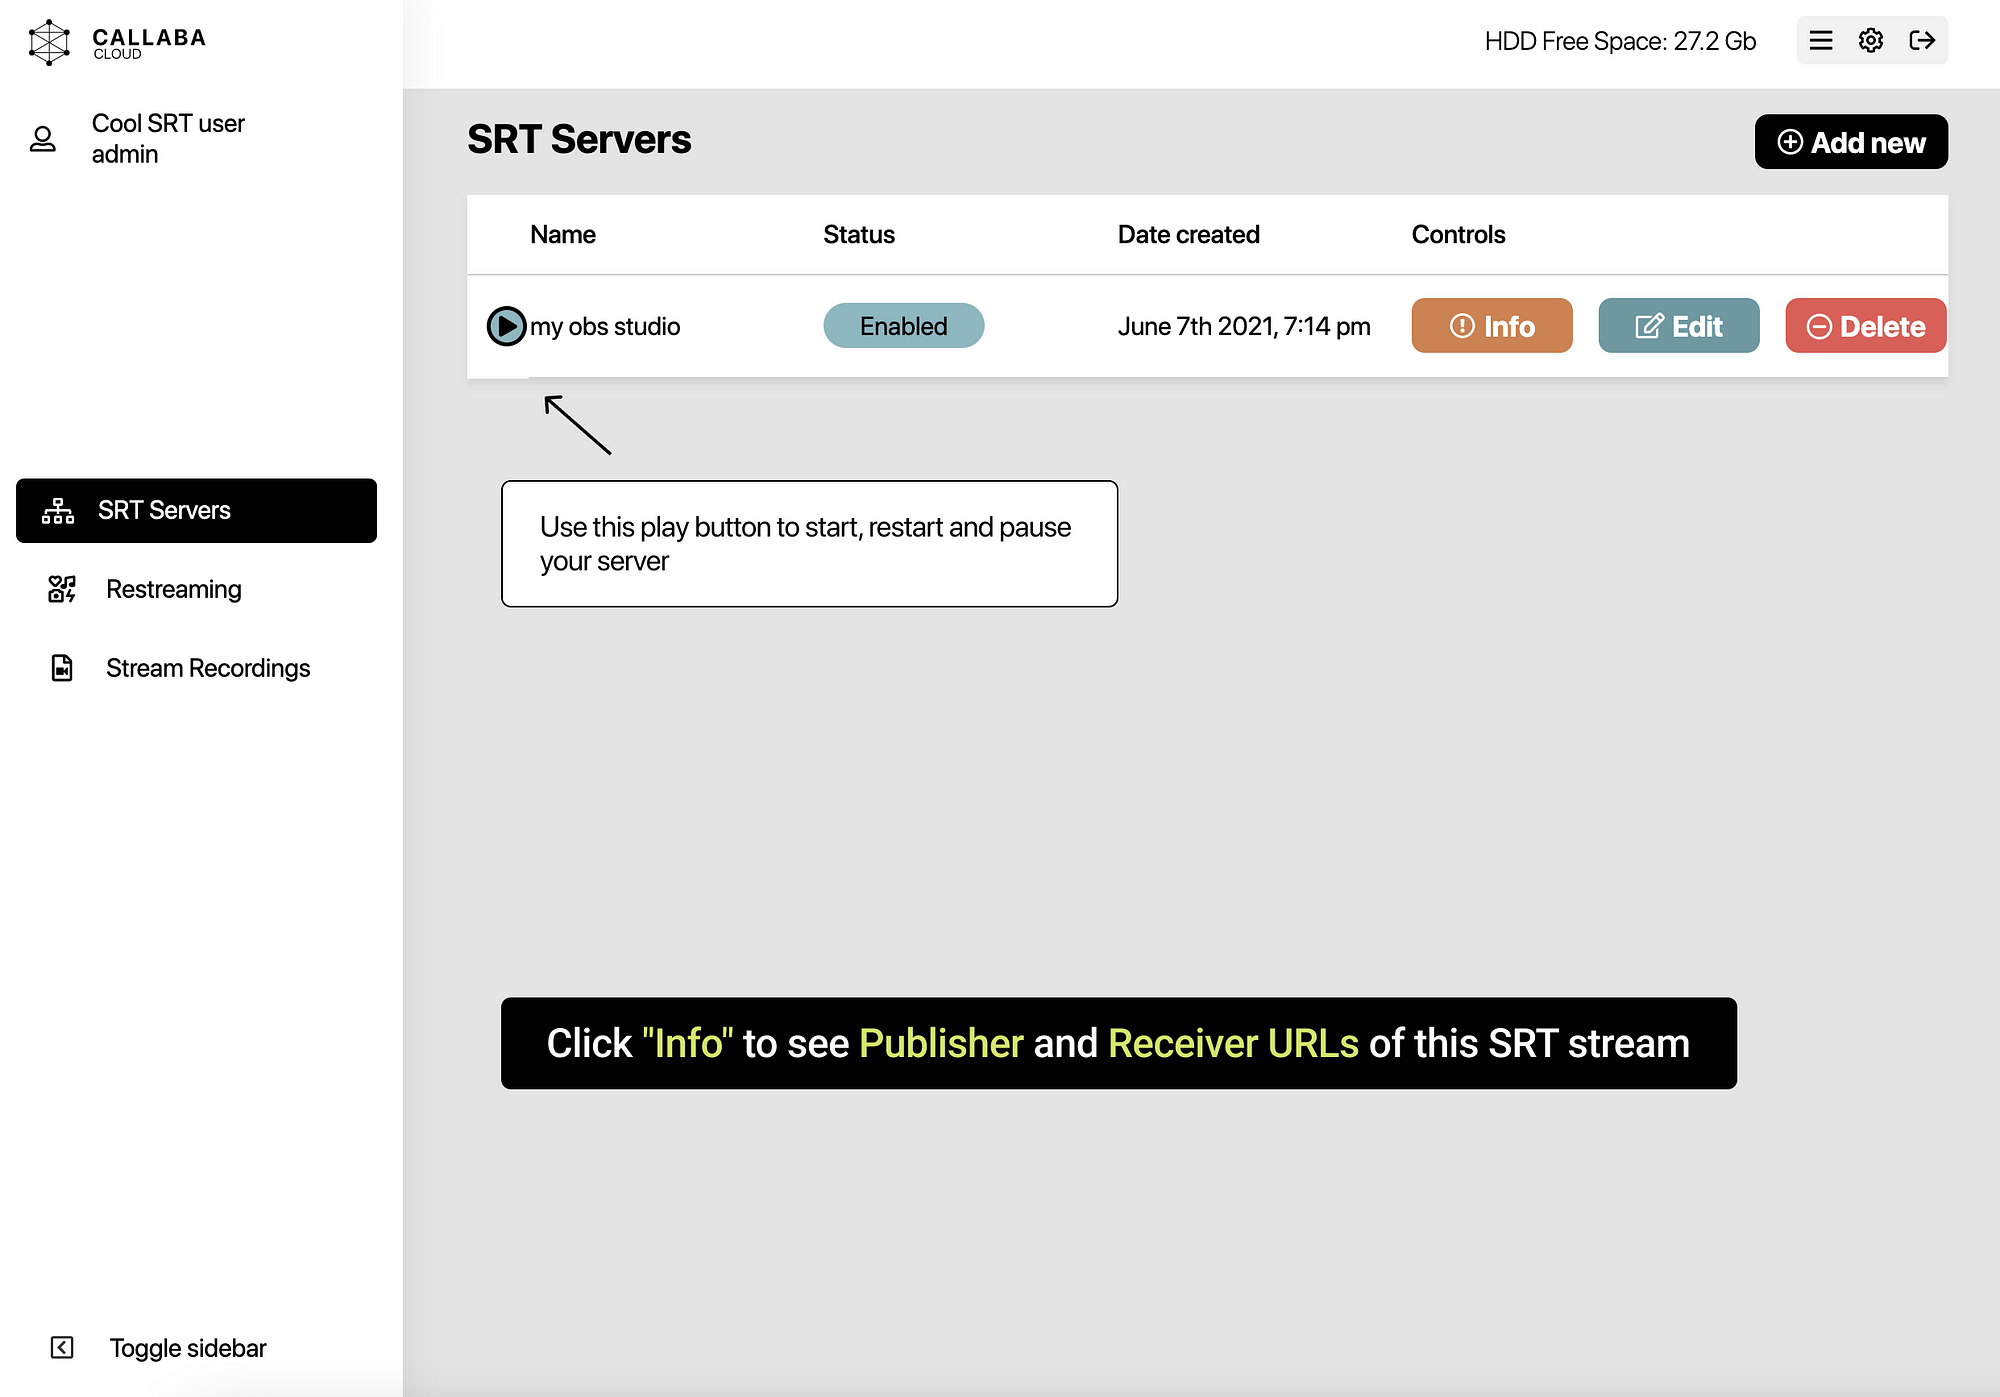
5. Copy the Publisher URL of your server.
6. Open OBS Studio. Click “Settings”.
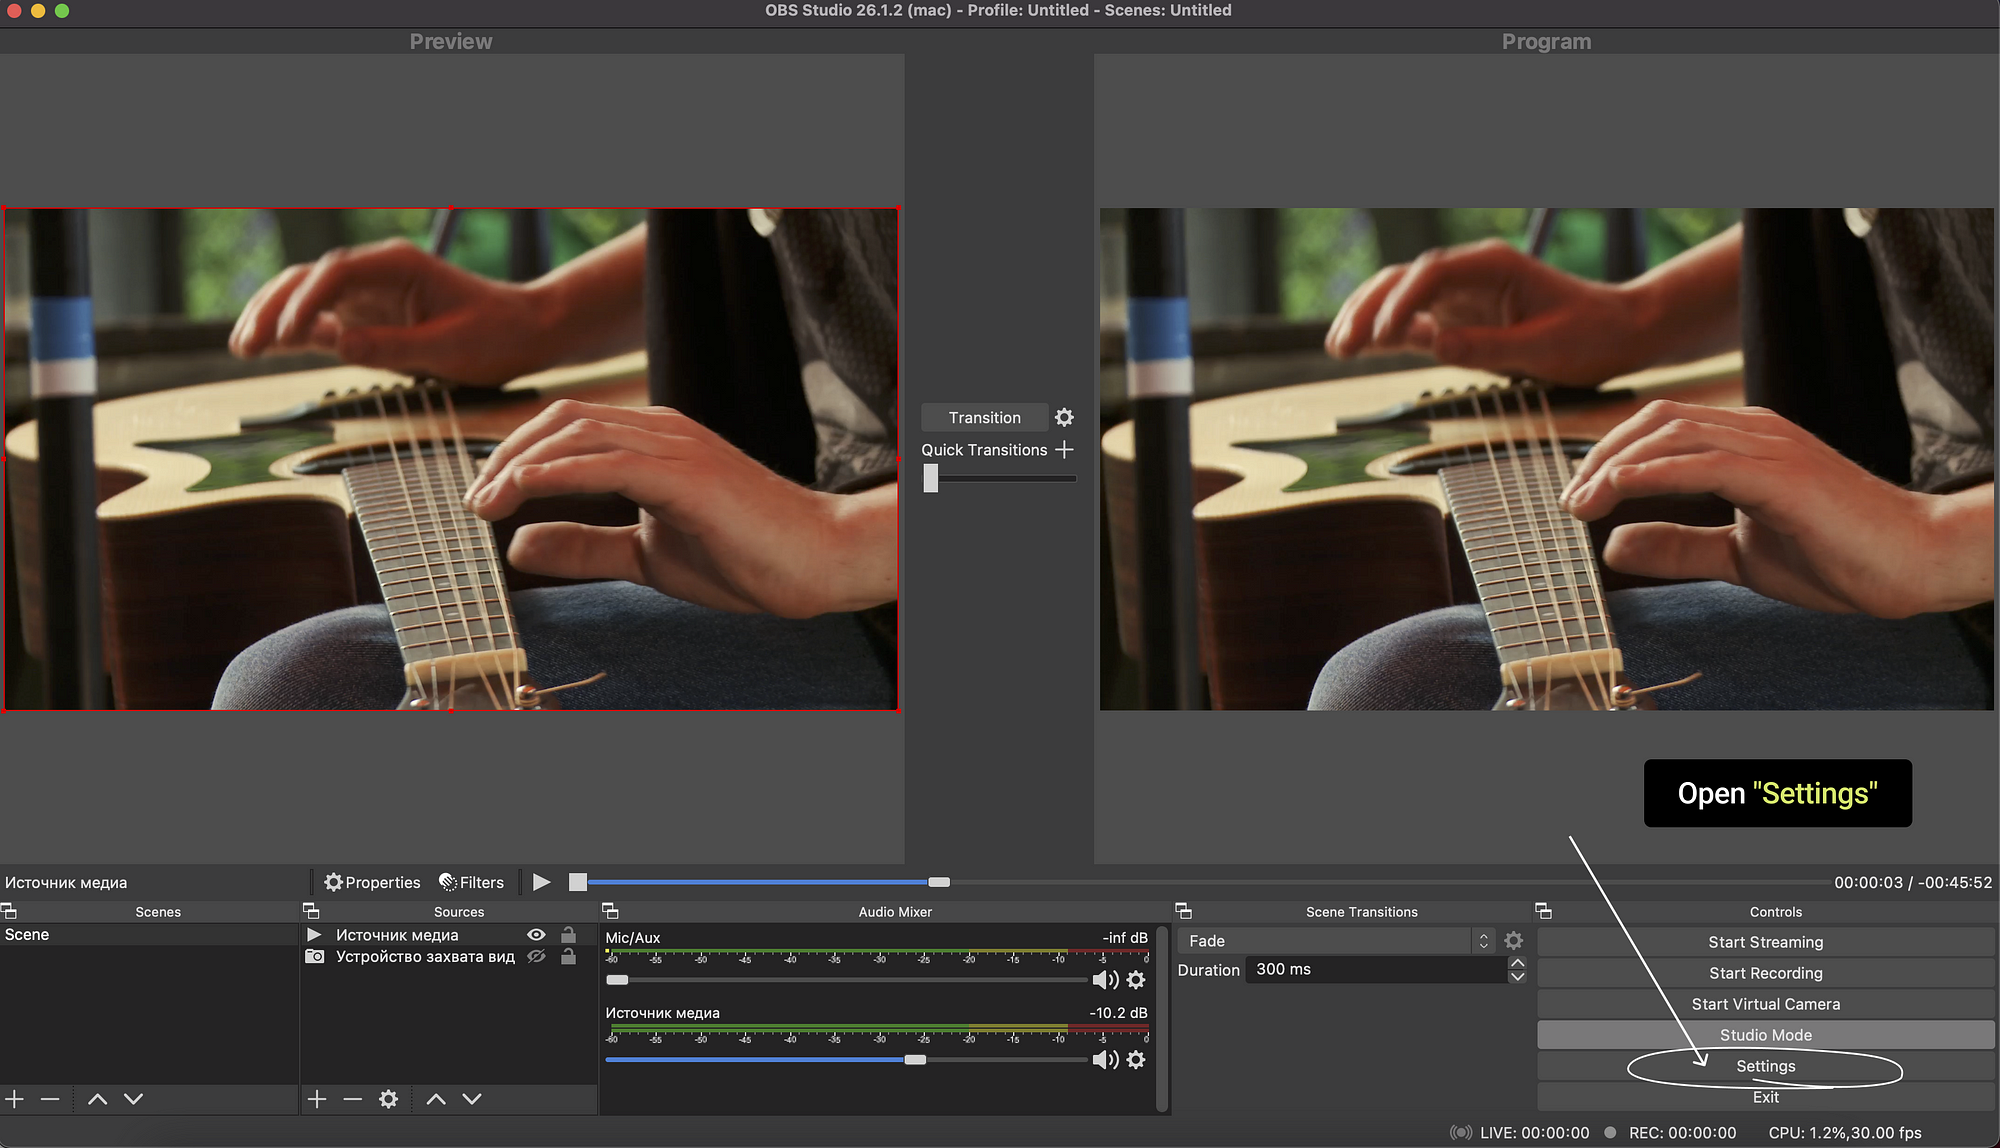
7. In the appeared window, switch to the “Stream” tab.
Set the “Service” to Custom.
Paste the Publisher URL in the Server field.
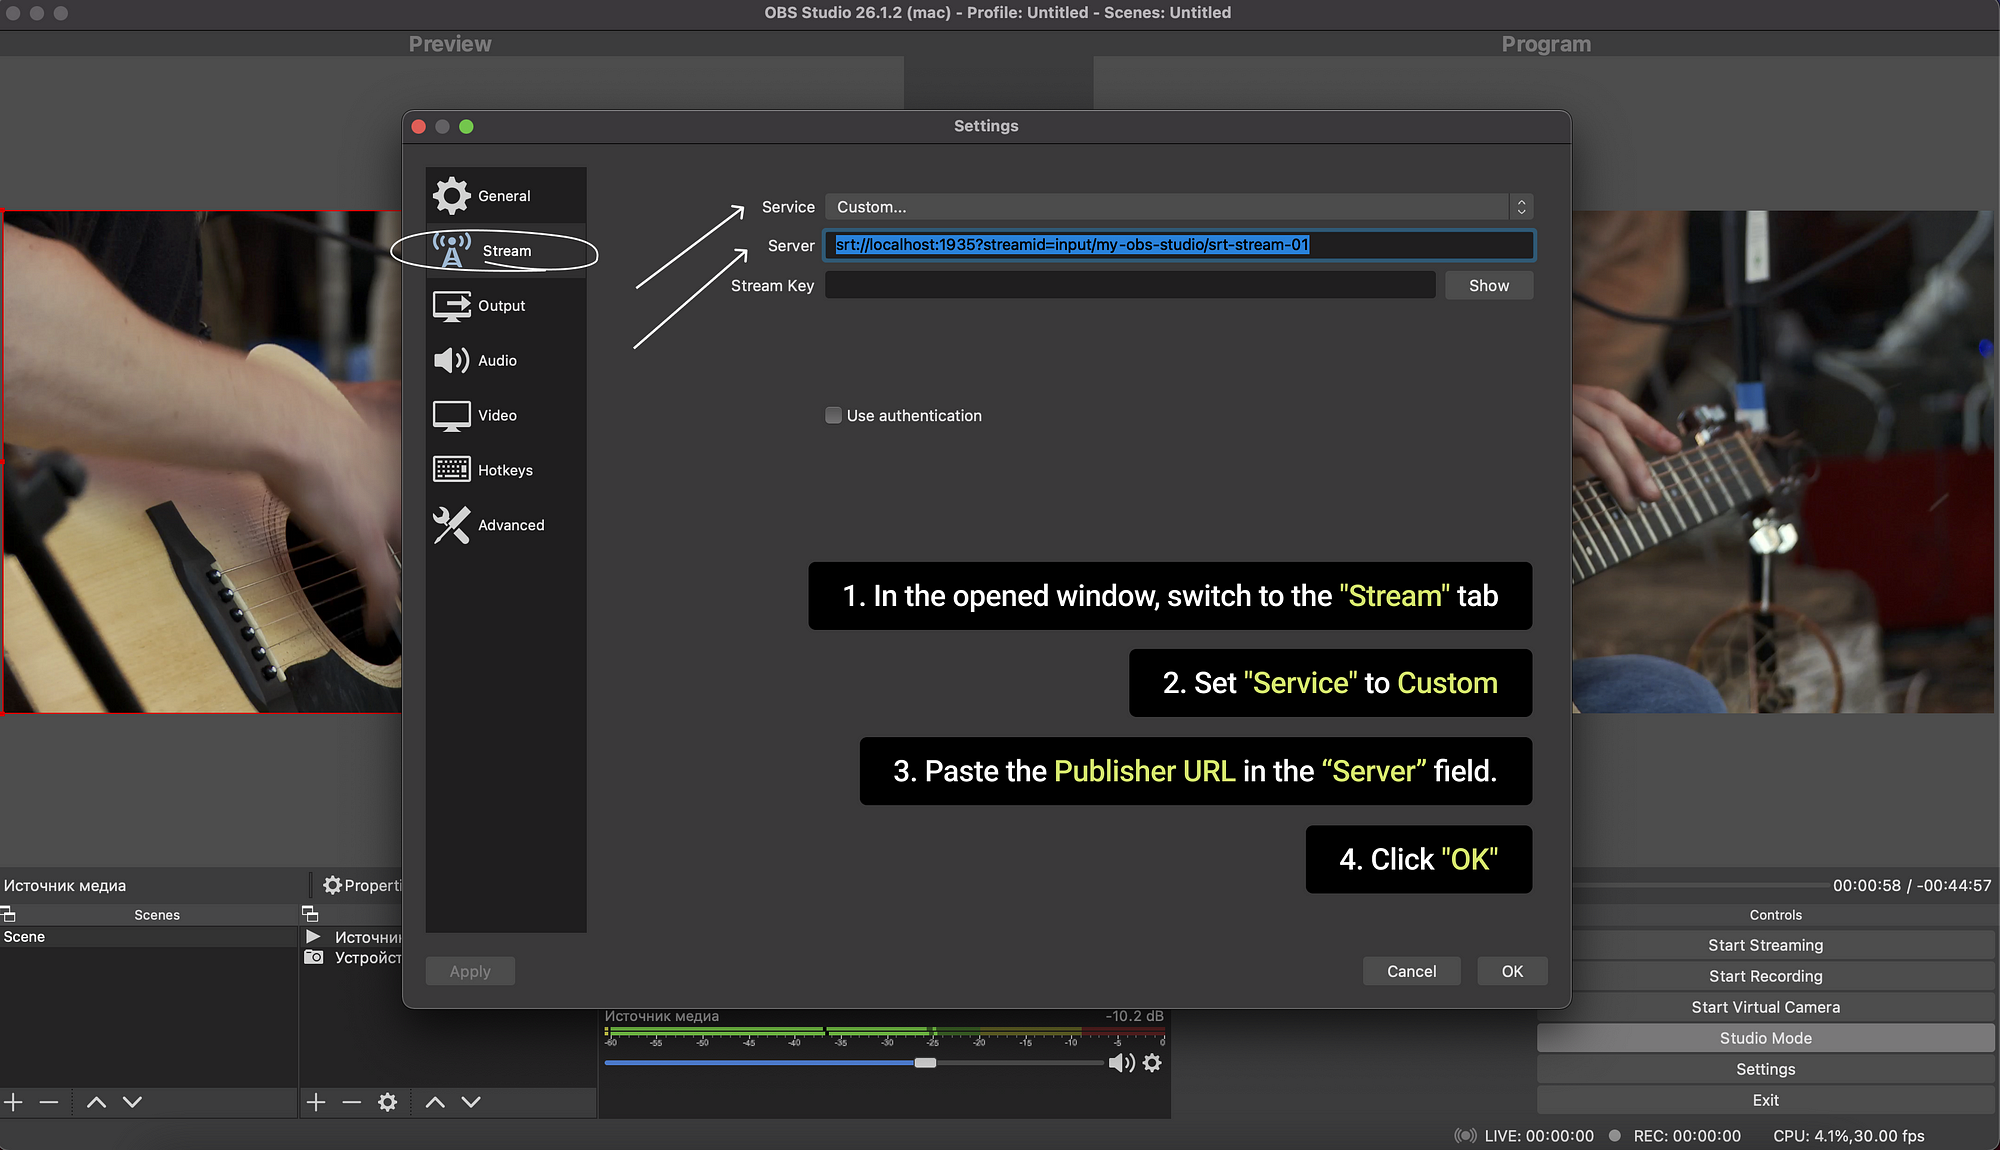
8. Switch to “Output” tab.
Here we will configure bitrate and keyframe interval.
Bitrate
Bitrate settings should be as follows:
At 720p resolution and 30 frames per second, the bitrate should be 2500 Kbits/s.
At 1080p and 30fps, set the bitrate to 6000 Kbits/s.
Keyframe Interval
Our tests showed that for Youtube, Twitch and Facebook, the interval keyframes should be set to 2.
Set the value to 2 in the appropriate field.
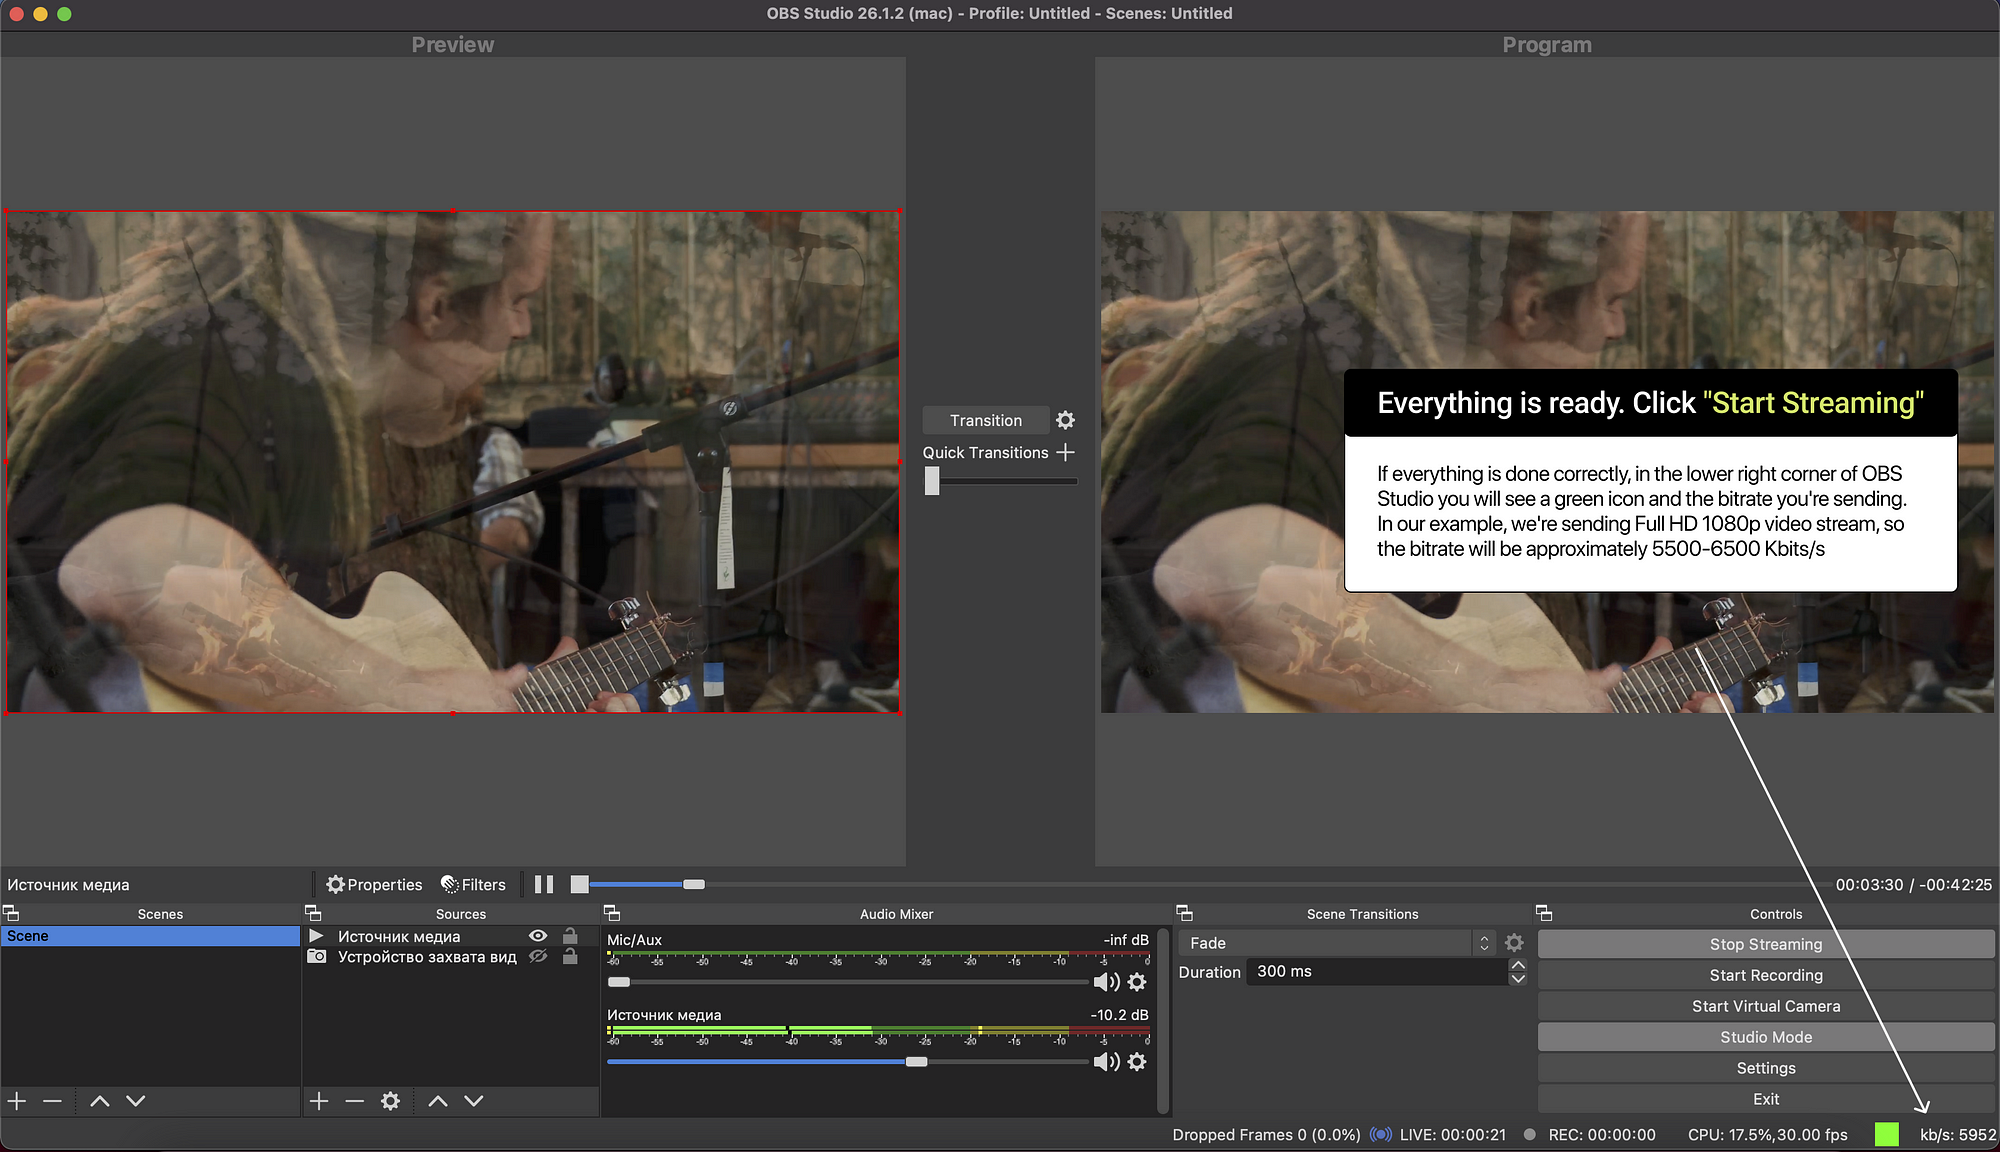
9. Everything is ready. Click “Start Streaming”.
If everything is done correctly, in the lower right corner of OBS Studio you will see a green icon and the bitrate you’re sending.
In our example, we’re sending Full HD 1080p video stream, so the bitrate will be approximately 5500–6500 Kbits/s.
10. Now let’s configure re-streaming to social networks: Twitch, Youtube and Facebook.
Twitch
First we’ll set up re-streaming to Twitch.
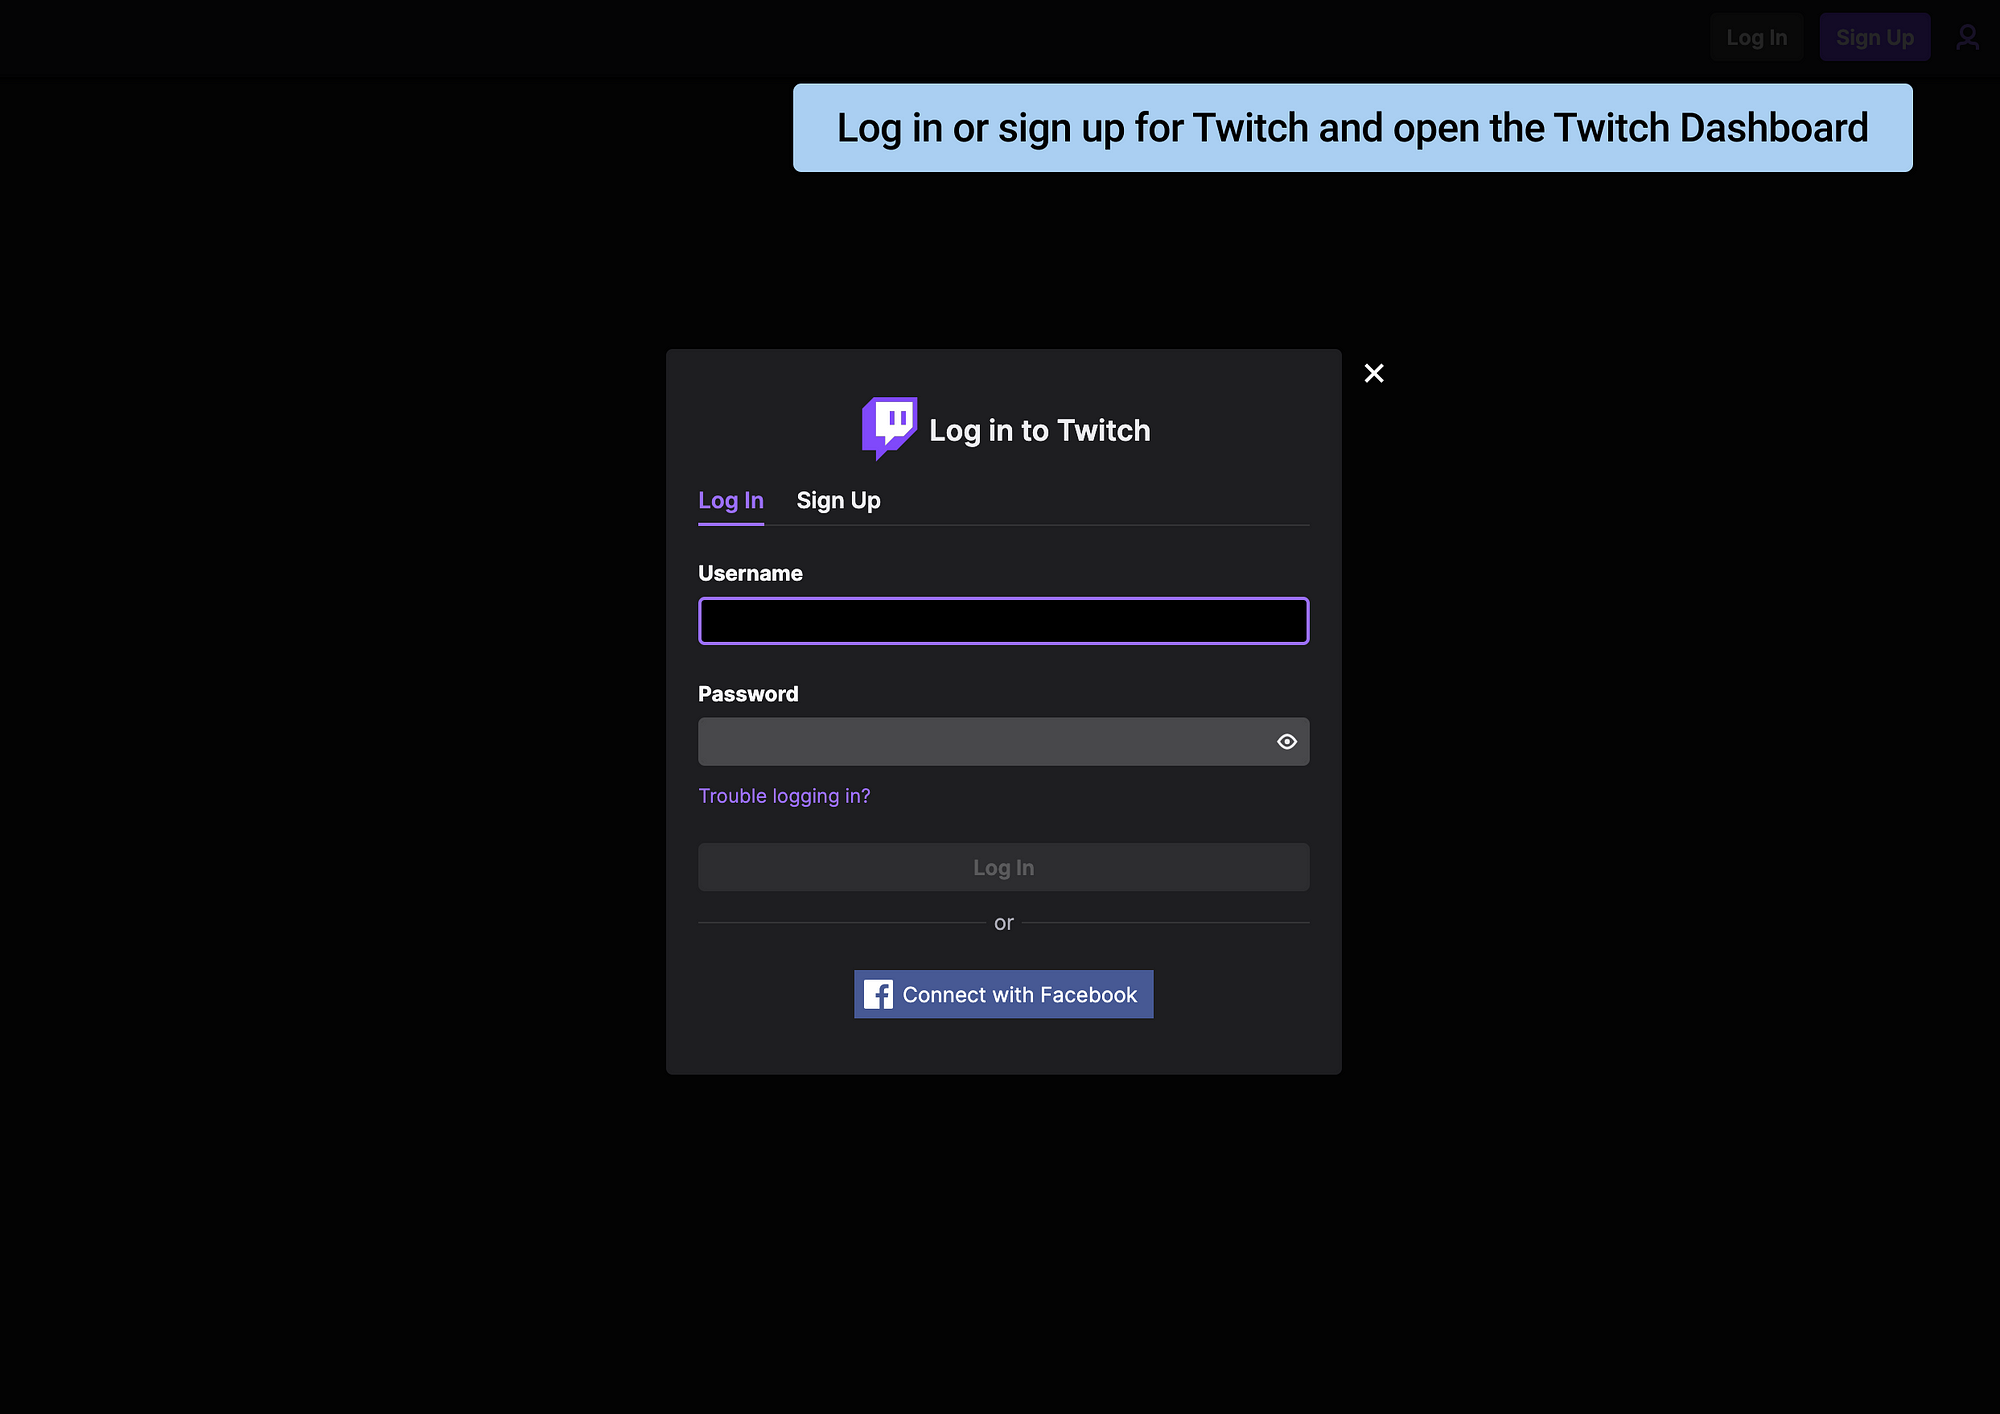
Log in or sign up for Twitch and open the Twitch Dashboard:
https://dashboard.twitch.tv/
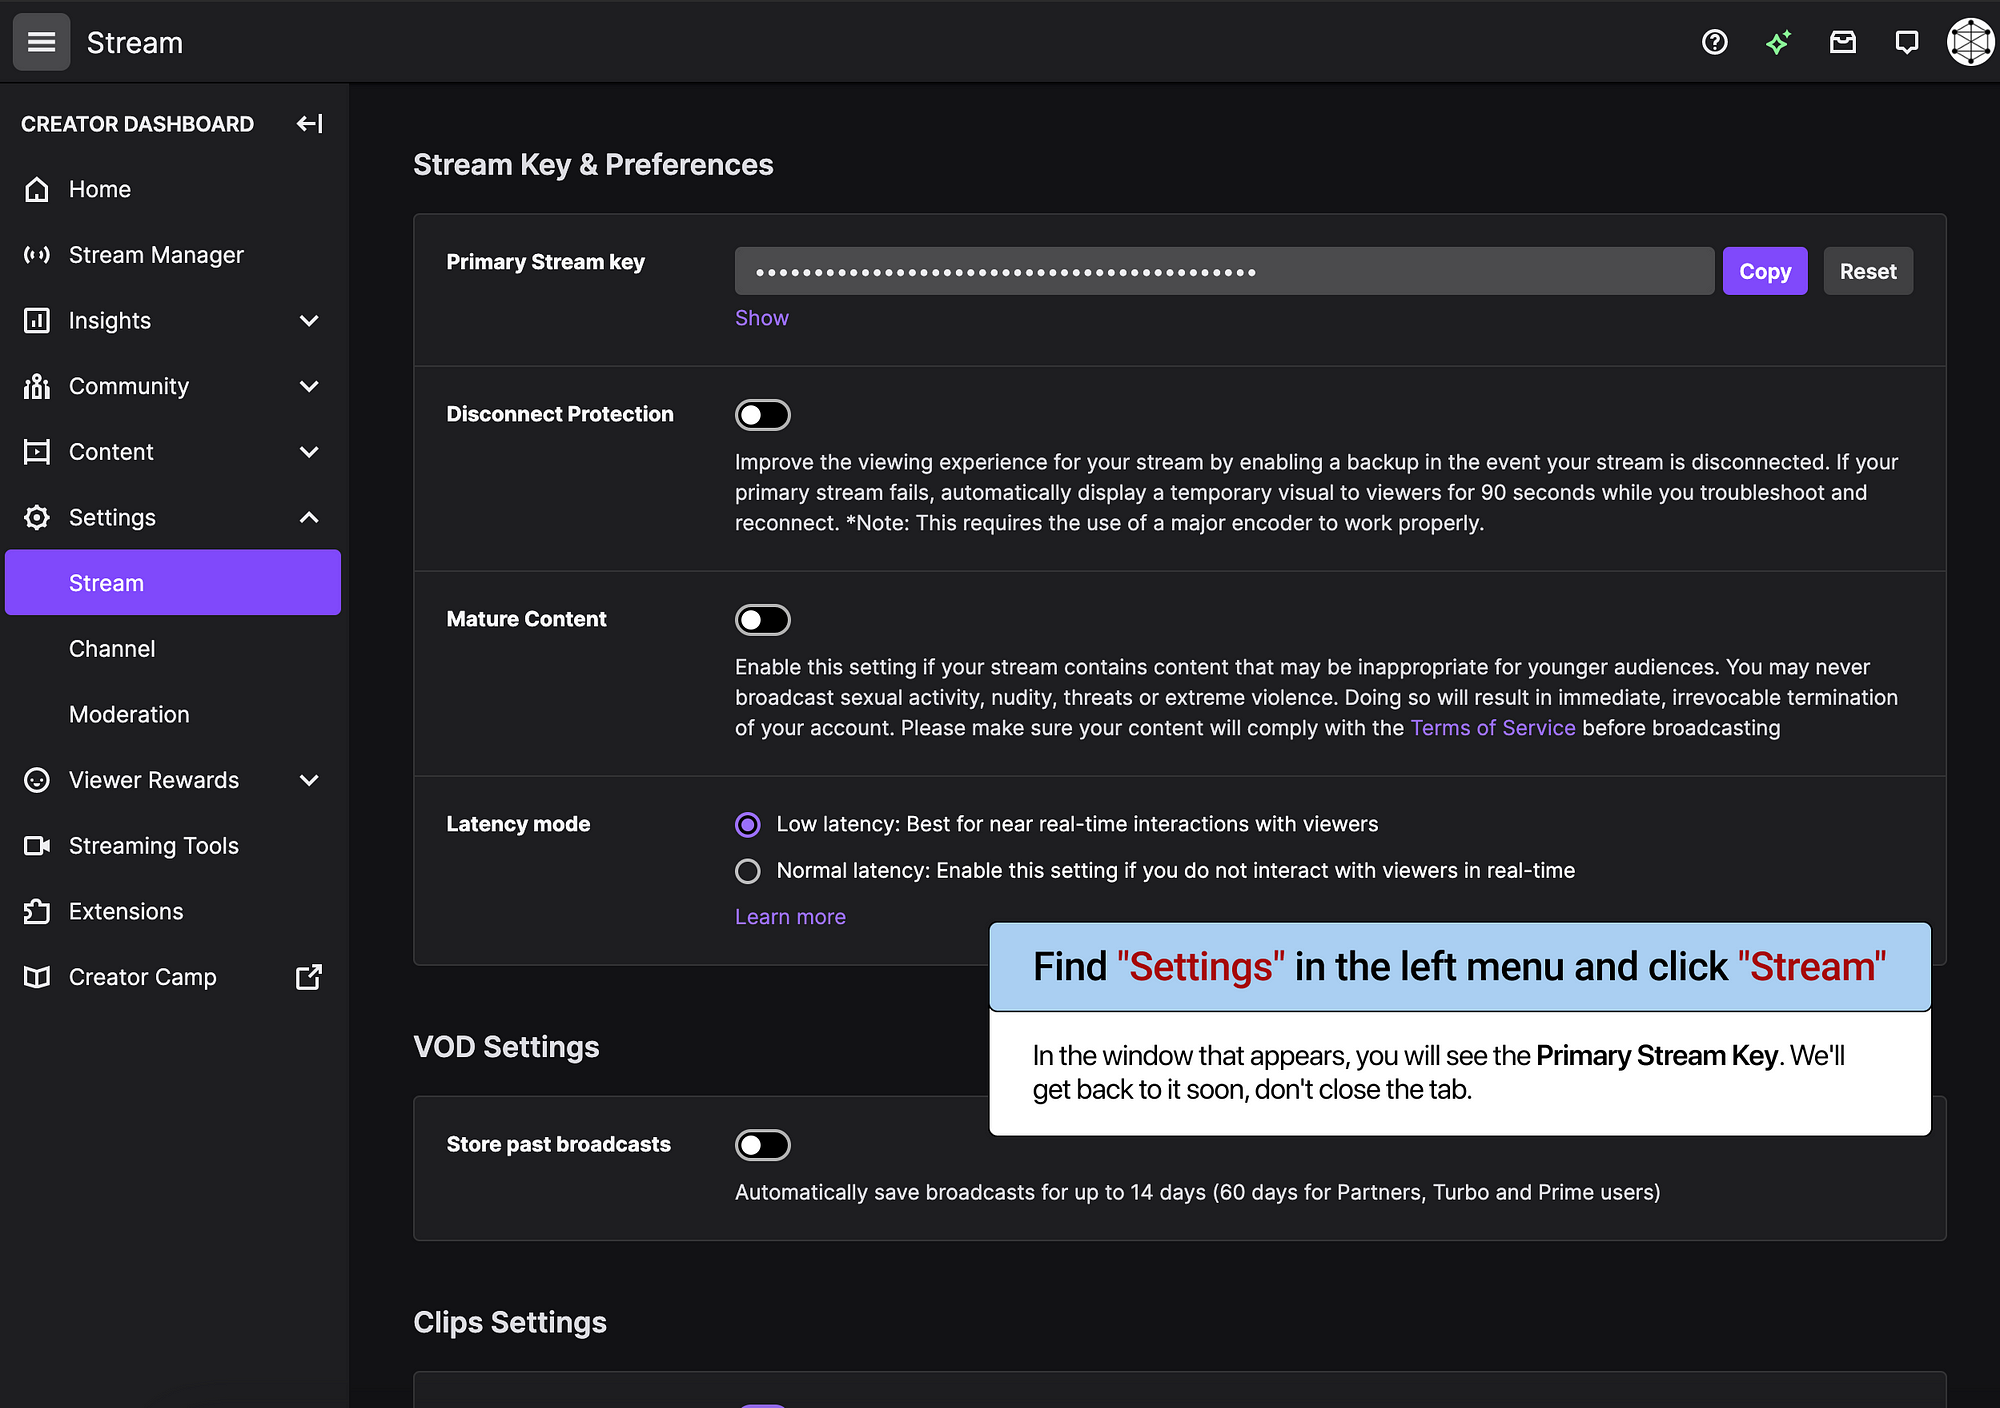
11. Find “Settings” in the left menu and click “Stream”. In the window that appears, you will see the Primary Stream Key. We’ll get back to it soon, don’t close the tab.
Go to Callaba Cloud Live Streaming Dashboard.
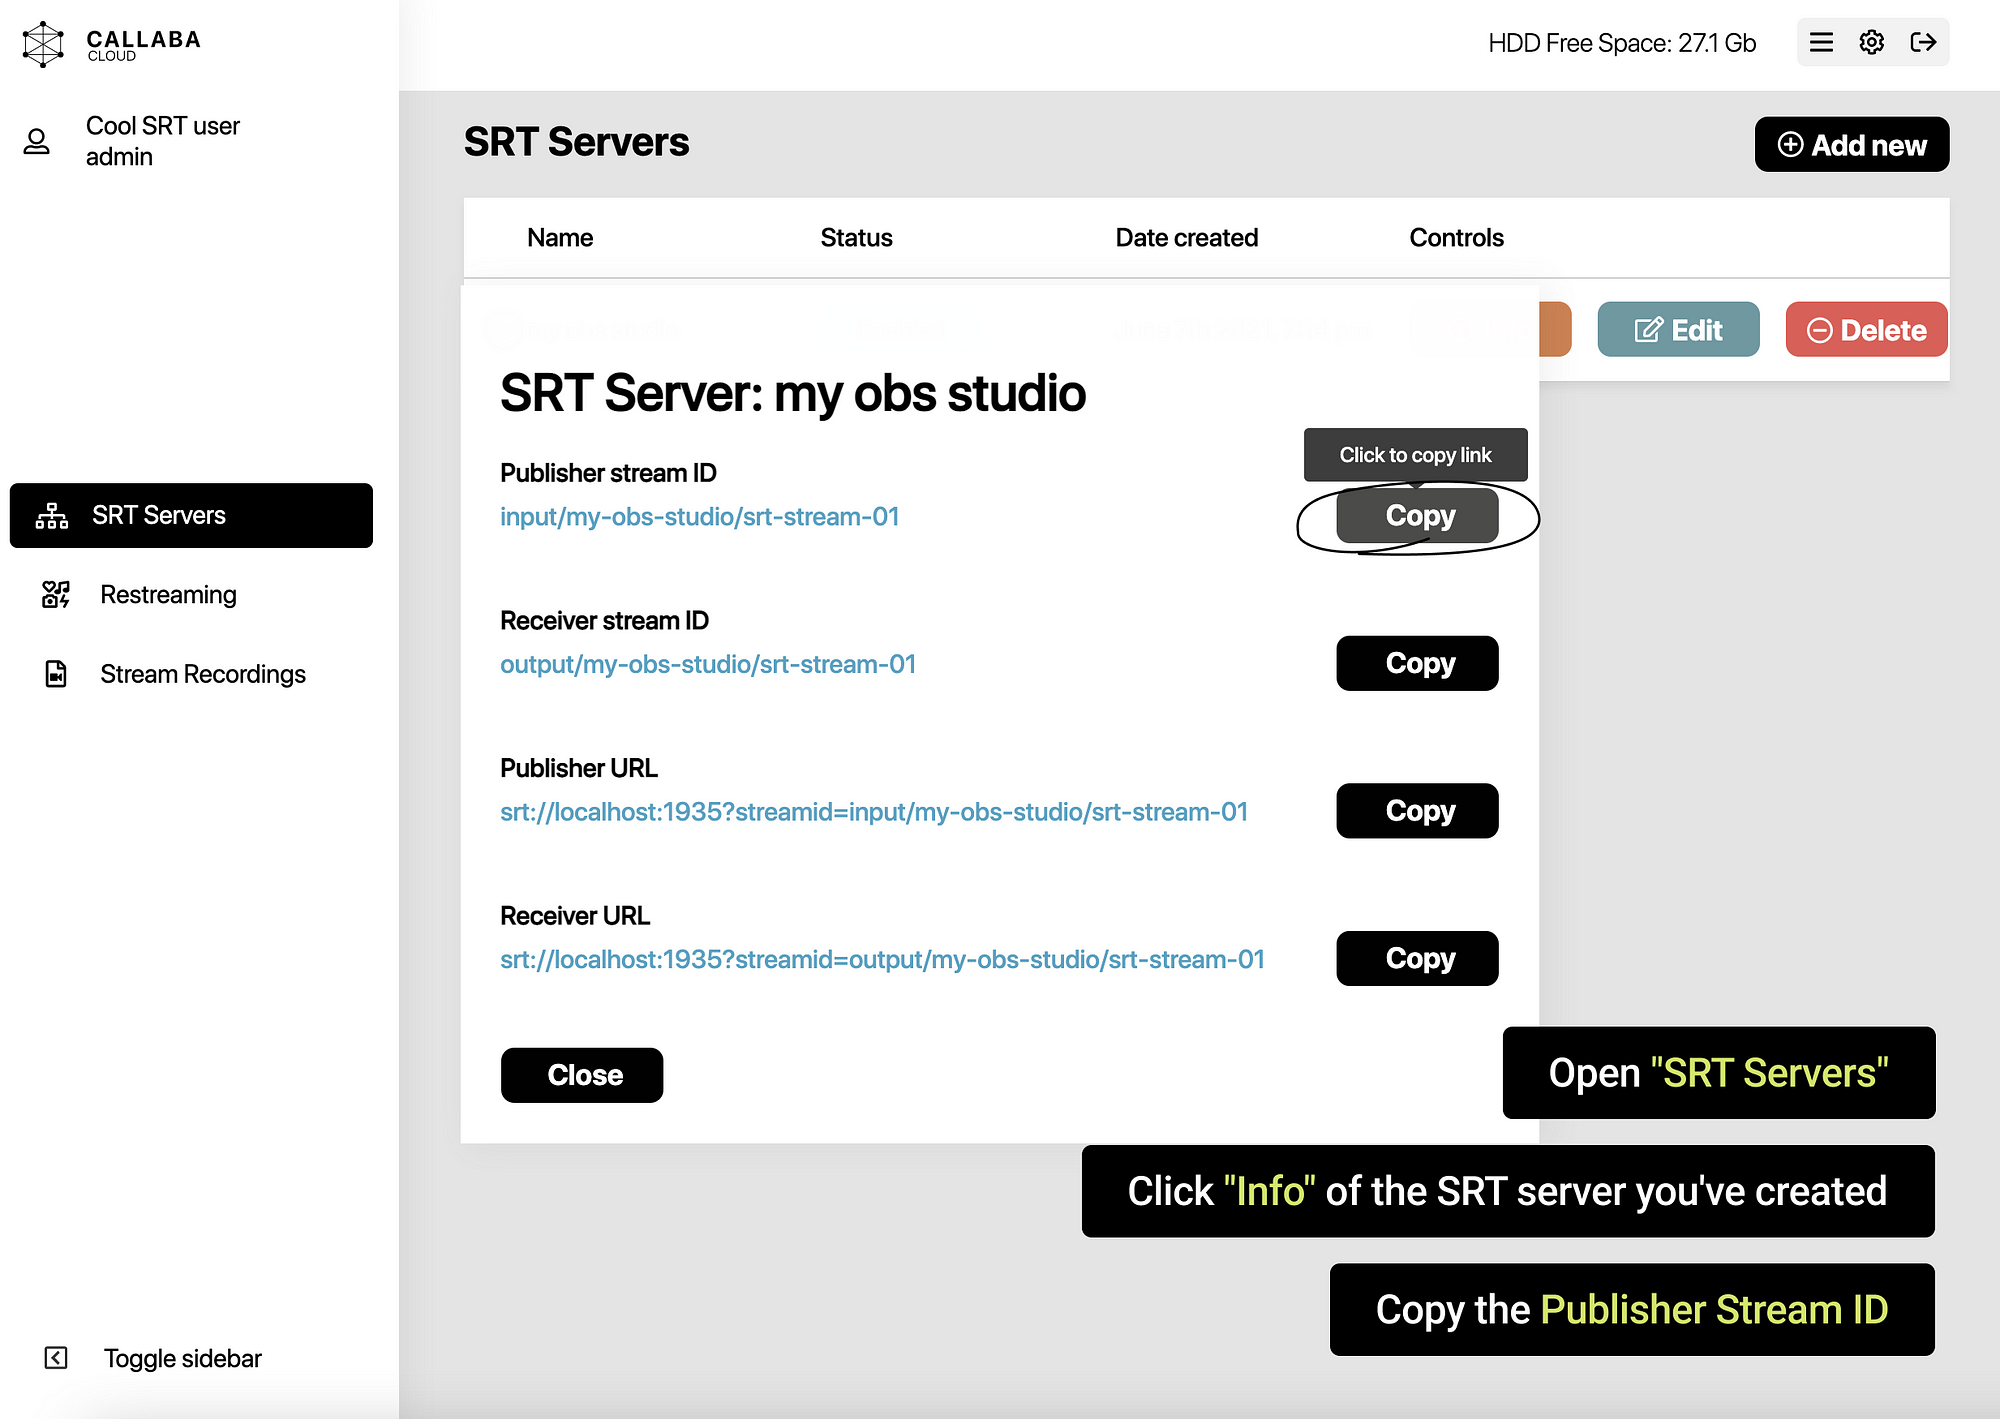
12. Open the SRT Servers section. Click “Info” of the SRT server you’ve created. Copy the Publisher Stream ID.
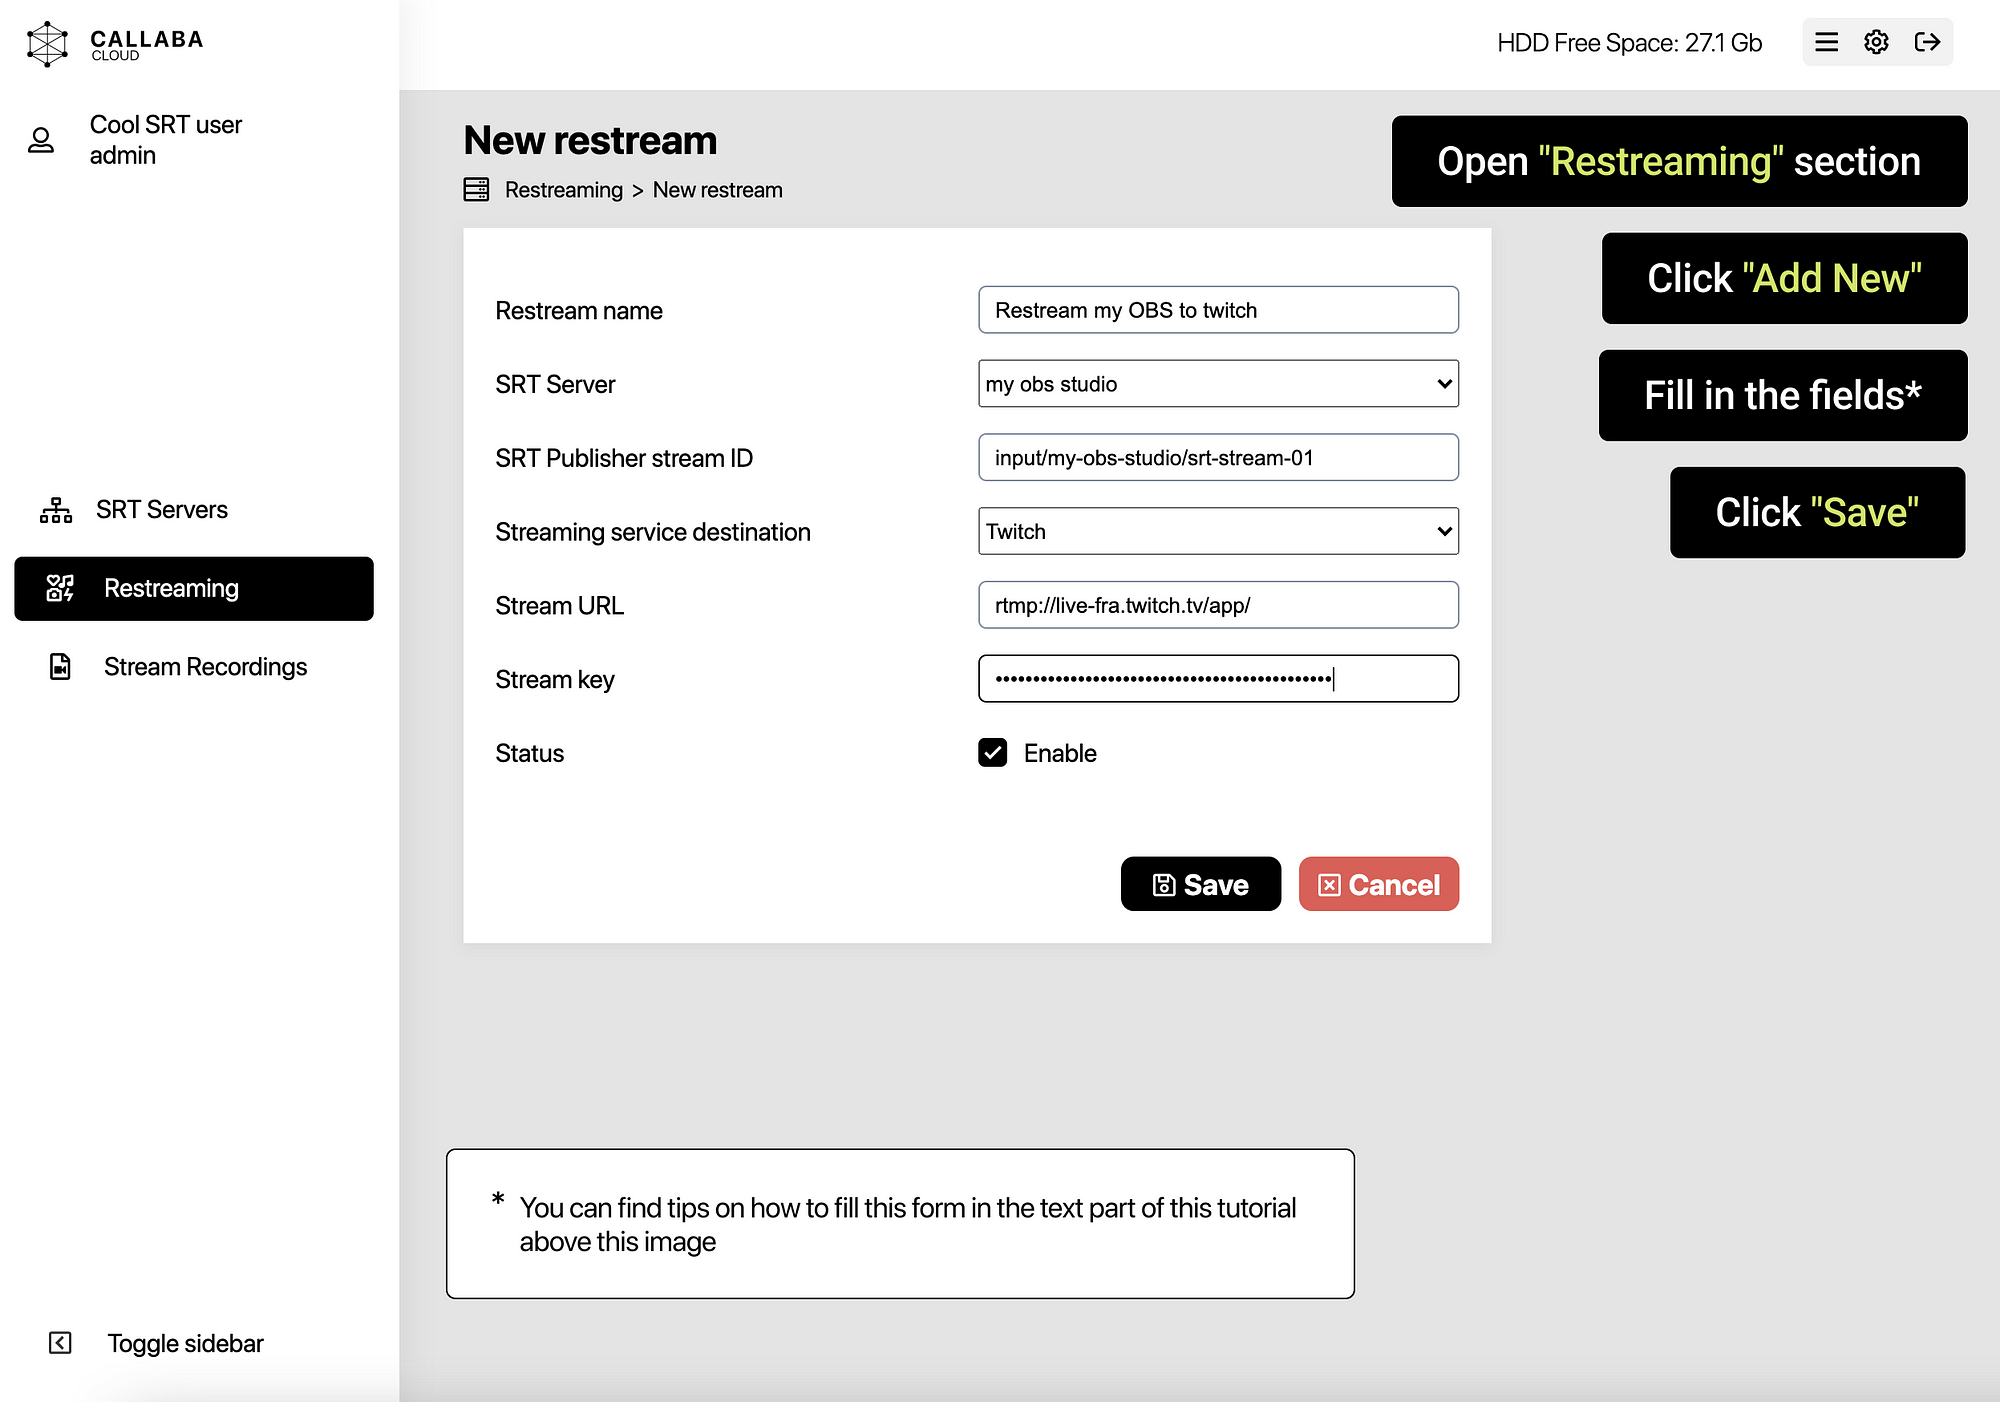
13. Next, open the Restreaming section. Click Add new. In the form that opens, fill in all the fields.
Restream Name:
Create a name for your re-stream, it will help you to not get puzzled, once you have multiple re-steams.
SRT Server:
Select an SRT server from the list. In our example it’s called “my obs studio”.
SRT Publisher Stream ID:
Paste the Publisher Stream ID. In our example it is input/my-obs/srt-stream-01.
Streaming service destination:
Select Twitch from the list of social networks.
Stream URL:
You can find a complete list of servers here : https://stream.twitch.tv/ingests/
Attention! Twitch uses different Stream URLs depending on the geographic region. Please use the appropriate Stream URL for your region. Our tests have shown that not all Twitch servers can work in a particular region, please test before live streaming.
Stream Key:
Paste Primary Stream Key from Twitch Dashboard.
Click “Save”.
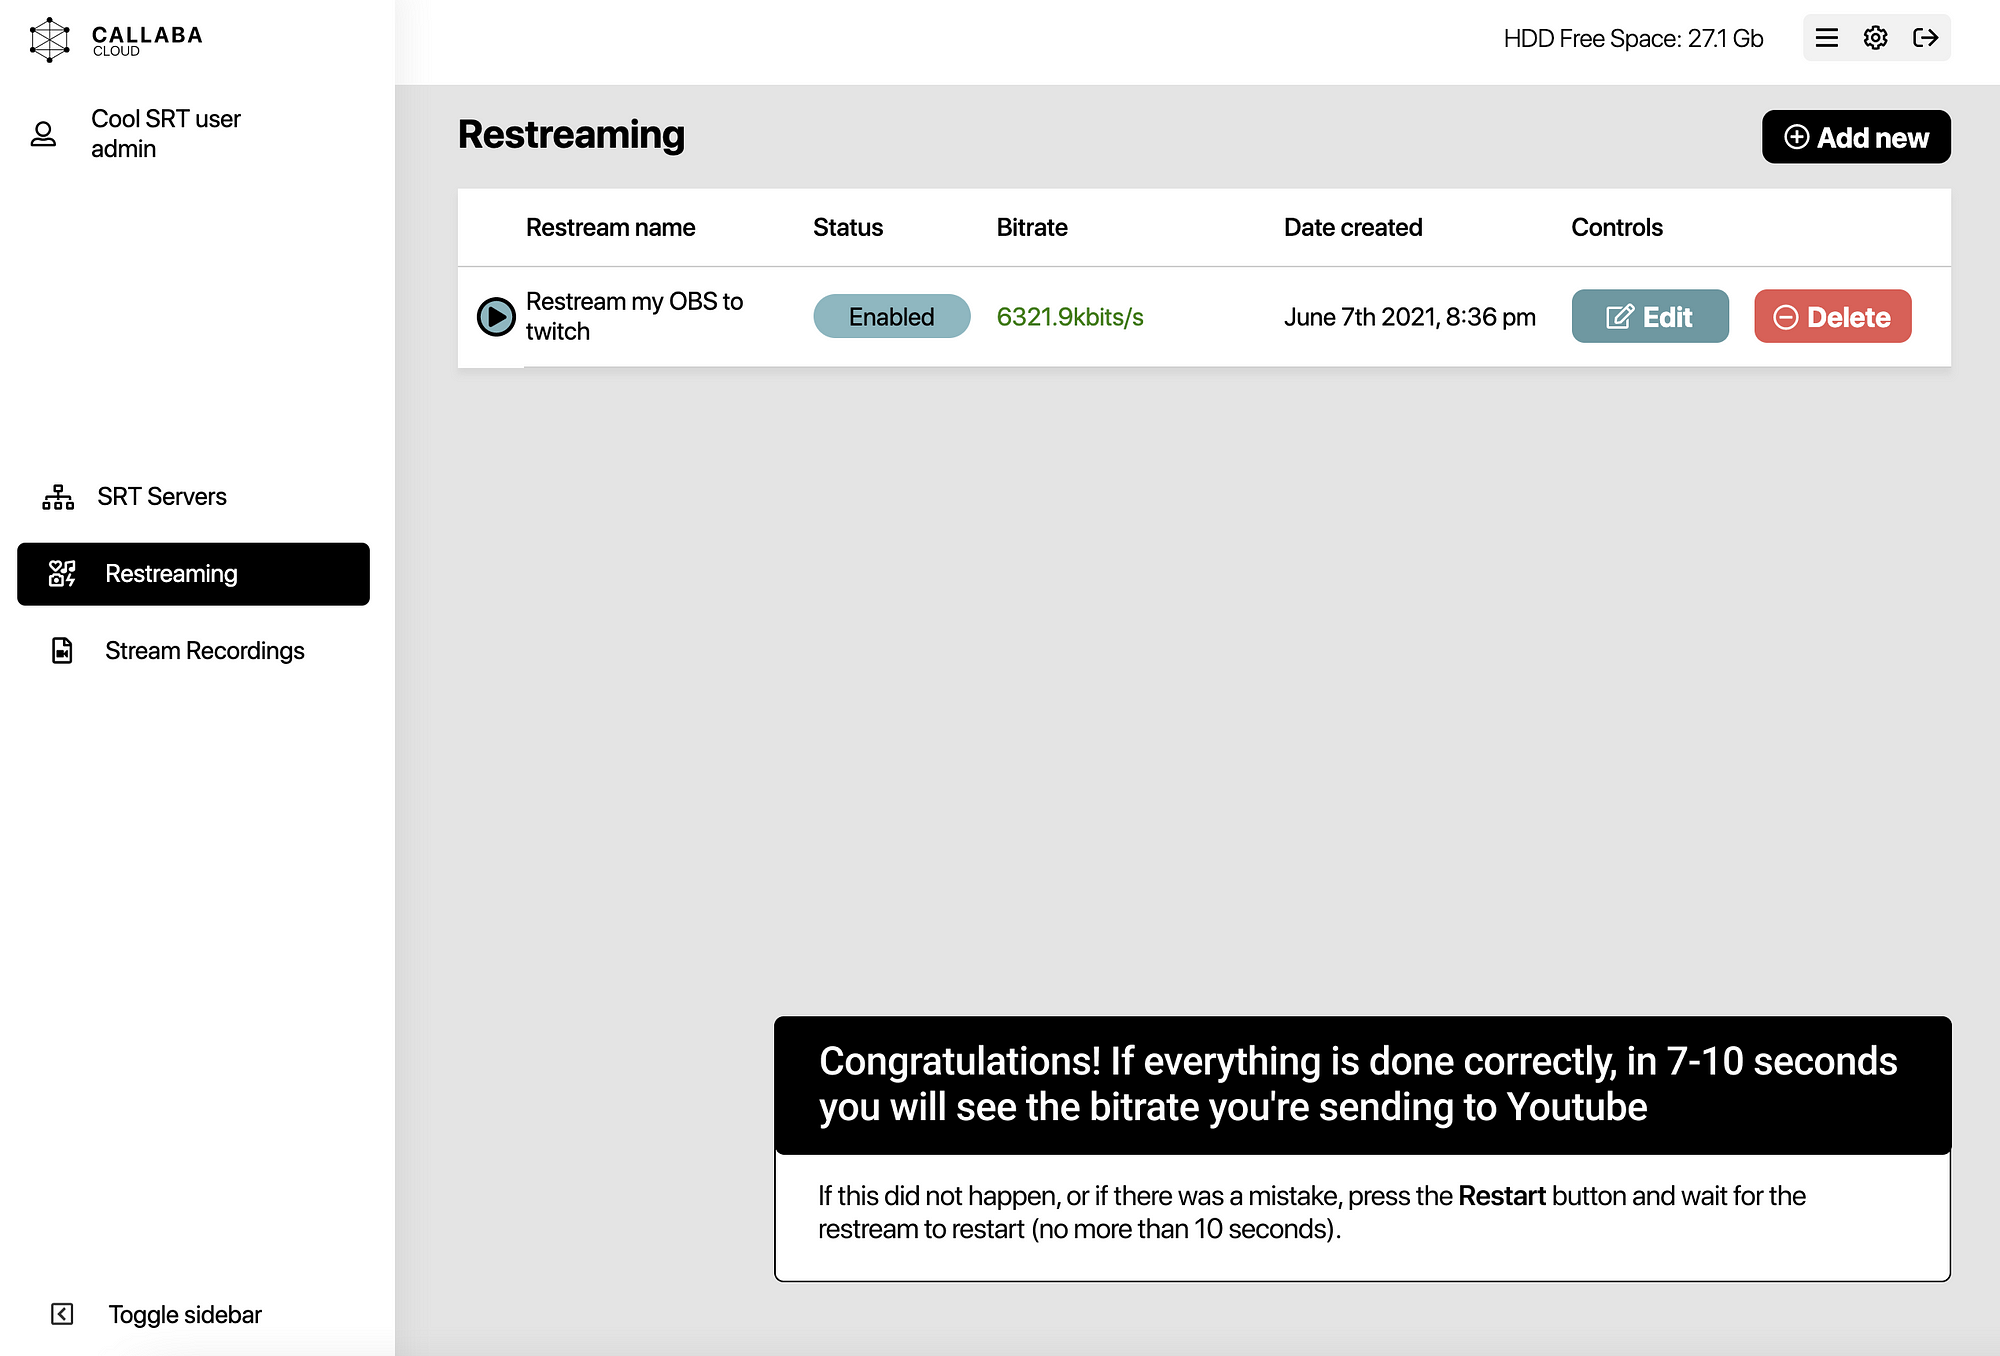
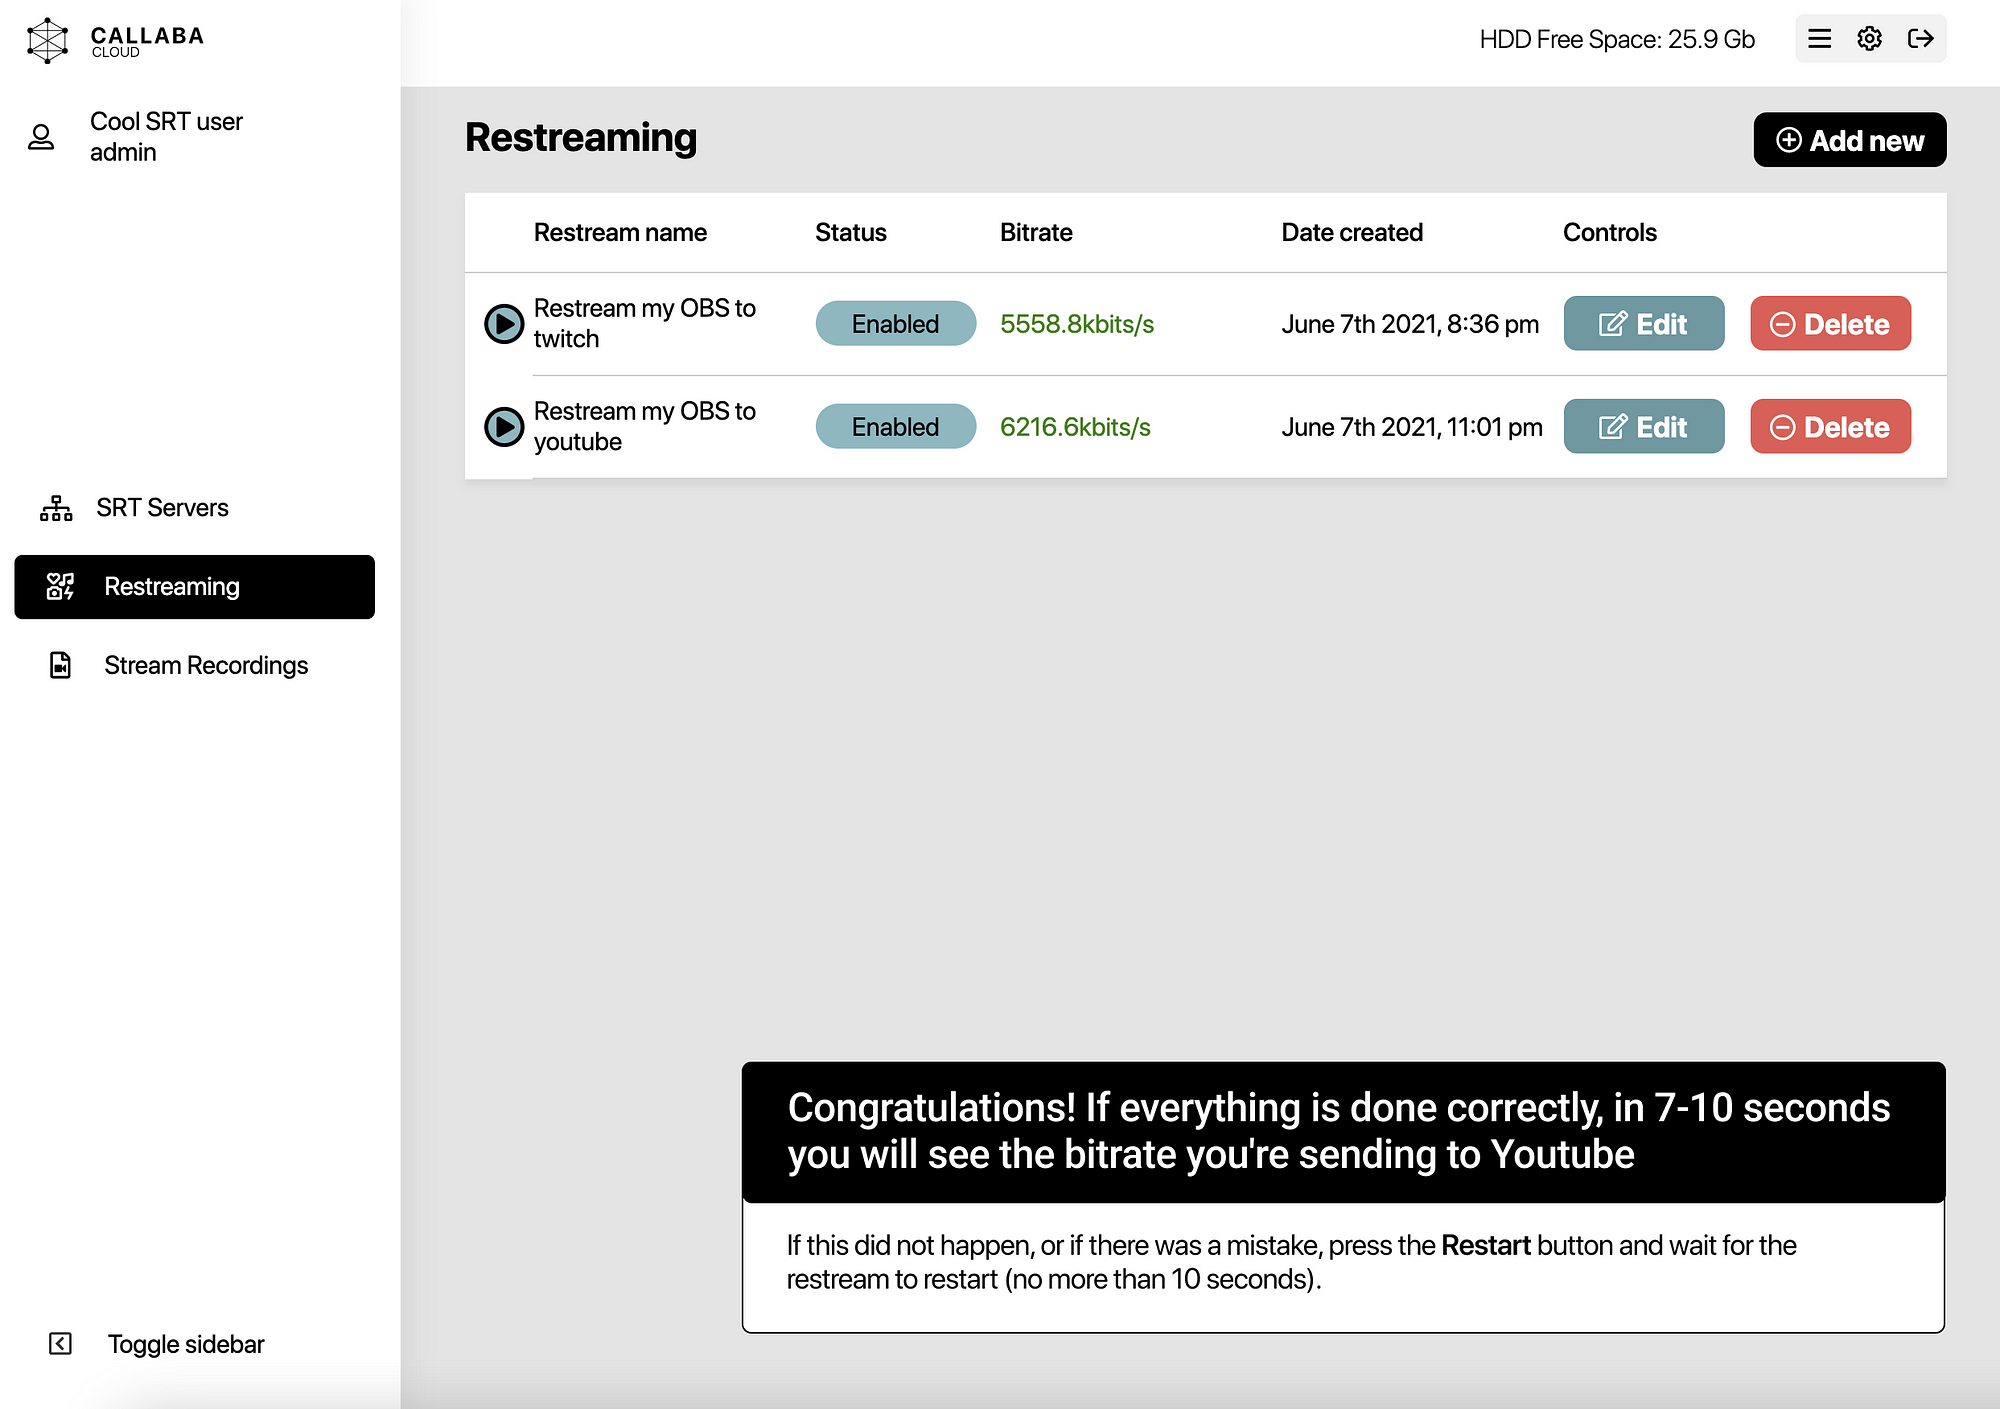
14. Congratulations! If everything is done correctly, in 7–10 seconds you will see the bitrate you’re sending to Twitch.
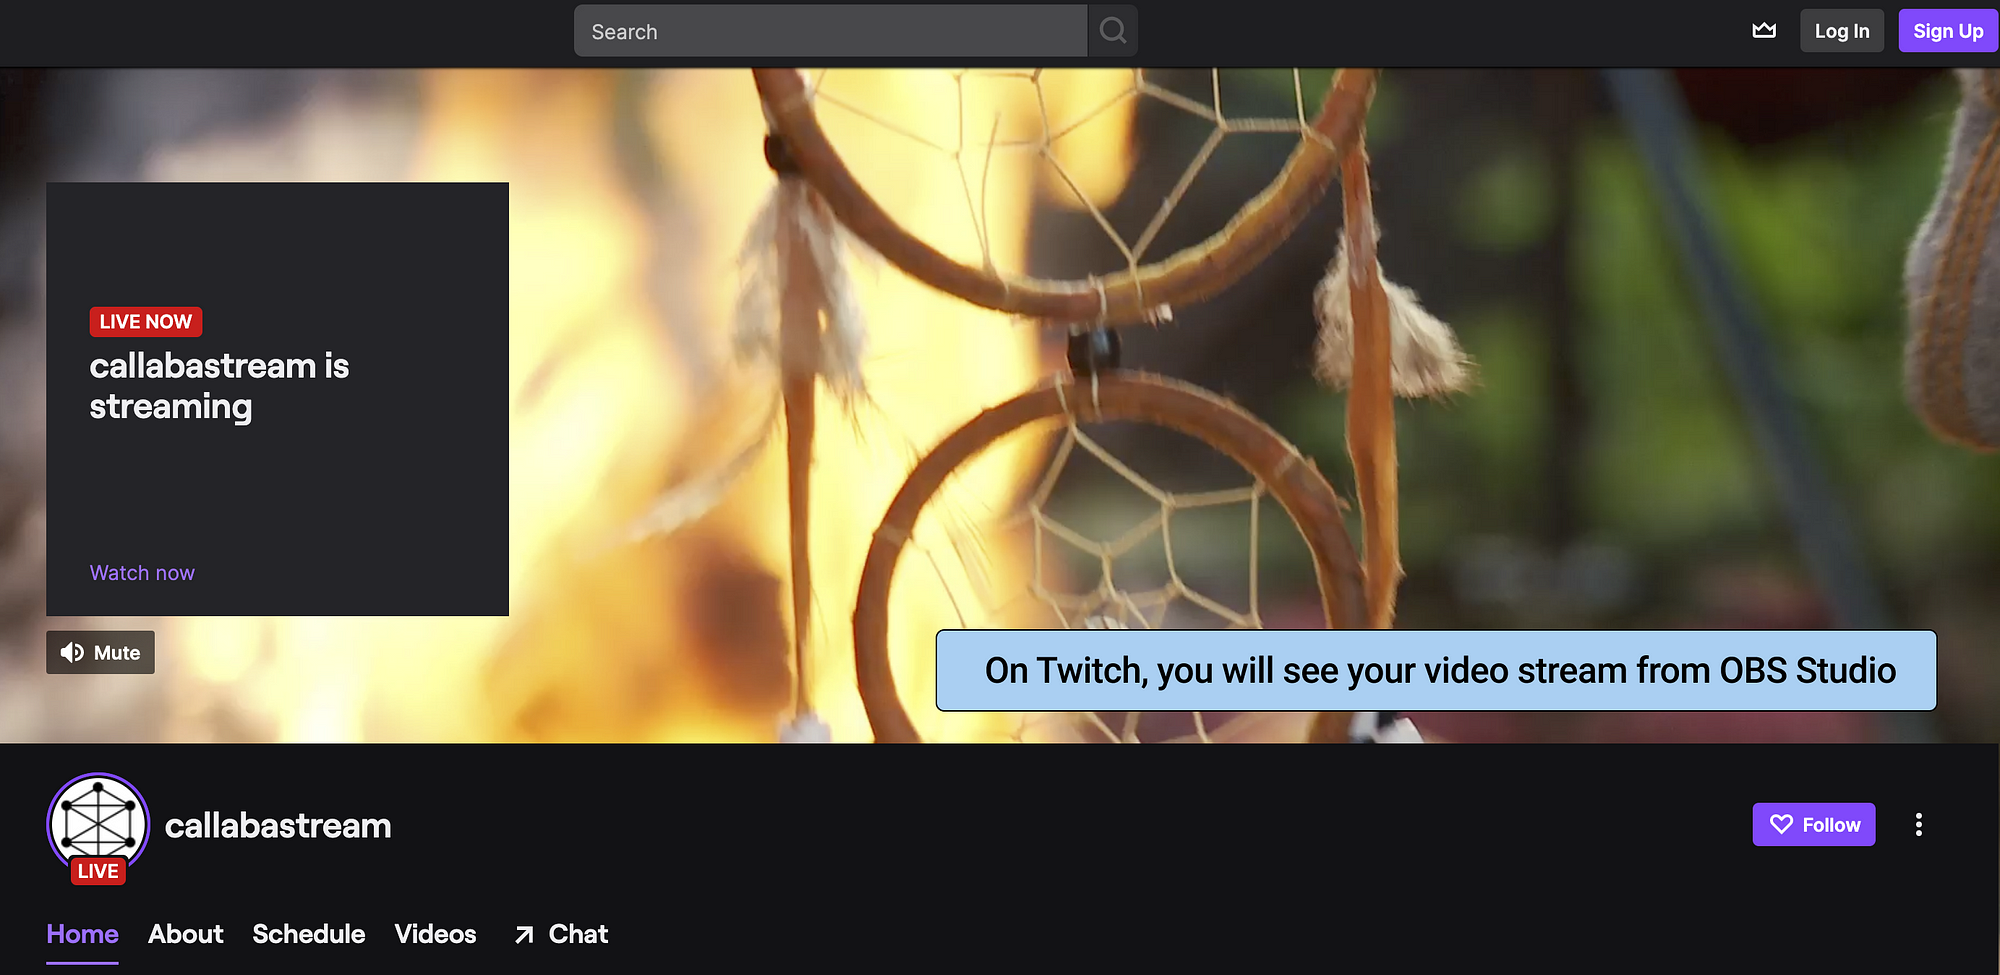
15. On Twitch, you will see your video stream from OBS Studio.
Youtube.
16. Let’s figure out how to stream to Youtube.
Log in or sign up to Youtube, then open: http://studio.youtube.com.
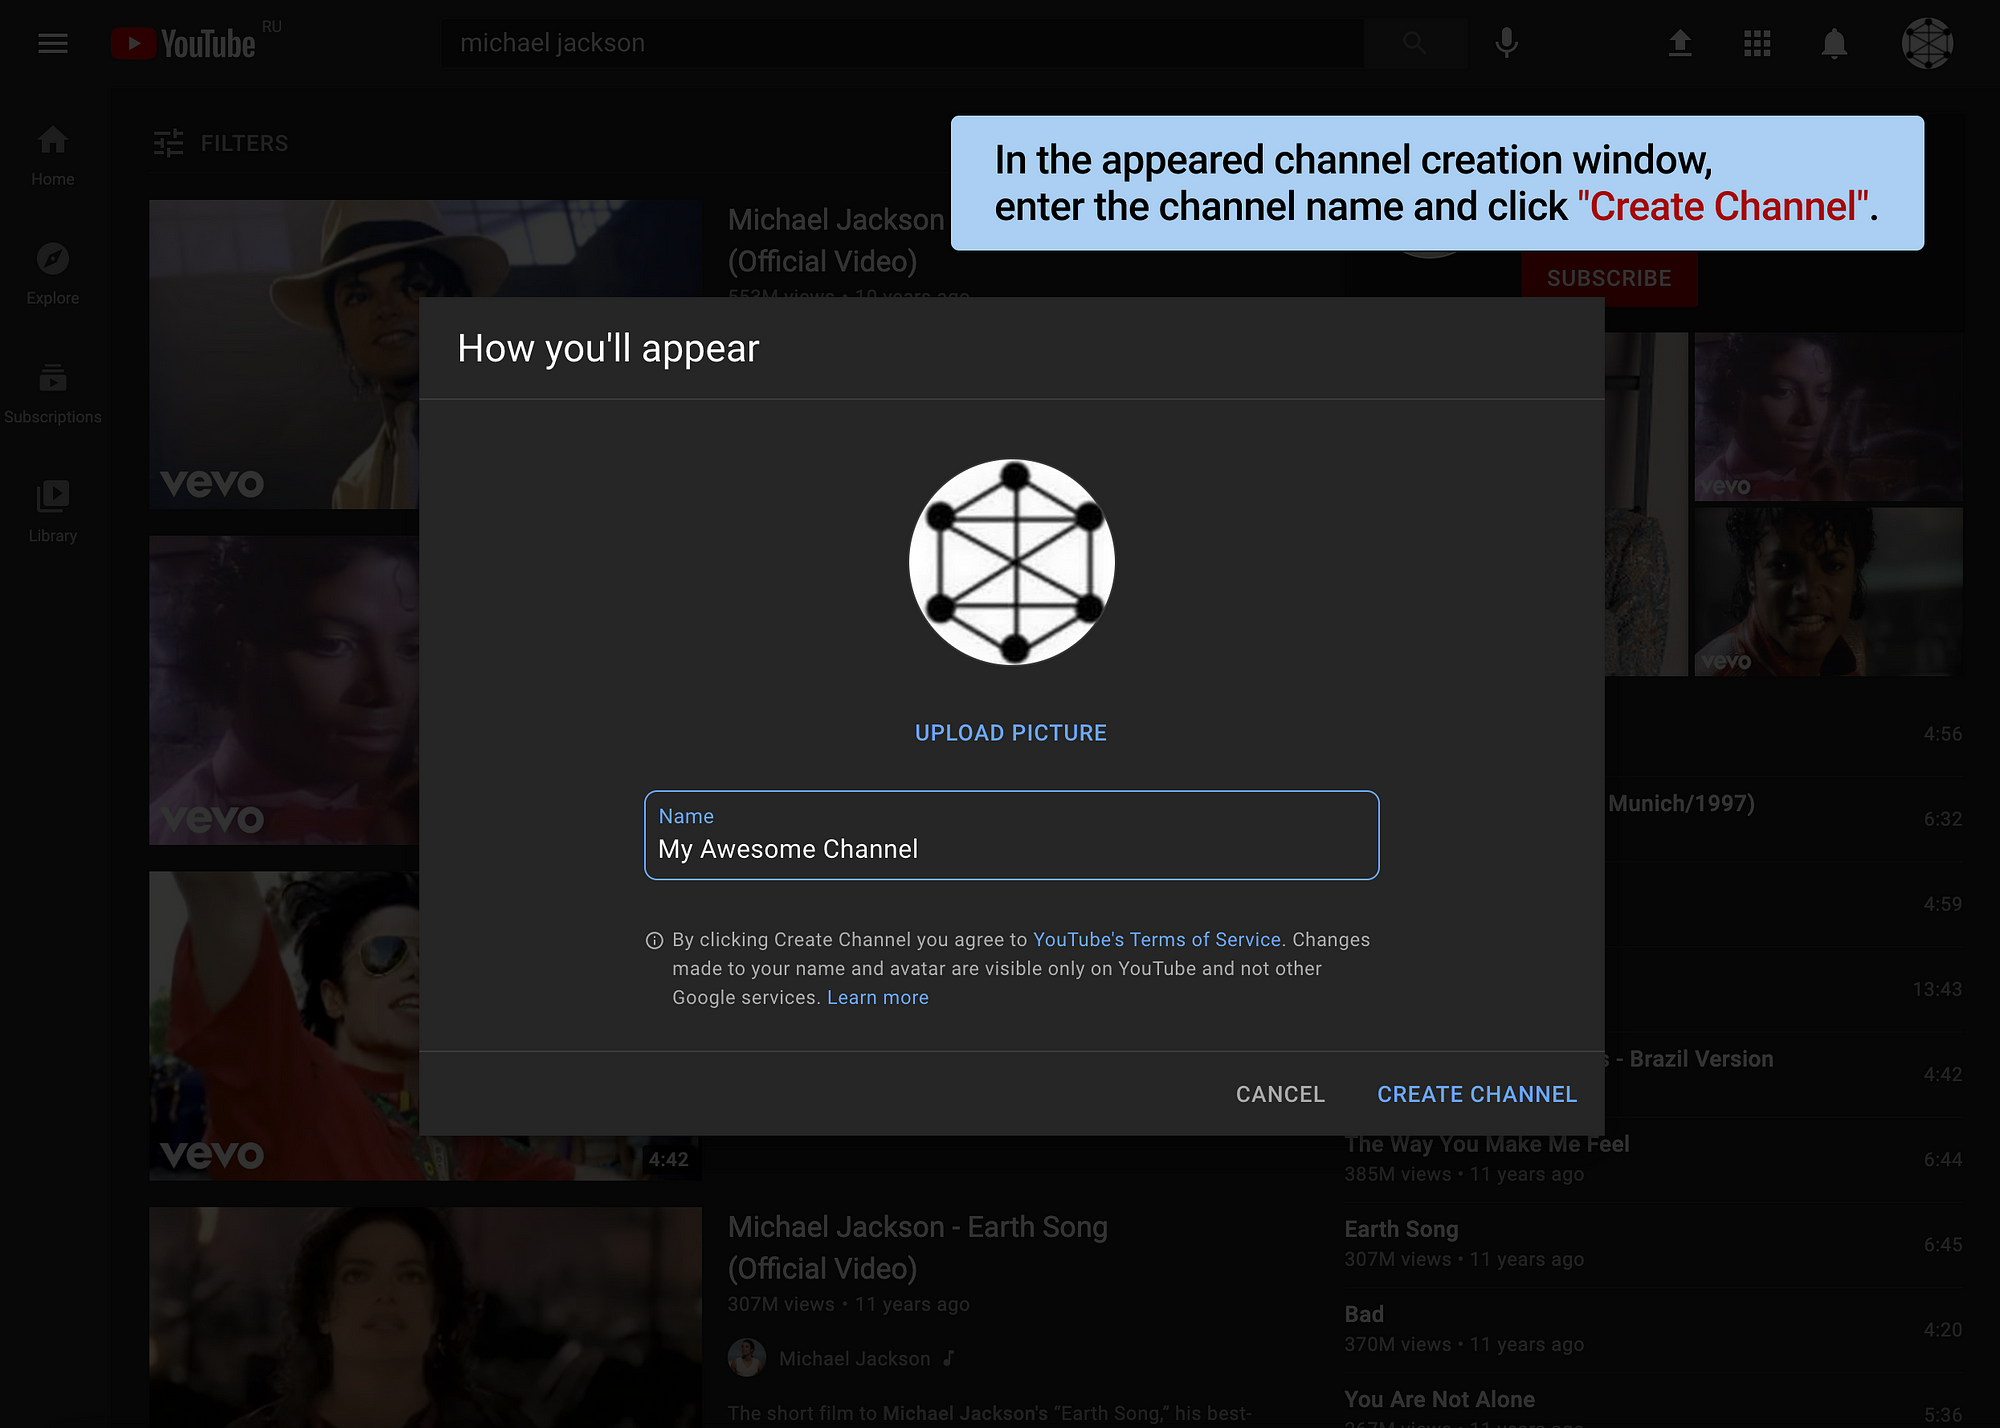
17. In the appeared channel creation window, enter the channel name and click “Create Channel”.
18. Next, go to the Youtube Studio

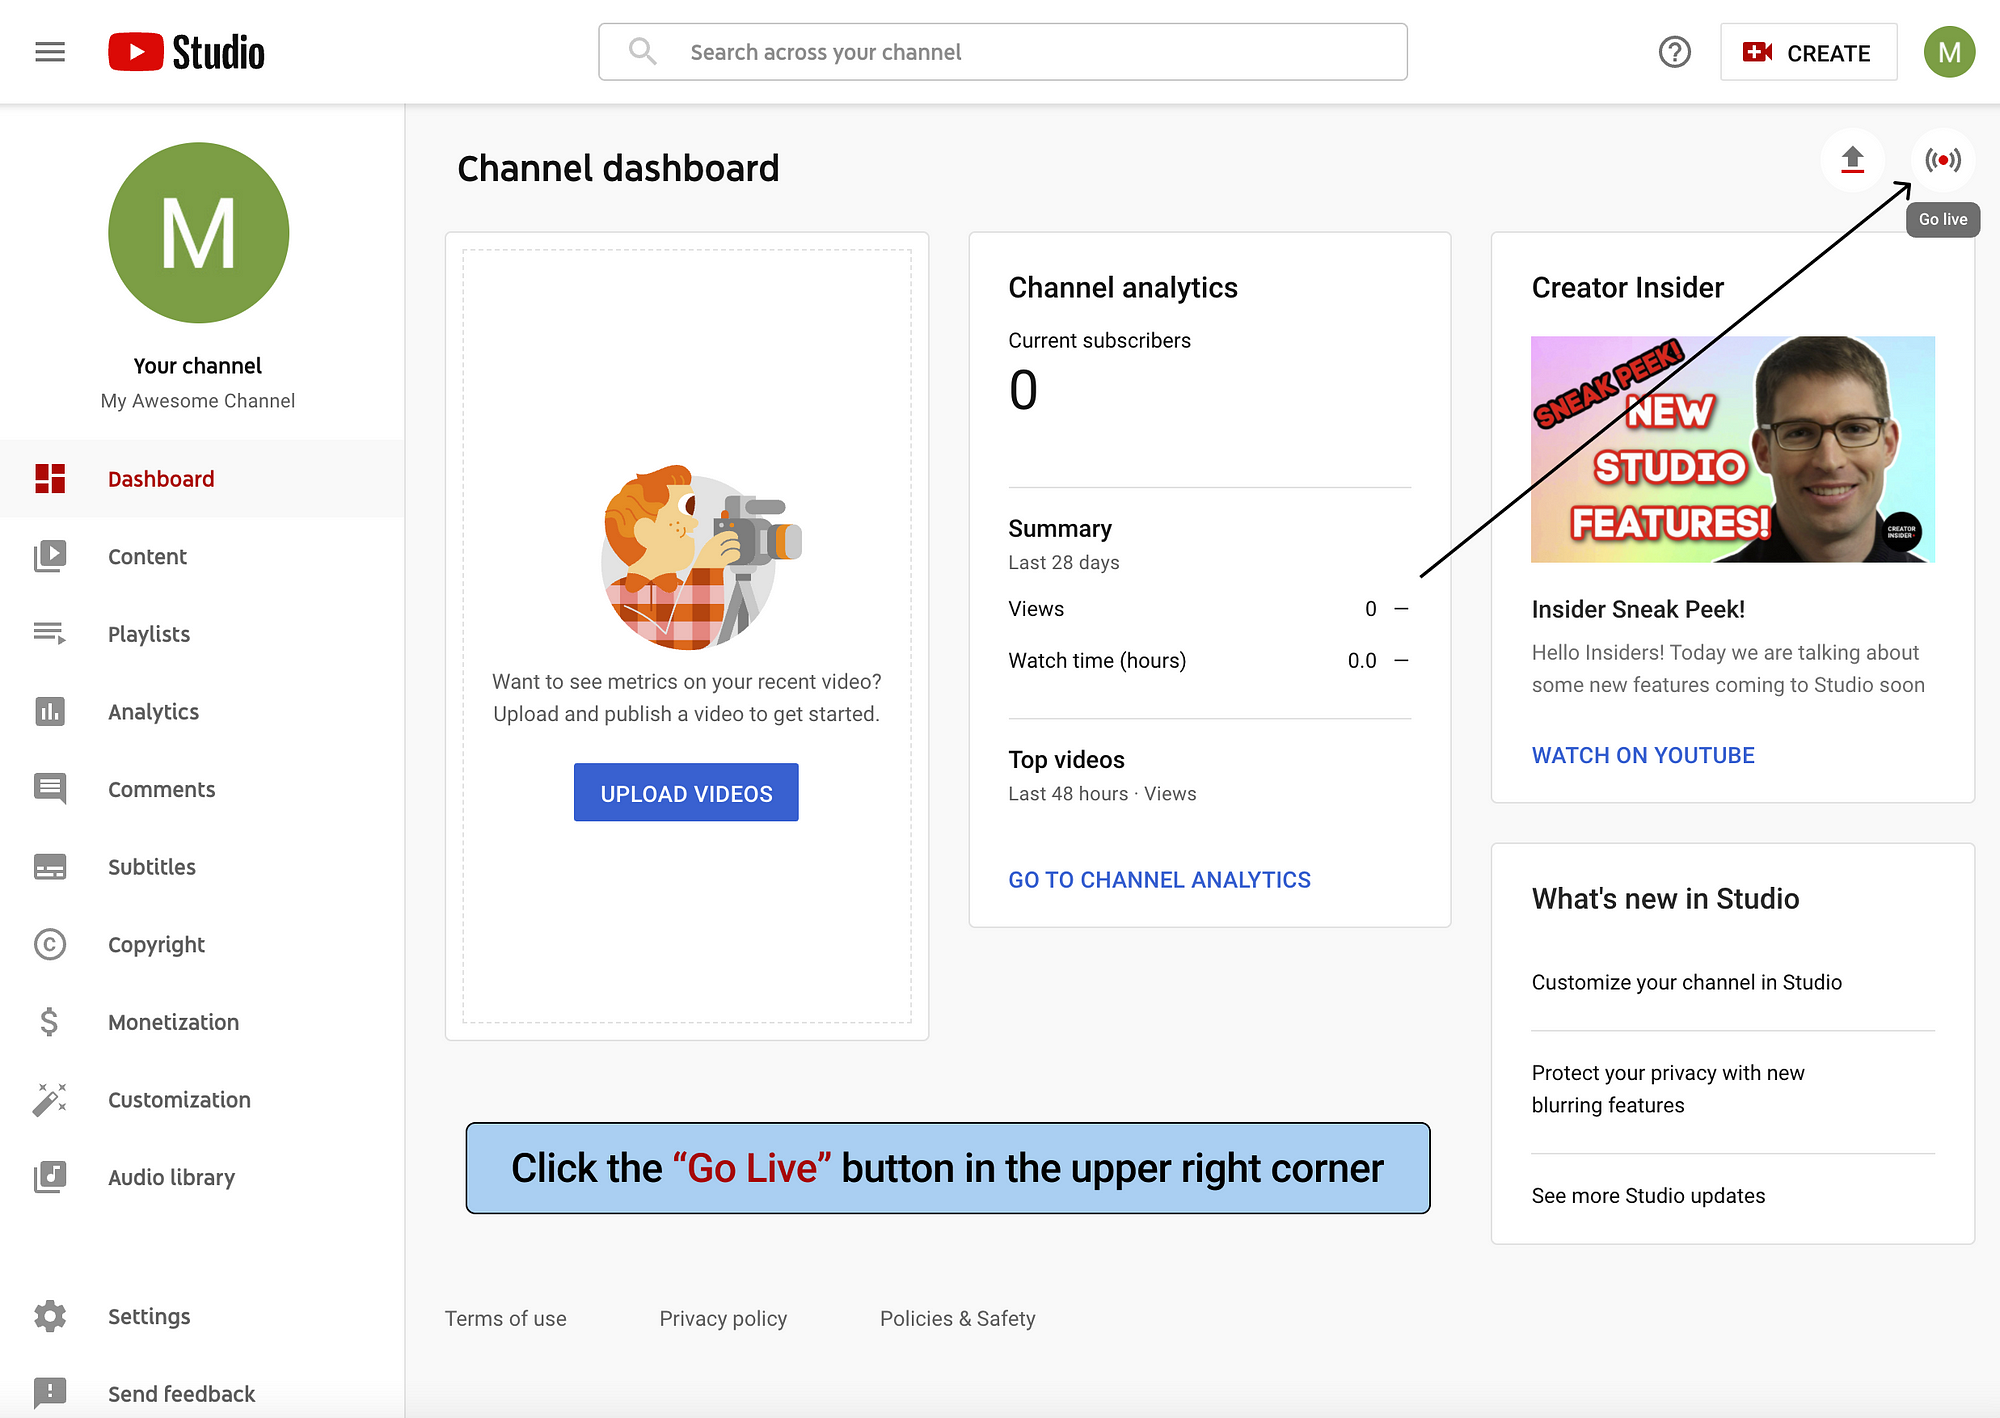
19. Click the Go Live button in the upper right corner
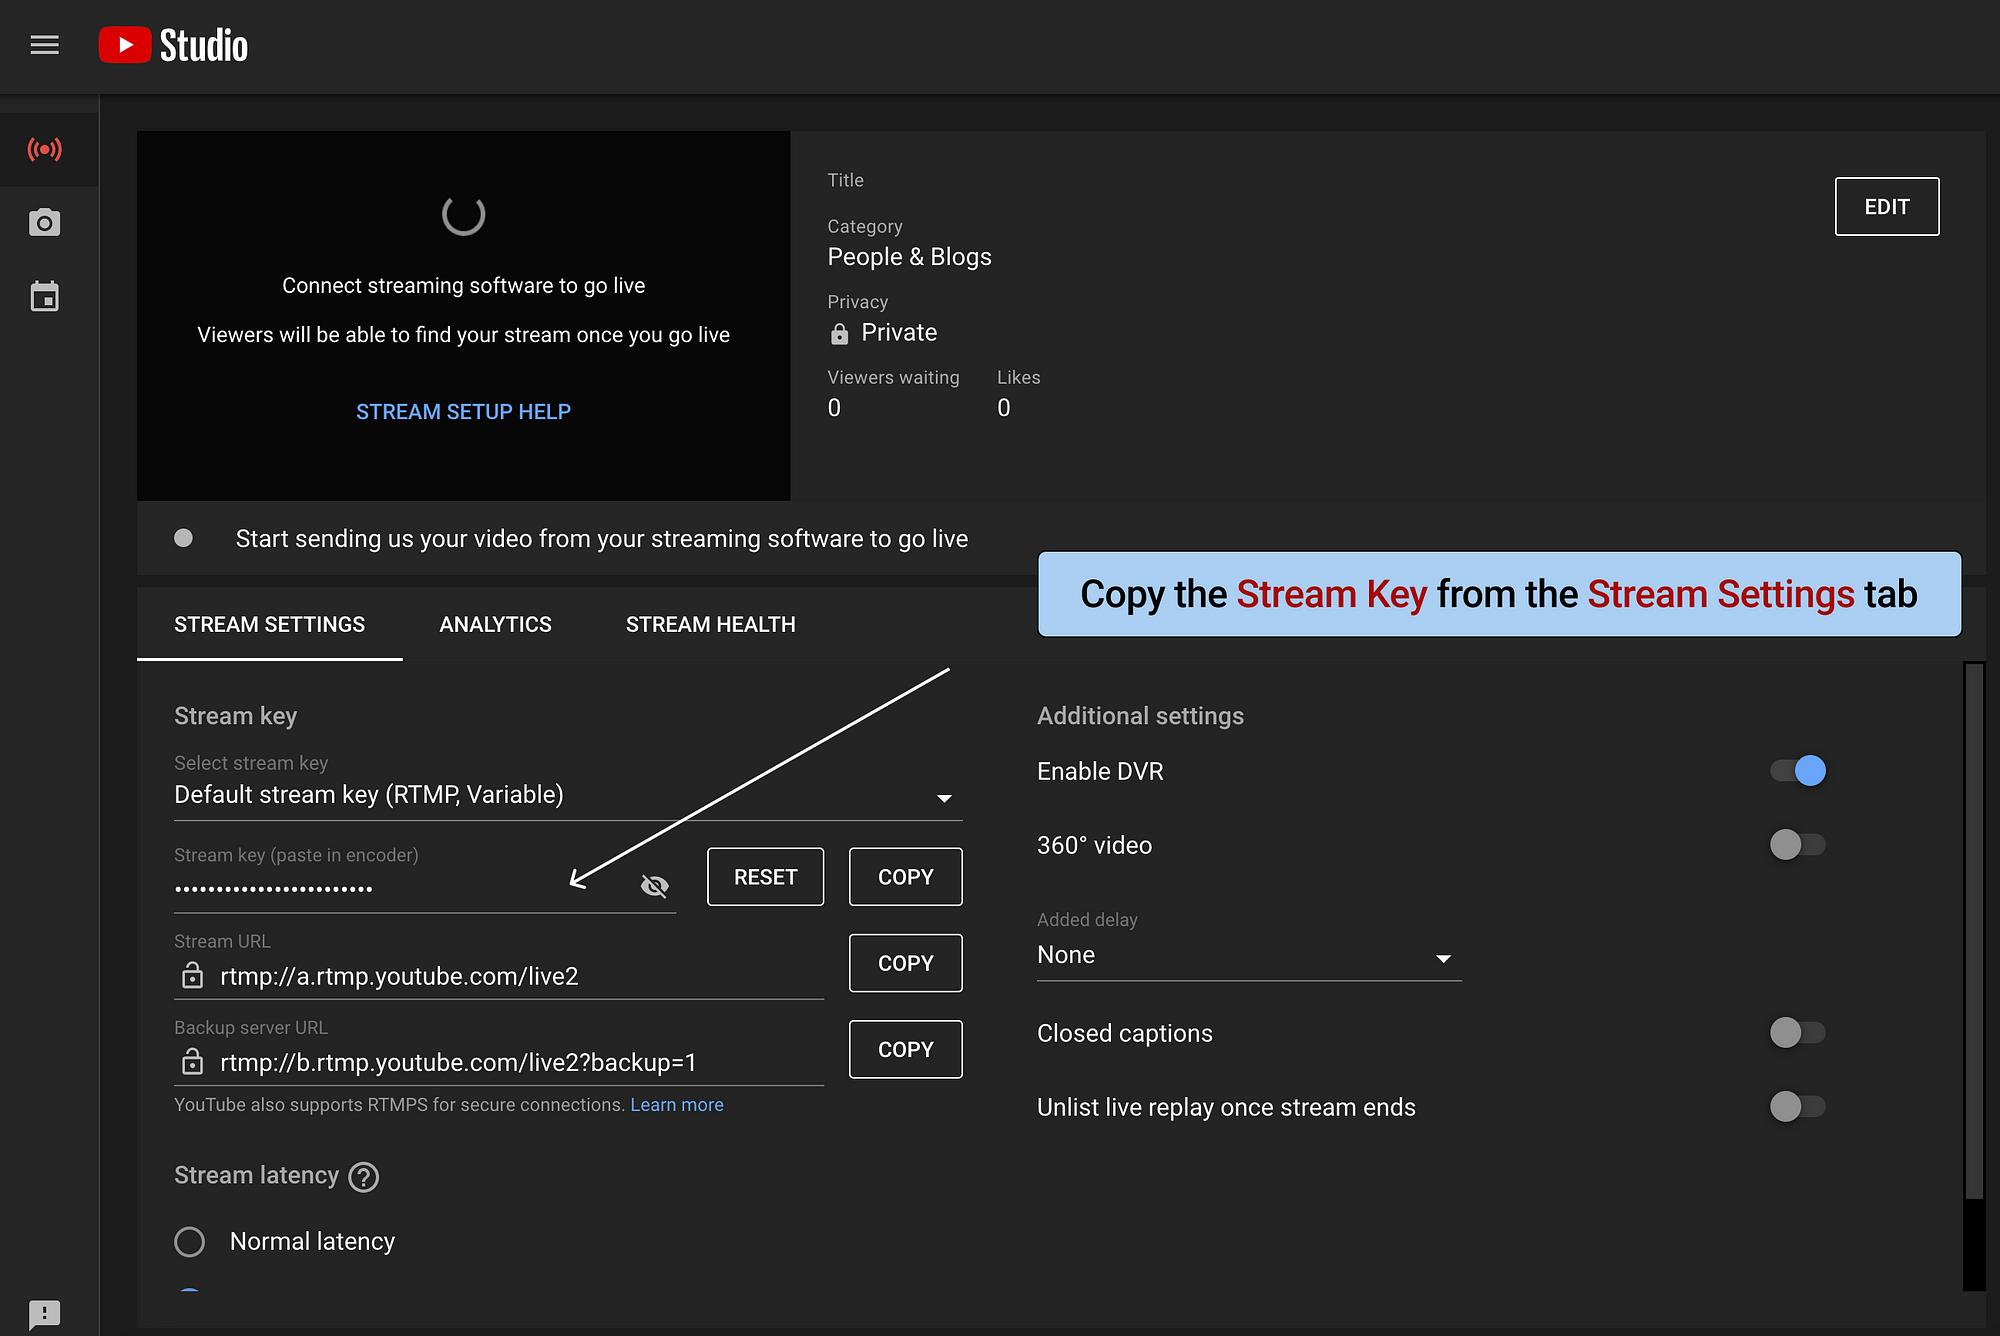
20. Copy the Stream Key from the Stream Settings tab
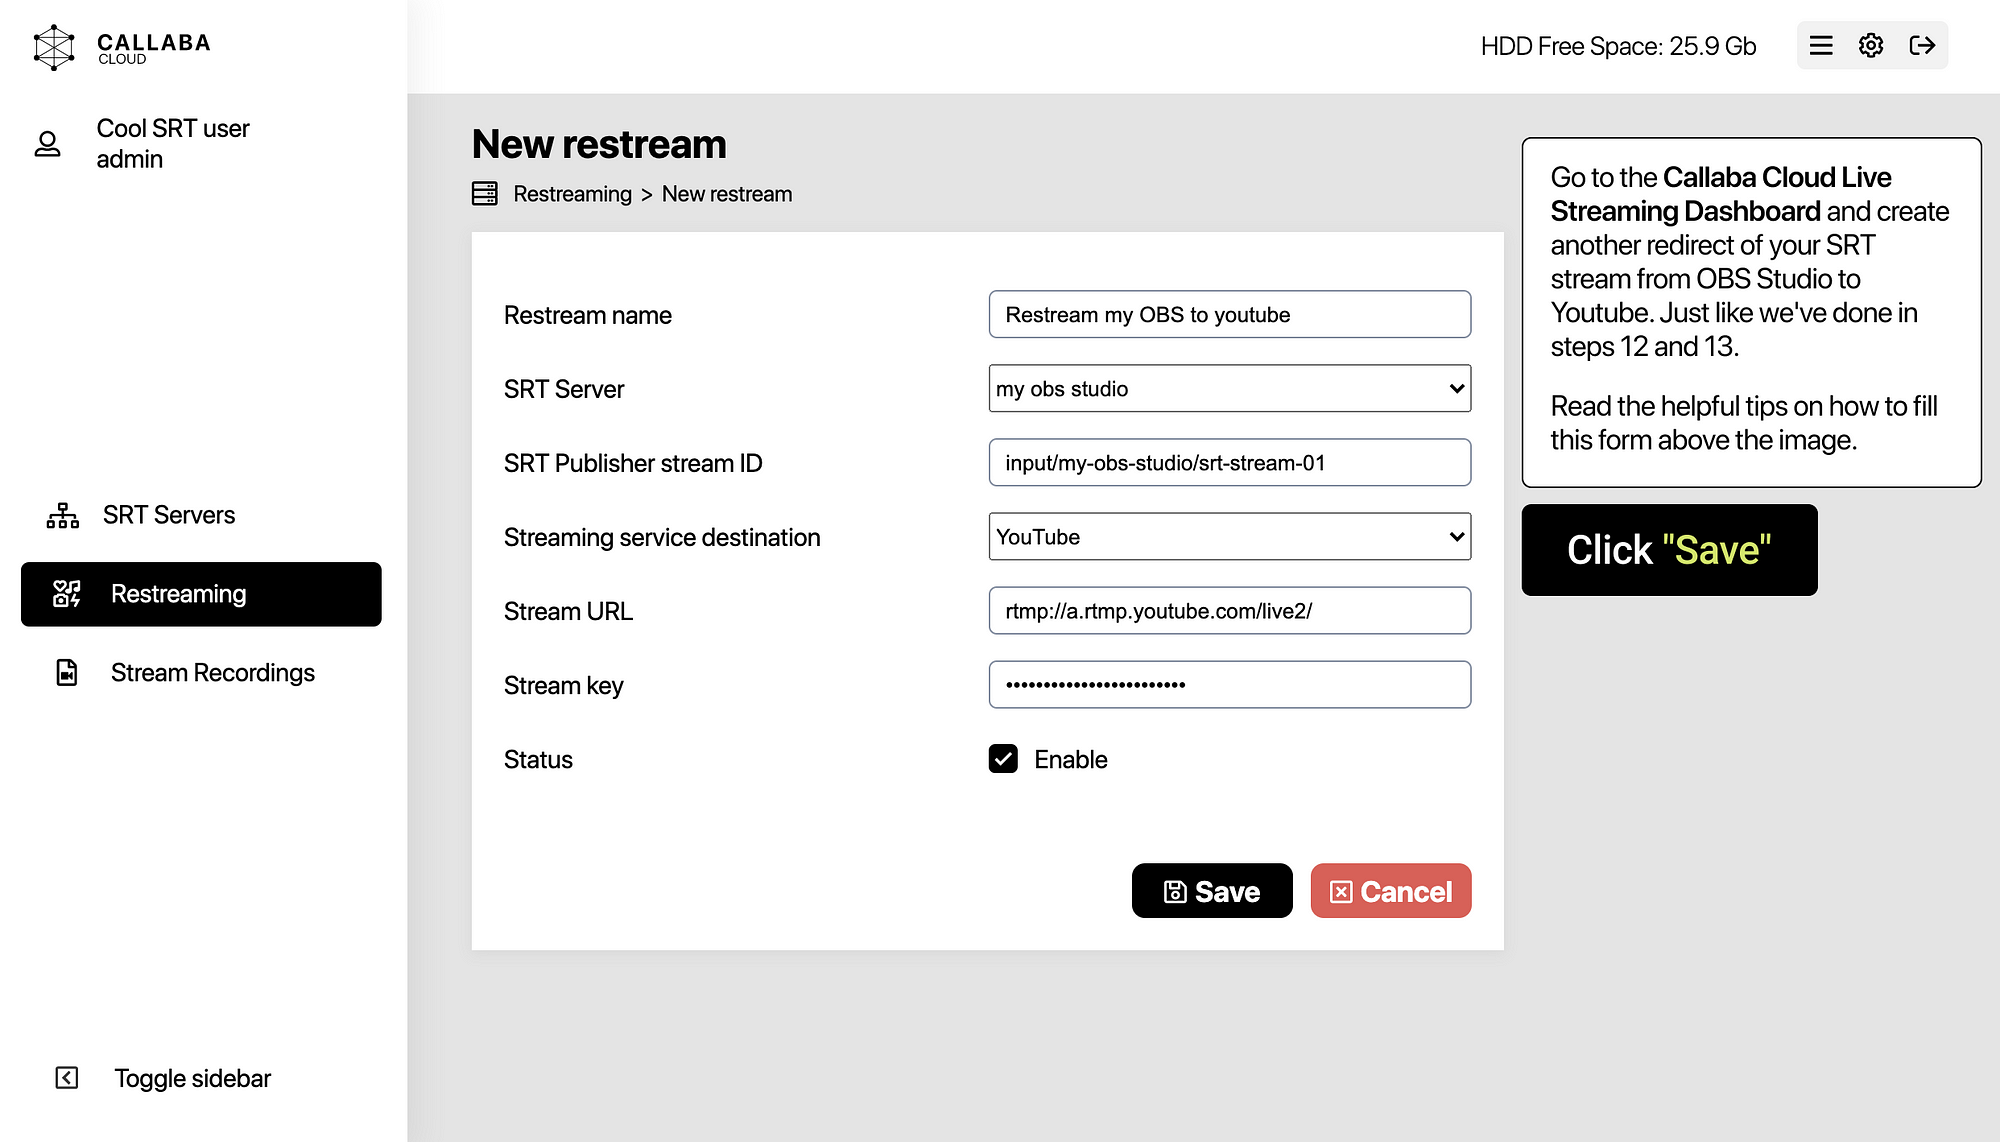
21. Go to the Callaba Cloud Live Streaming Dashboard and create another redirect of your SRT stream from OBS Studio to Youtube. Just like we’ve done in steps 12 and 13.
22. Creating re-stream. Switch to “Restreaming” section.
Click “Add new”. In the form that opens, fill in all the fields.
Restream Name:
Create a name for your re-stream, it will help you to not get puzzled, once you have multiple re-steams.
SRT Server:
Select an SRT server from the list. In our example it’s called “my obs studio”.
SRT Publisher Stream ID:
Paste the Publisher Stream ID. In our example it is input/my-obs/srt-stream-01.
Streaming service destination:
Select Youtube from the list of social networks.
Stream URL:
Paste Stream URL from from Youtube Studio Stream Settings tab.
Stream Key:
Paste Stream Key from Youtube Studio Stream Settings tab.
Click “Save”
23. Hurray! If everything is done correctly, in 7–10 seconds you will see the value of the bitrate being sent to Youtube. If this did not happen, or if there was a mistake, press the Restart button and wait for the restream to restart (no more than 10 seconds).
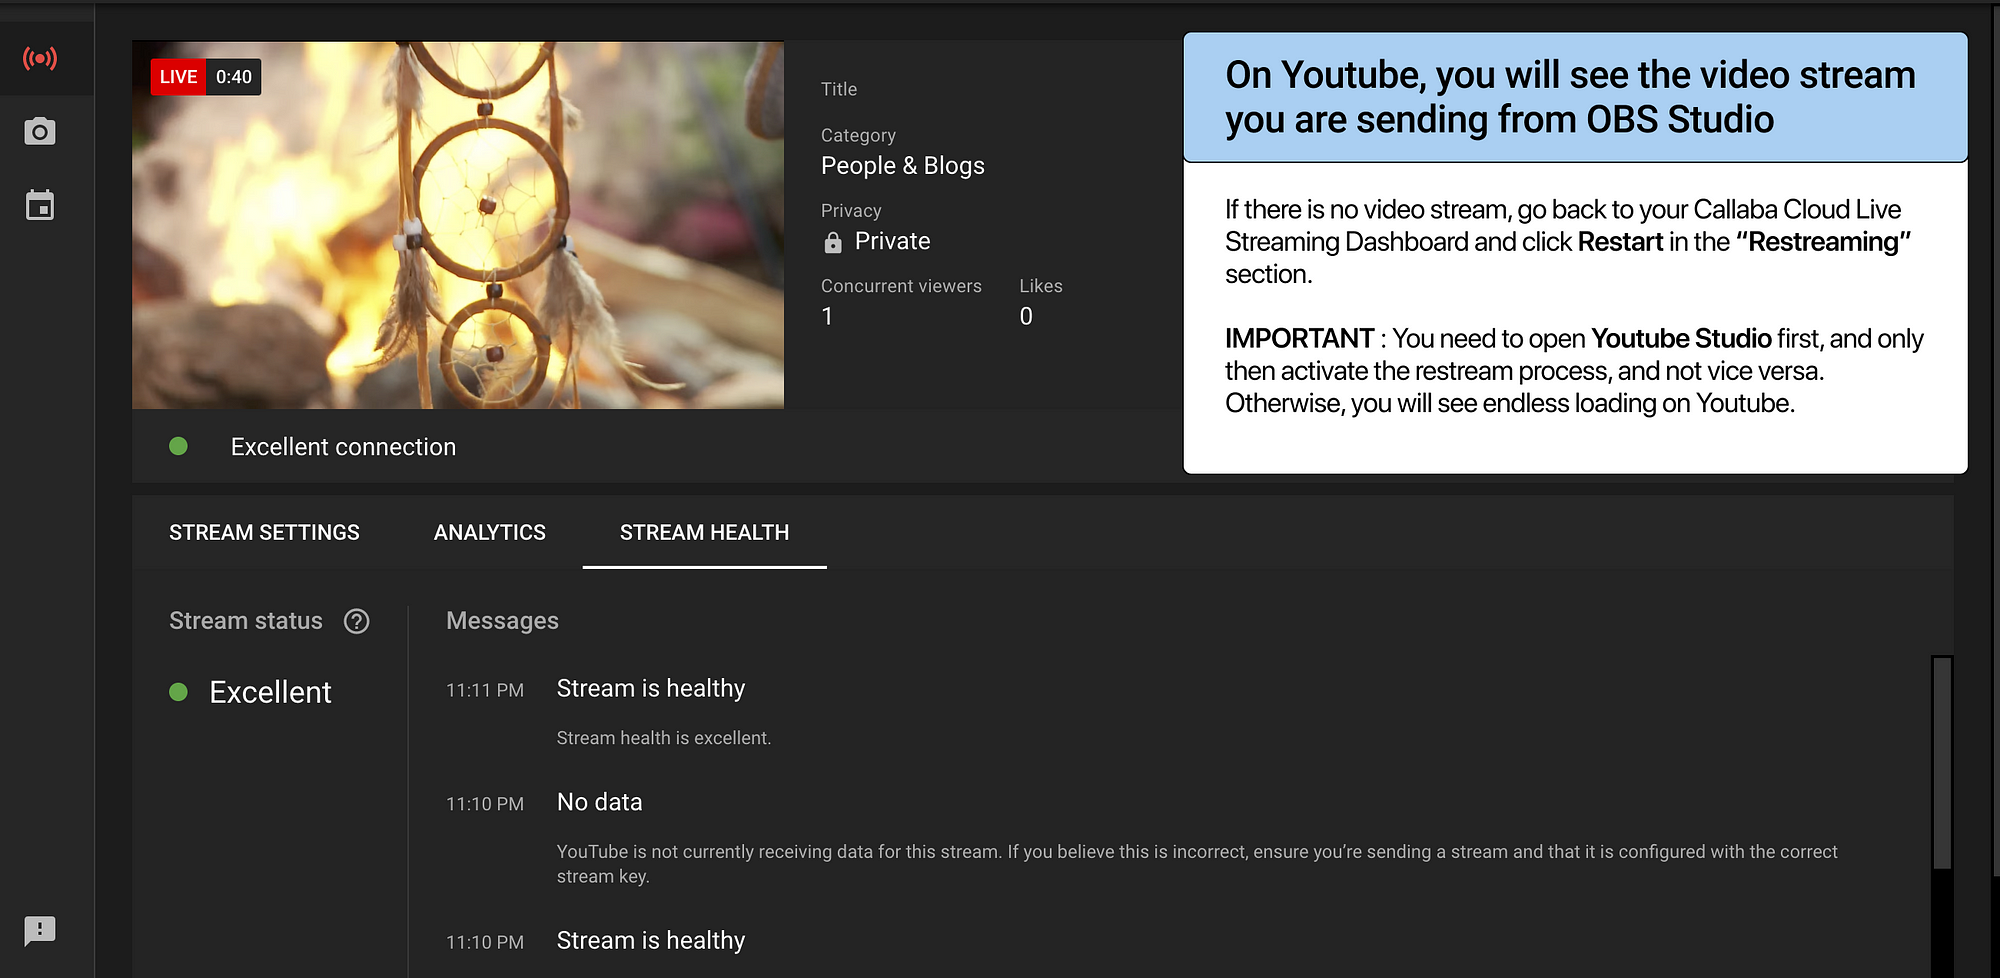
24. On Youtube, you will see the video stream you are sending from OBS Studio.
If there is no video stream, go back to your Callaba Cloud Live Streaming Dashboard and click Restart in the Restreaming section.
IMPORTANT! You need to open Youtube Studio first, and only then activate the re-stream process, and not vice versa. Otherwise, you will see endless loading on Youtube.
Also, our tests have shown that in case of network problems, sometimes Youtube ends the stream on its own. In this case, in the Stream Finished window that appears, click Dismiss, go back to Callaba Cloud Live Streaming Dashboard, and click Restart. Please keep an eye on this during the entire live stream.
Now we will set up restream to Facebook.
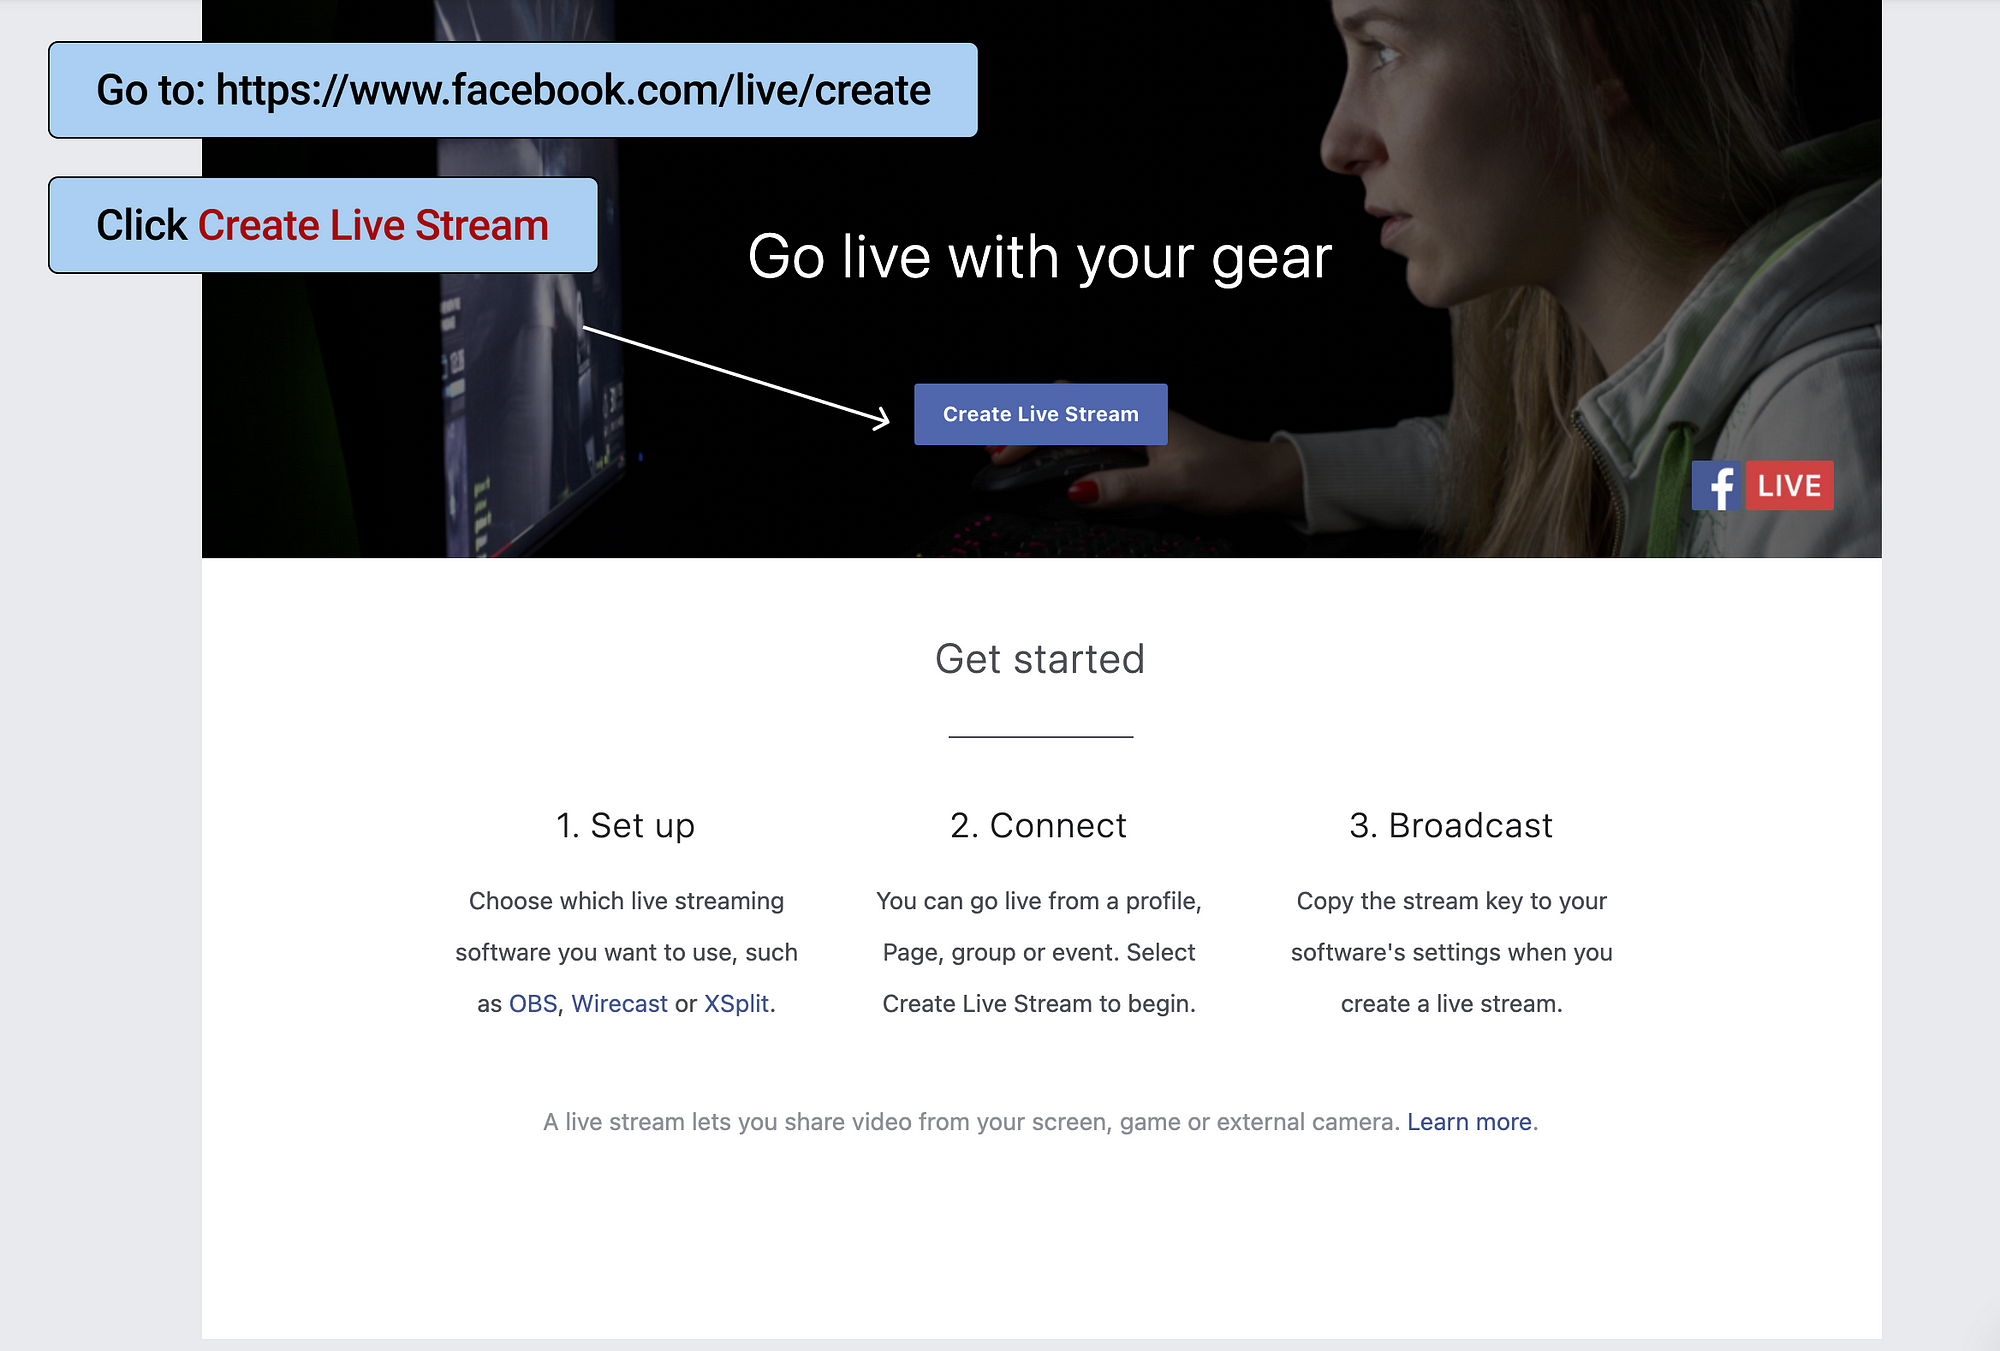
25. Go to: https://www.facebook.com/live/create and click Create Live Stream.
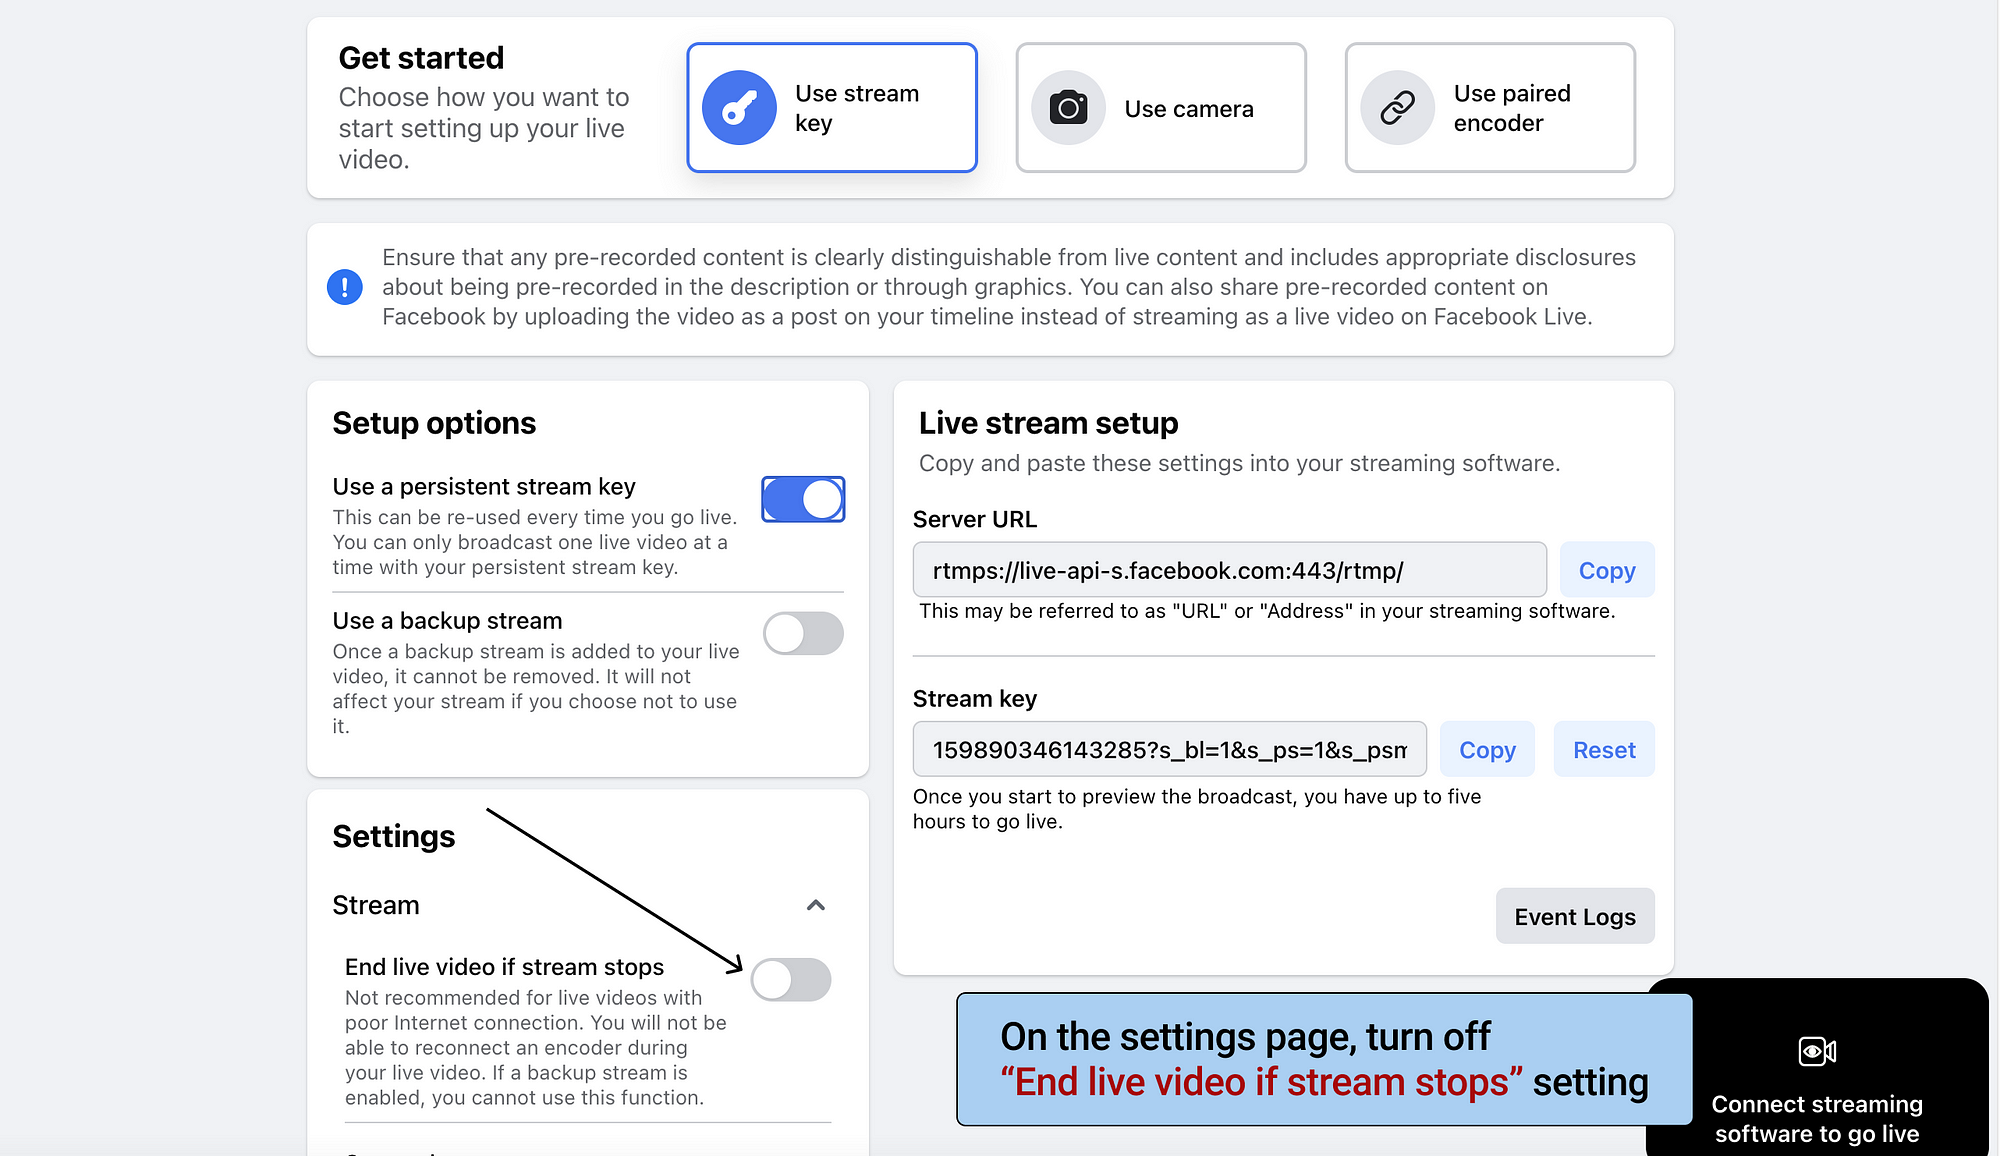
26. On the settings page, turn off “End live video if stream stops” setting. Also, our tests showed that using the Persistent Stream Key is preferable, as it’s more stable.
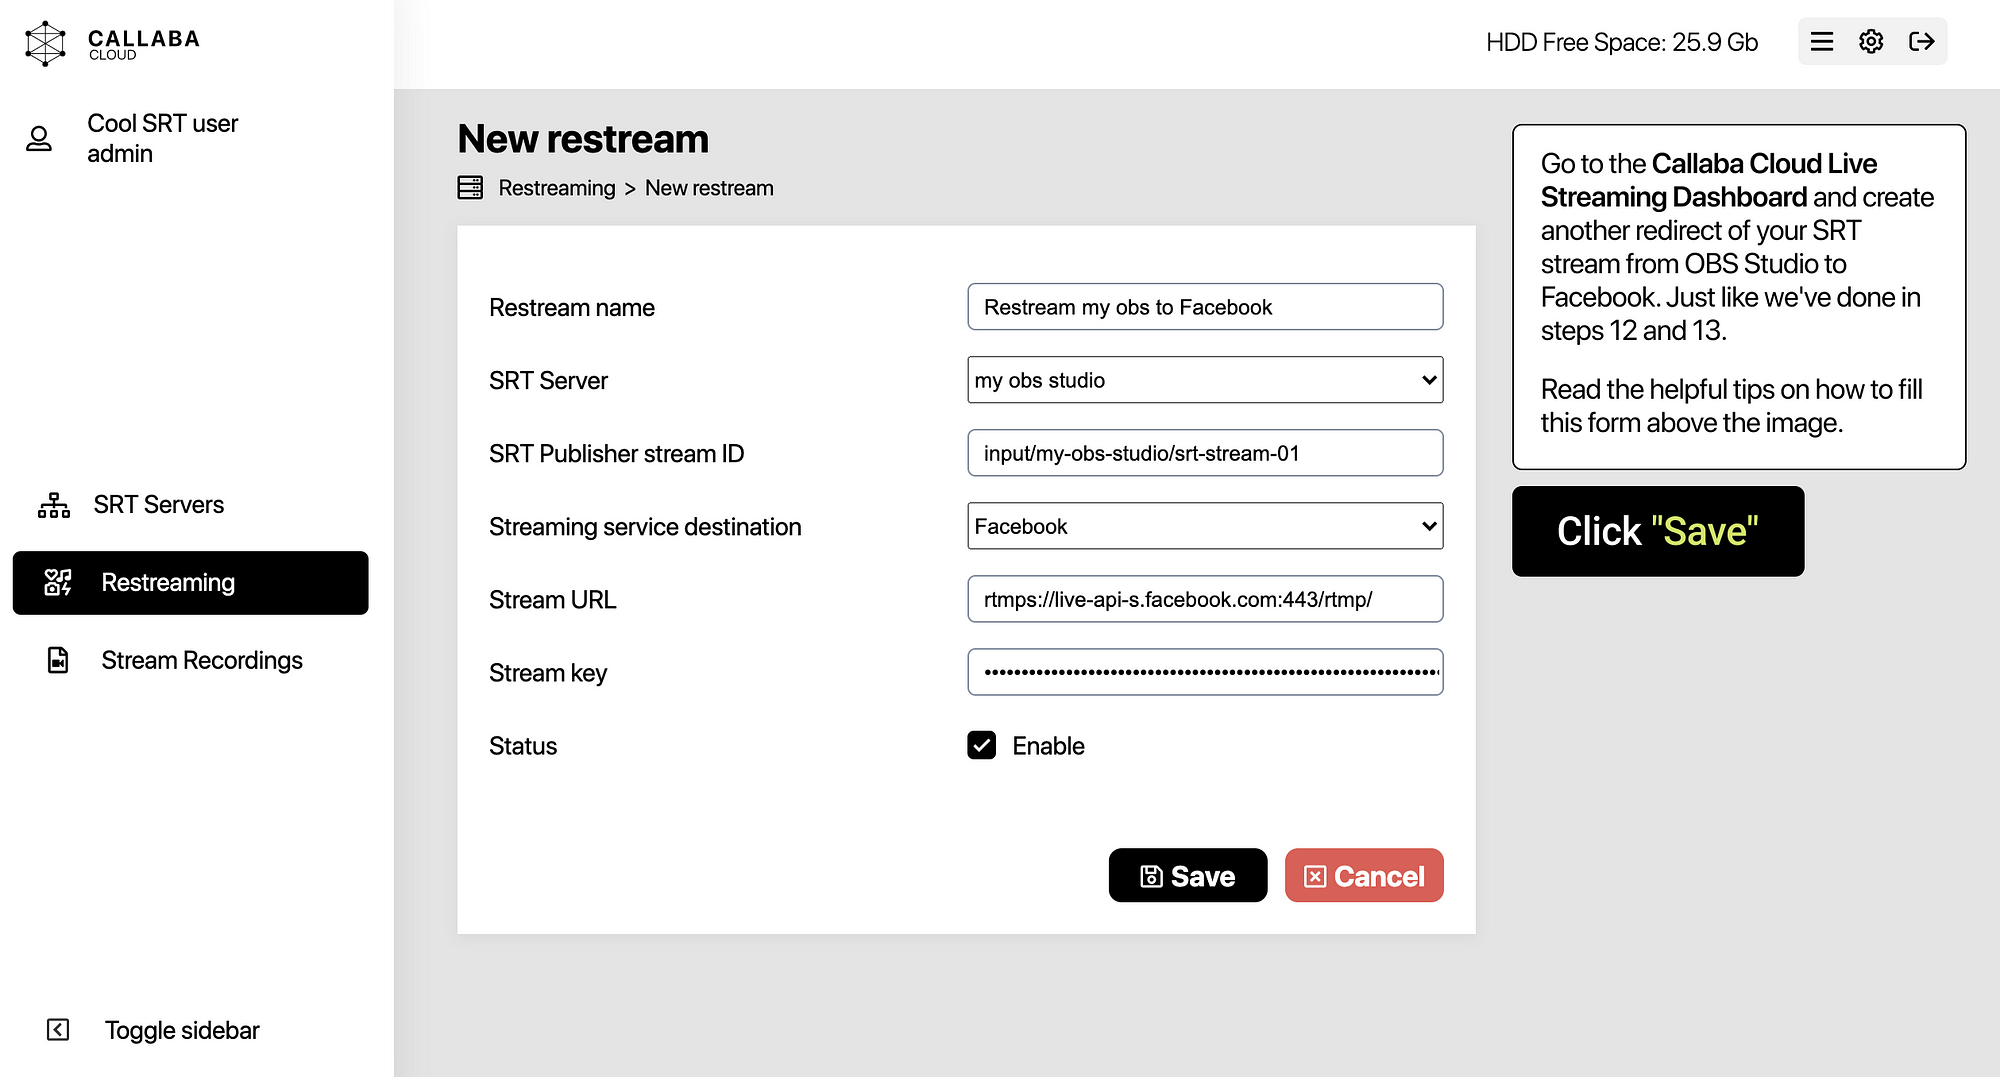
27. Again, return to the Callaba Cloud Live Streaming Dashboard and create a re-stream of your SRT stream from OBS Studio to Facebook. Just like in the steps 12 and 13.
28. Creating a re-stream.
Switch to “Restreaming” section.
Click “Add new”.
In the form that appears, fill in all the fields.
Restream Name:
Create a name for your re-stream, it will help you to not get puzzled, since you have multiple re-steams now.
SRT Server:
Select an SRT server from the list. In our example it’s called “my obs studio”.
SRT Publisher Stream ID:
Paste the Publisher Stream ID. In our example it is input/my-obs/srt-stream-01.
Streaming service destination:
Select Facebook from the list of social networks.
Stream URL:
Paste Server URL from Facebook Stream Settings page.
Stream Key:
Paste Stream Key from Facebook Stream Settings page.
Click “Save”
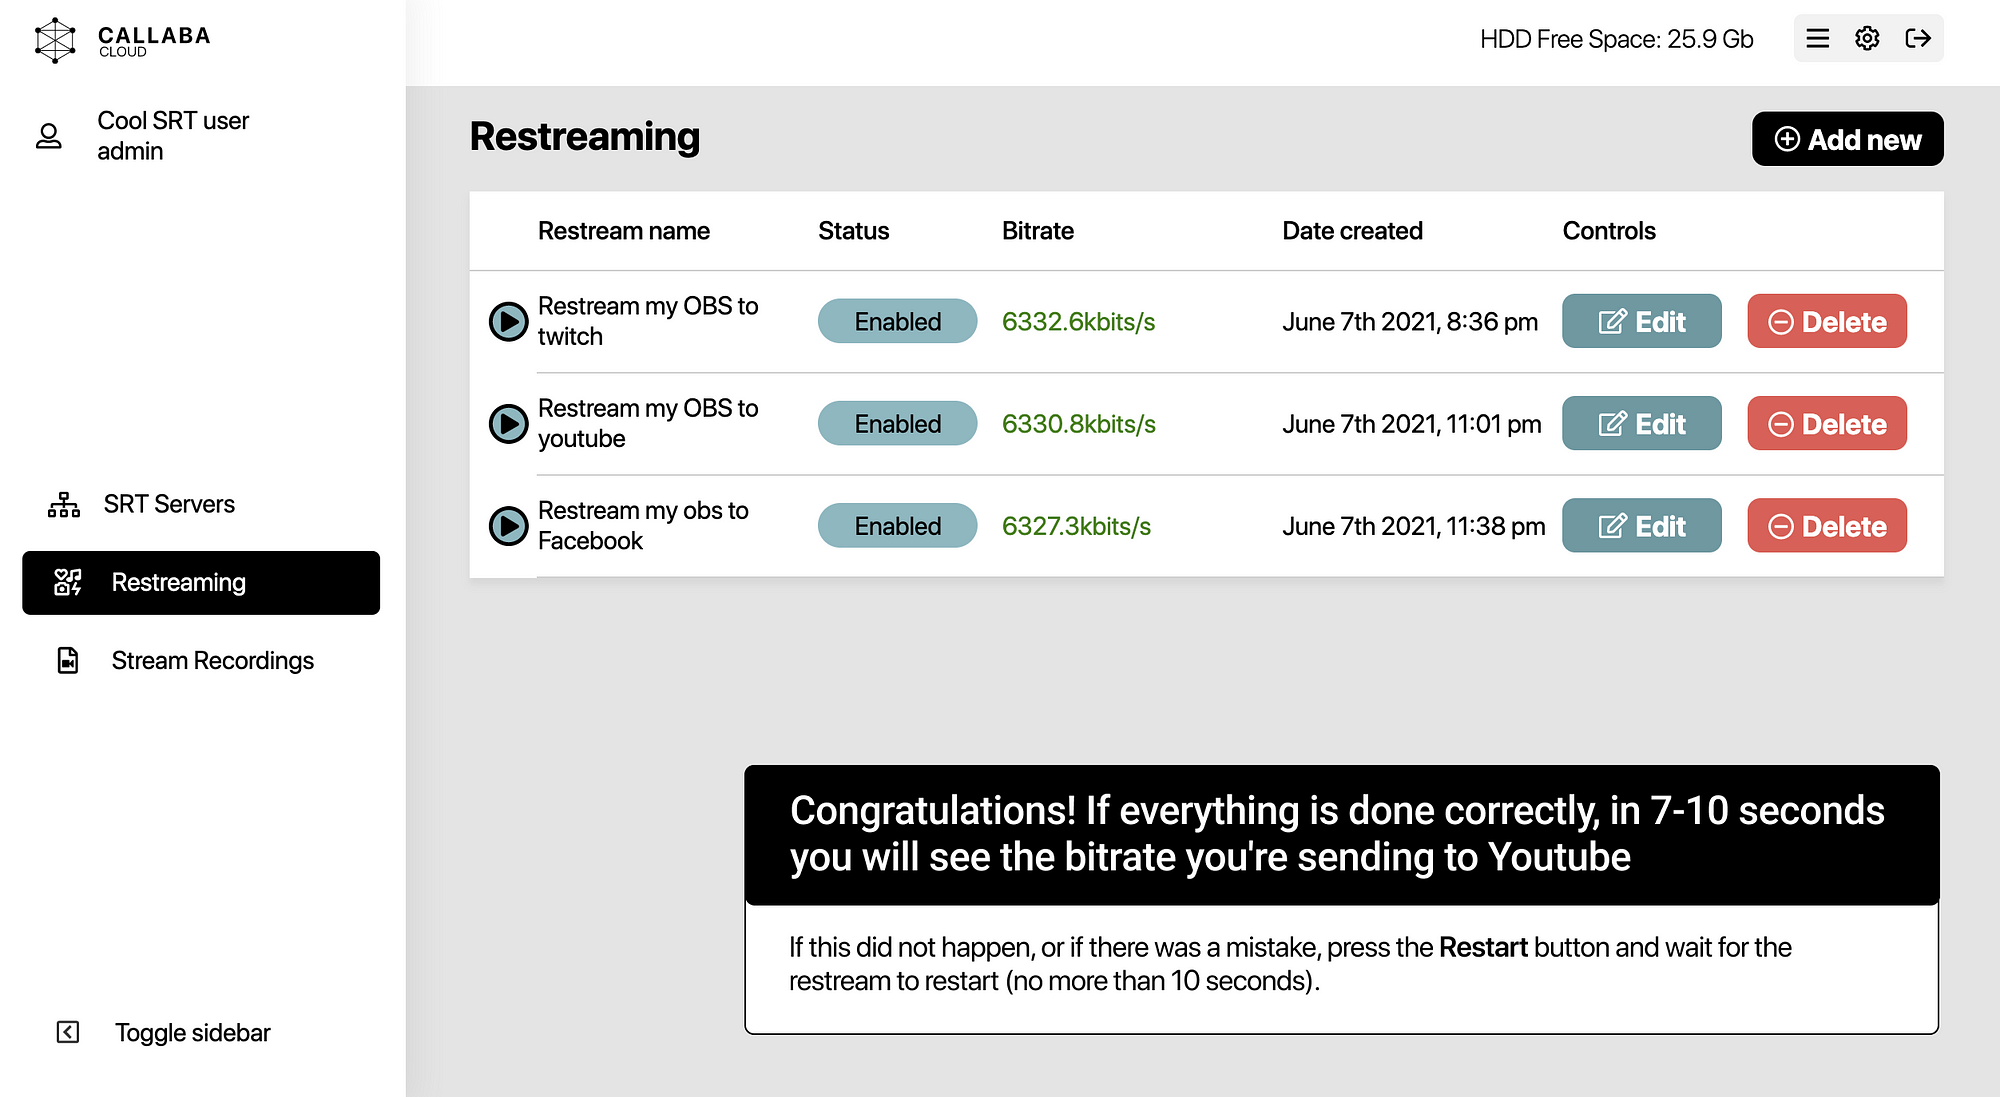
29. Tada! If everything is done correctly, in 7–10 seconds you will see the bitrate you’re sending to Facebook. If this did not happen, or if there was a mistake, press the Restart button and wait for the restream process to restart (no more than 10 seconds).
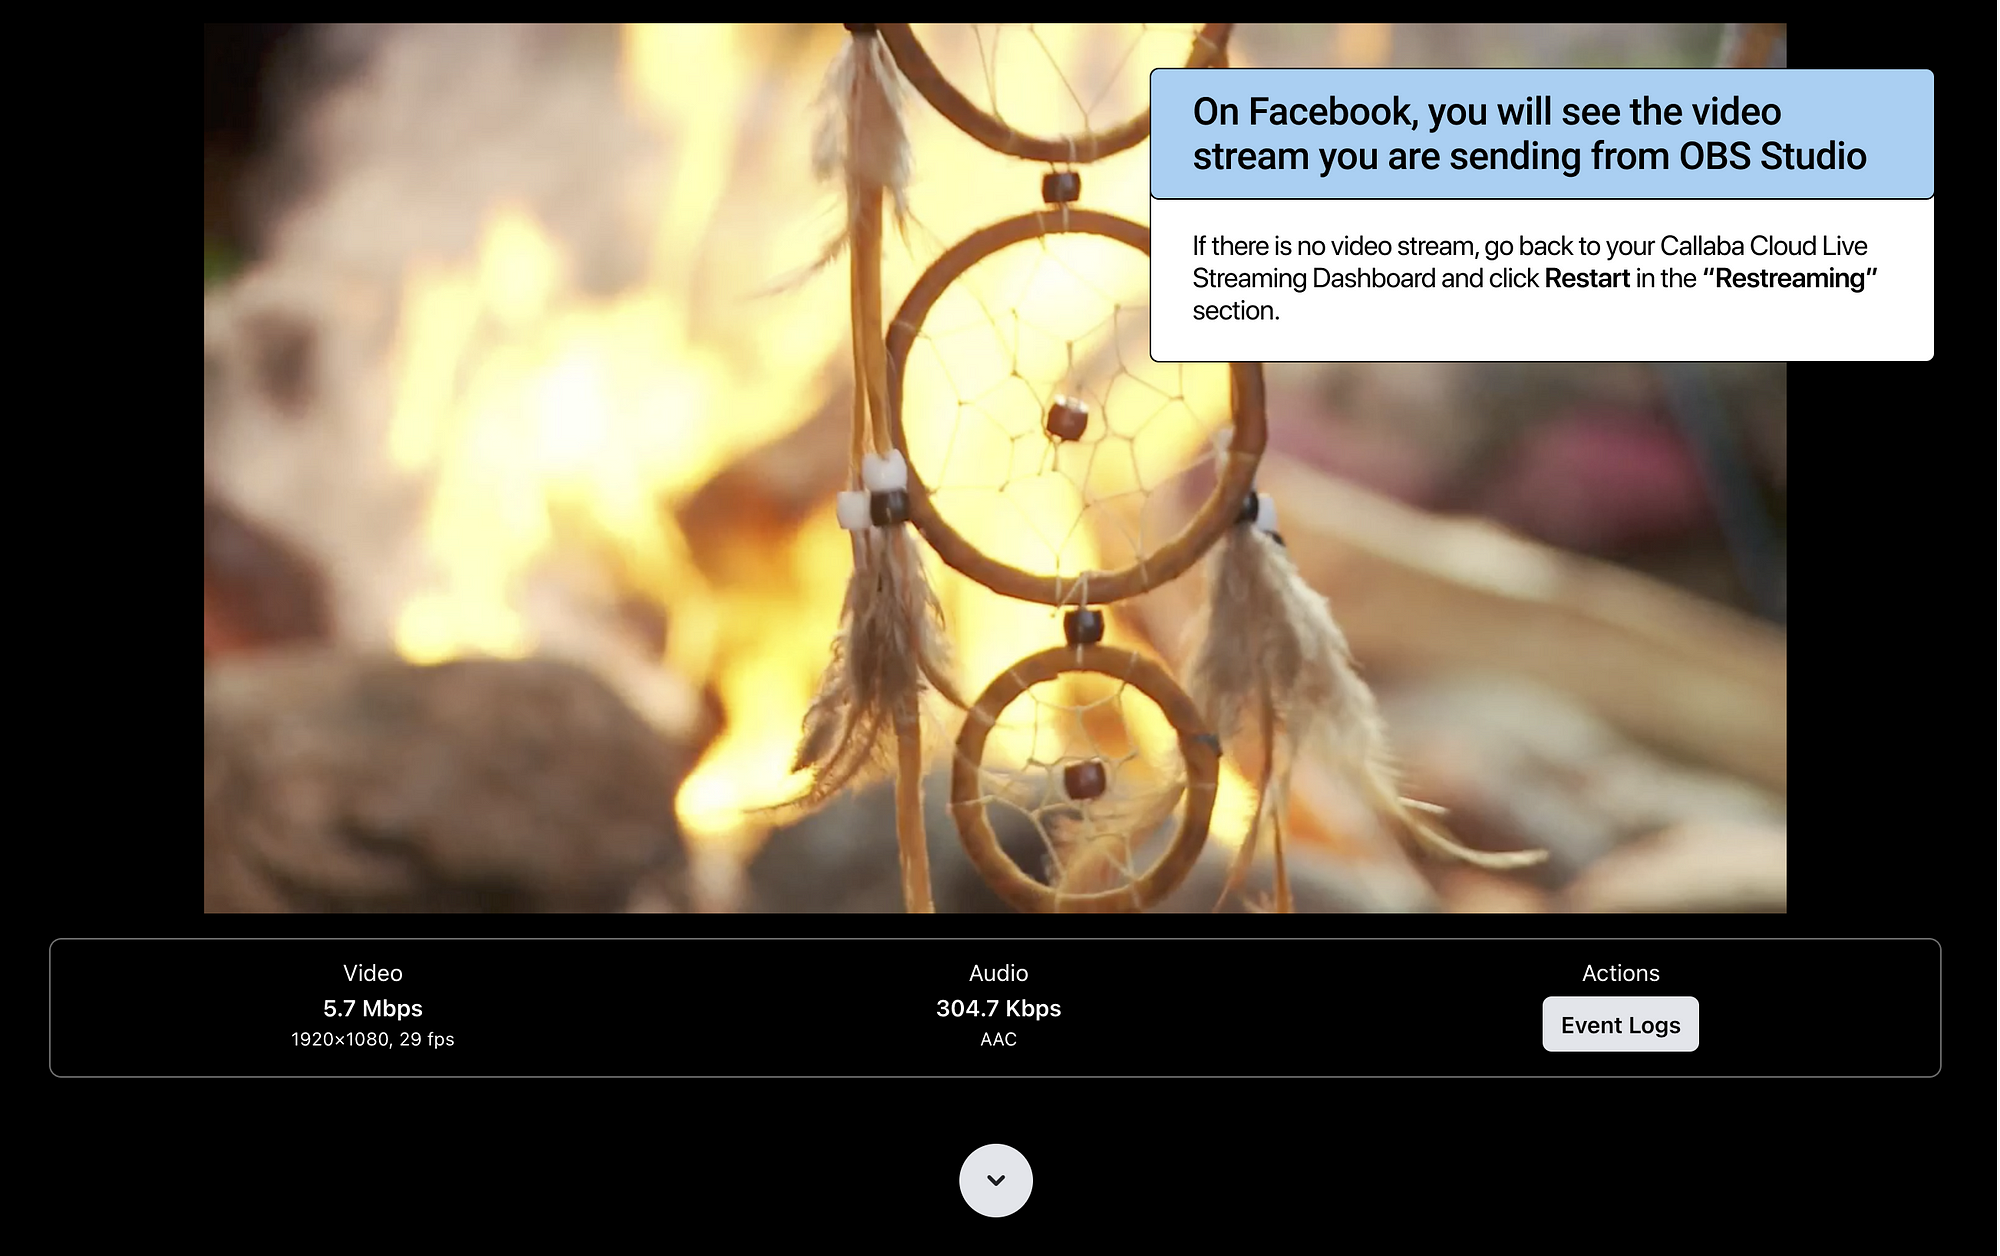
30. On Facebook, you will see your video stream from OBS Studio.
This is the end of our tutorial.
If you have any questions, please contact us at: [email protected]
We will respond to you within 24 hours.
Happy streaming!
Related articles :
How to launch Callaba Cloud Live Streaming
How to start streaming in OBS Studio over the SRT Protocol
How to receive SRT stream in OBS Studio
Originally published at https://callabacloud.com


