Setting up SRT stream from a mobile phone via Larix Broadcaster to Vmix

In this tutorial, we will show you how to set up SRT live streaming from a mobile phone with Larix Broadcaster and Vmix.
We’re happy to present both video and text version of the tutorial.
For this tutorial, we will use:
1. Larix Broadcaster. It’s an application for broadcasting over a number of protocols: SRT/RTMP/RTSP/RIST.
Larix Broadcaster allows you to stream video and/or audio in real time from your mobile device over Wi-Fi, EDGE, 3G, LTE and 5G.
Download the app to your mobile phone:
Download on the App Store
Get it on Google Play
2. Vmix: Live Video Streaming Software is a professional streaming tool. You can download it from the official website and get a free trial period.
Official vMix website
3. Callaba Cloud Live Streaming is a server that can send and receive SRT streams, record and re-stream them to streaming platforms. Subscription will take less than 5 minutes.
Step by step guide : How to subscribe and launch Callaba Cloud
Before you proceed, please note that this tutorial is written with the assumption that you have already installed Larix Broadcaster and Vmix, as well as subscribed to Callaba Cloud Live Streaming. Will not cover these steps in detail here to make it shorter.
So let’s get started:
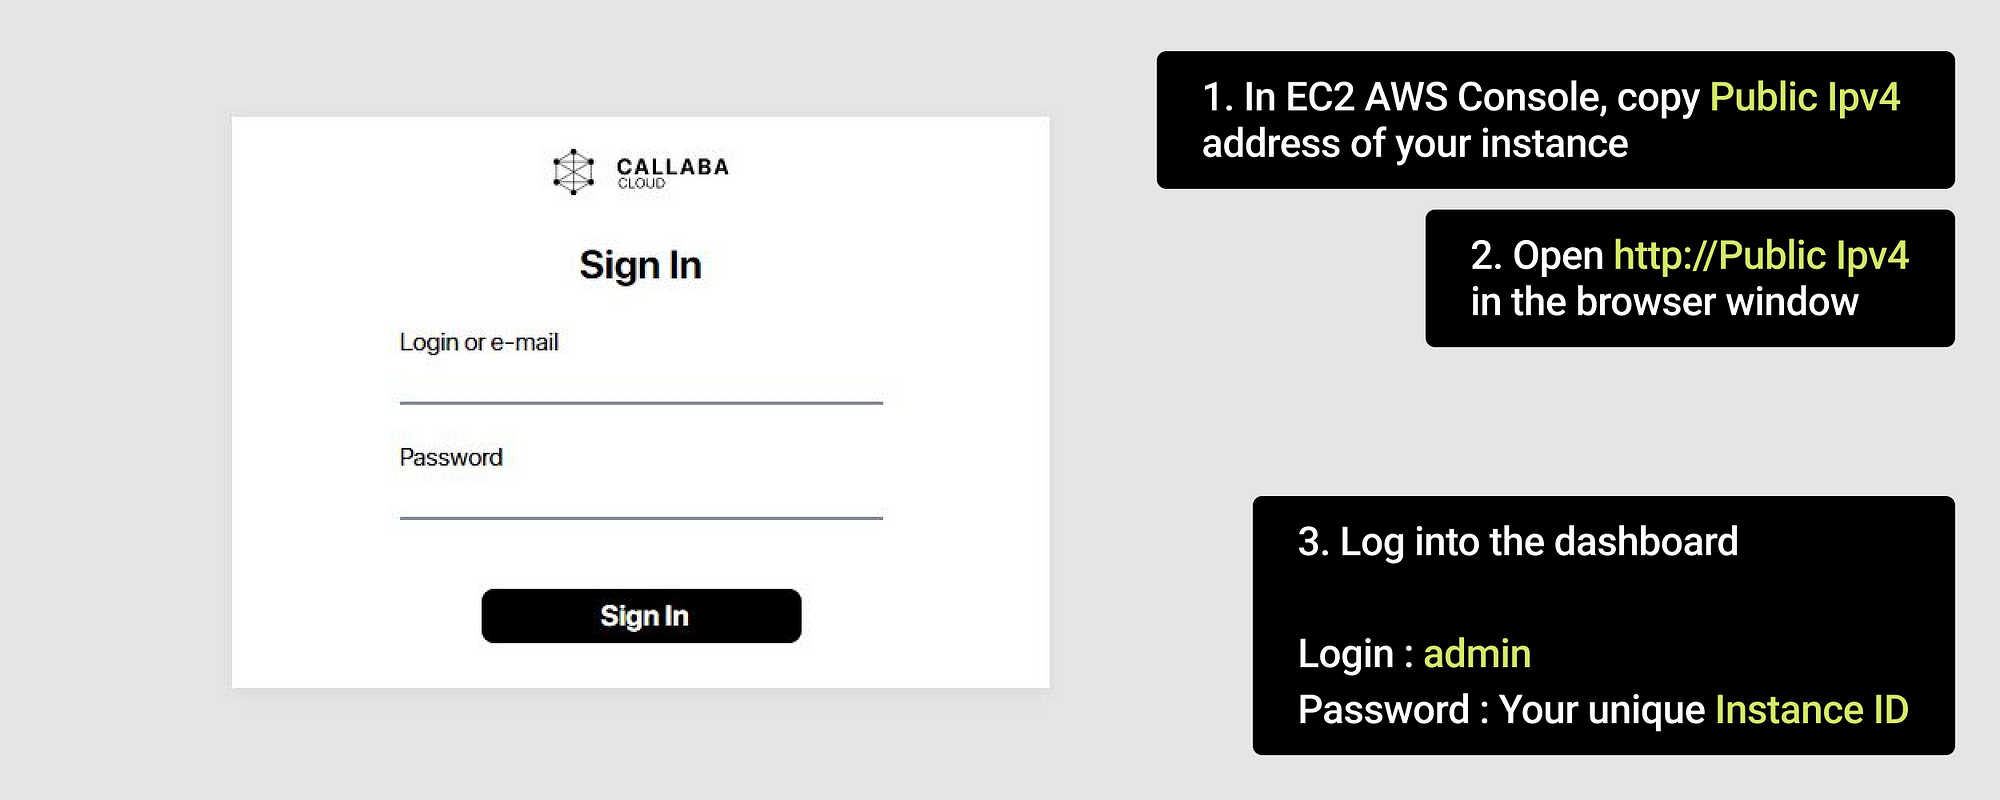
1. Open your Callaba Cloud dashboard and login.
To get into the dashboard, open http://PUBLIC-IPV4 in your browser.
(The address of the dashboard is the Public Ipv4 address of your Amazon Web Services instance)
Login: admin
Password: your unique Instance ID
2. Go to the “SRT Servers” section
Click “Add New”

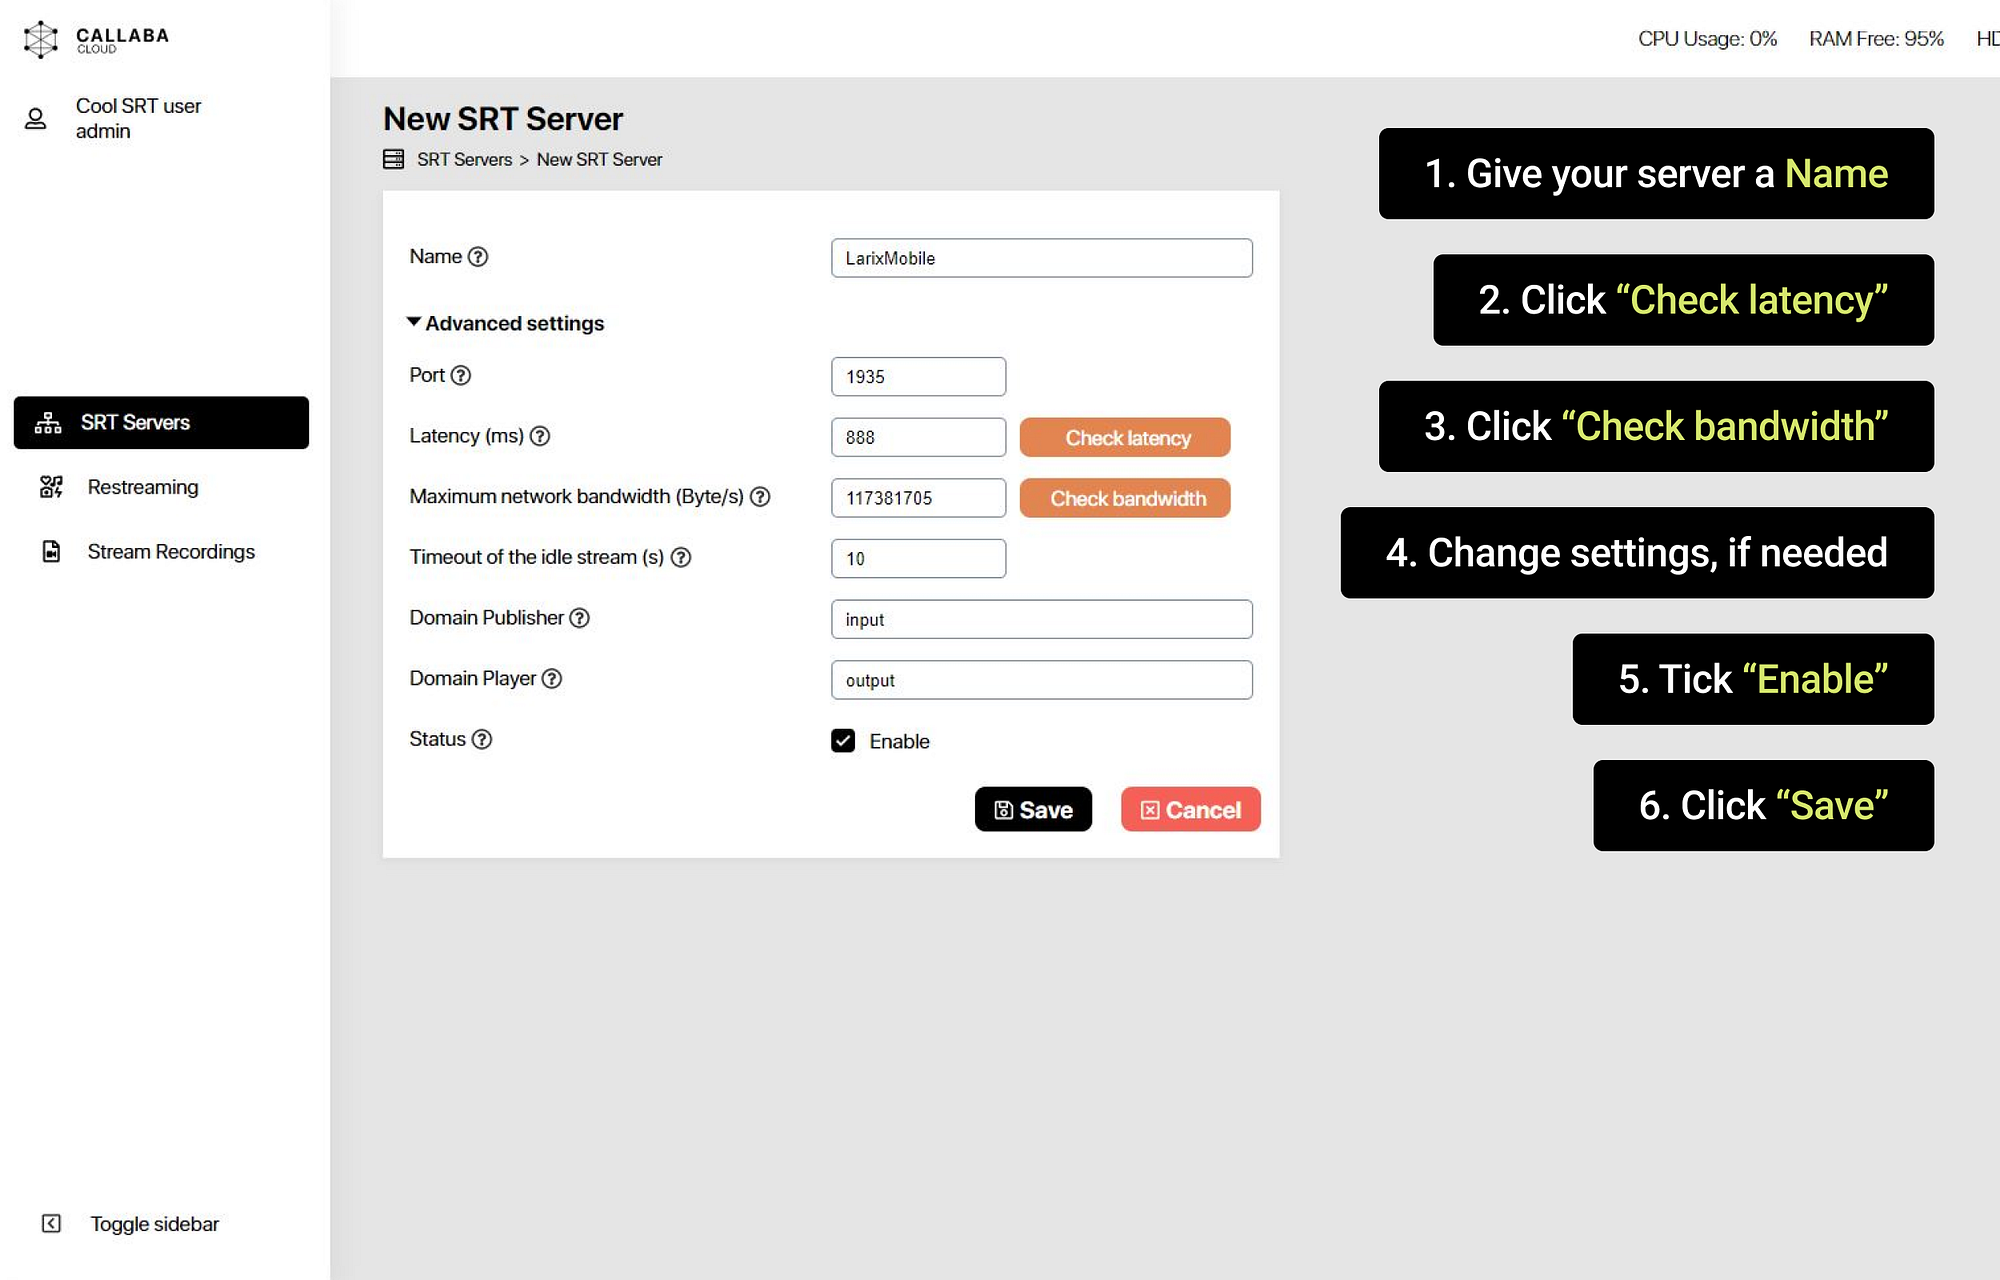
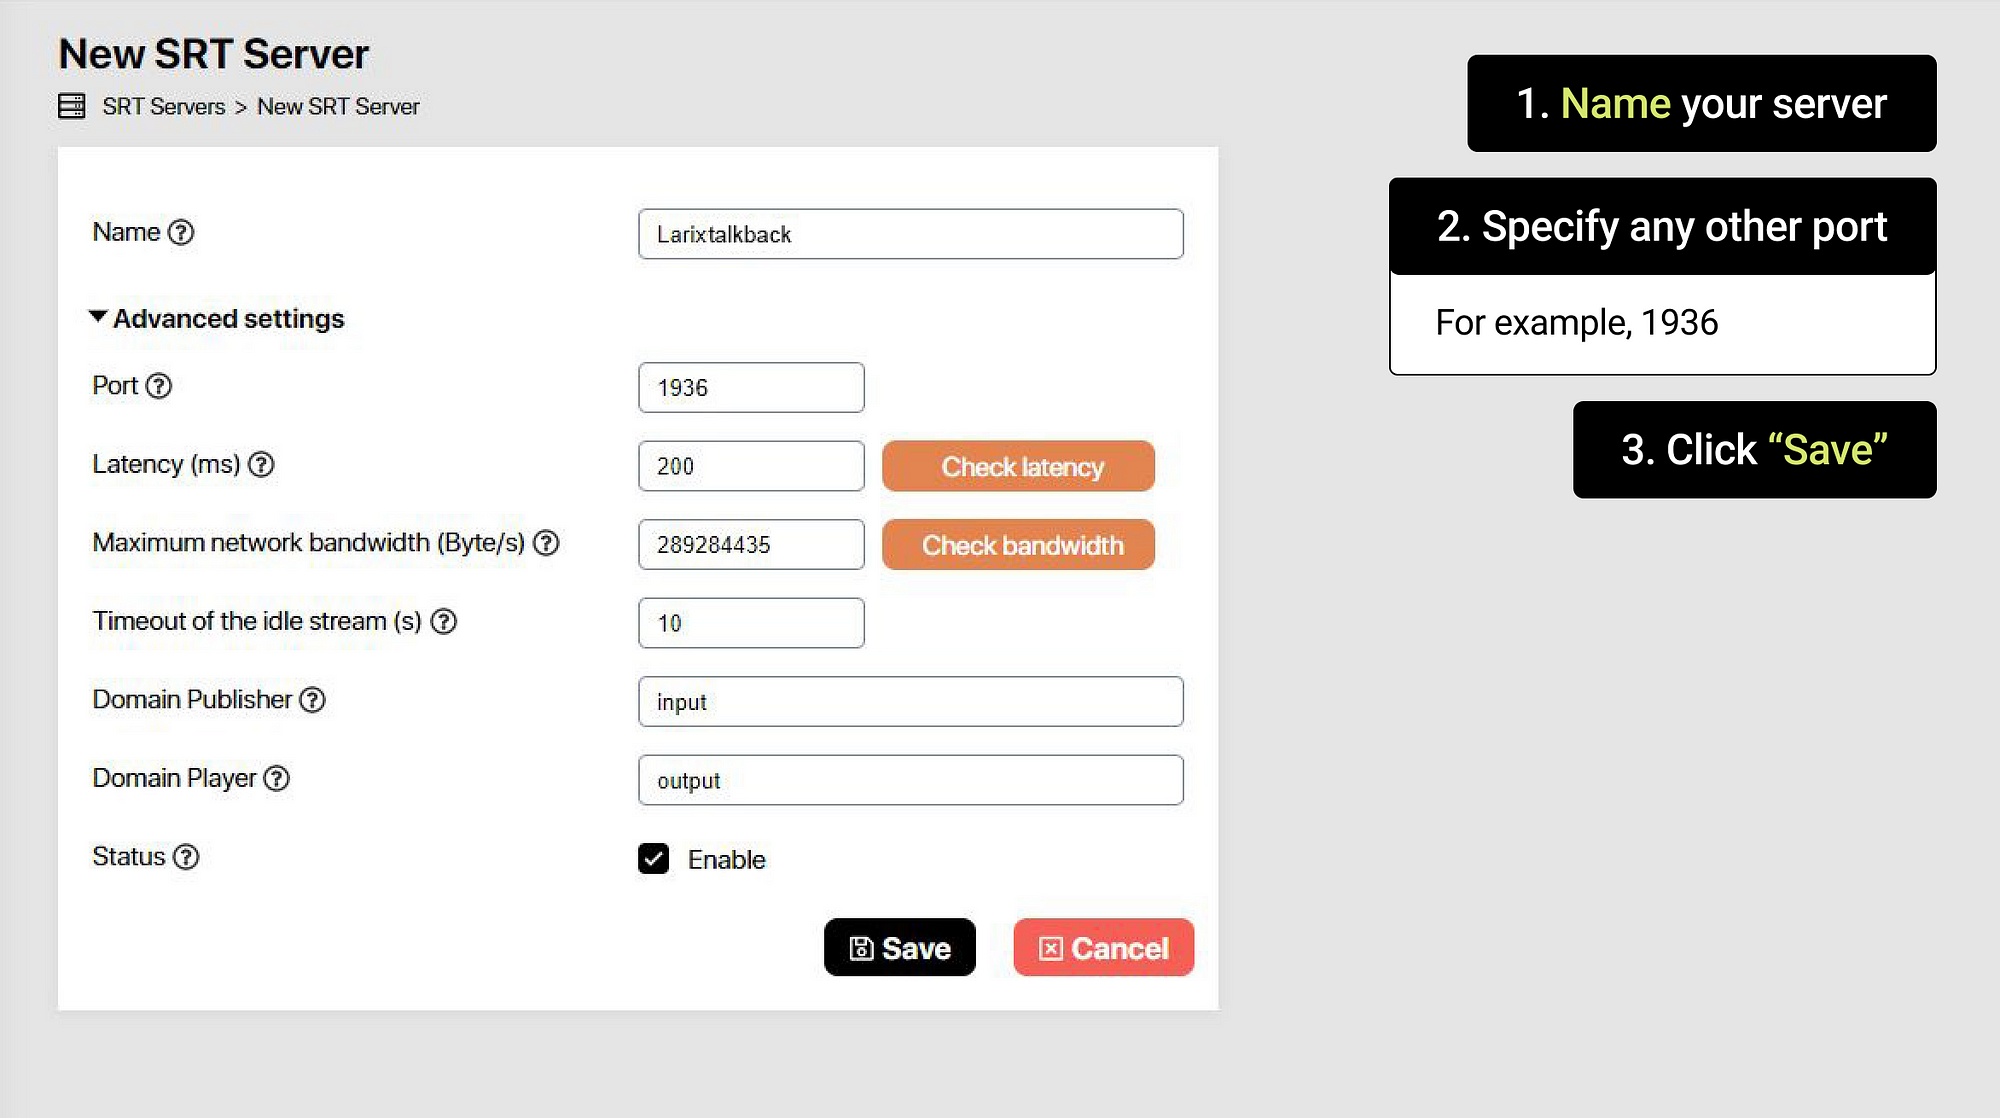
3. In the window that opens, fill in the following fields:
Name:
Give your server a name. This will help you avoid confusion in the future.
Latency (ms):
To determine the optimal delay, we recommend using the self-diagnostic function.
Click “Check Latency”
Maximum network bandwidth (Byte/s):
We recommend using the autodiagnostics function to determine the channel width.
Click “Check bandwidth”
These measurements will minimize your SRT packet loss
Status:
Check the “Enable” checkbox
The remaining settings can be left unchanged. Please only make changes to the settings if you really understand what they are affecting.
Click “Save”
4. Success! You have created your personal Callaba SRT server.
Let’s check it in action.
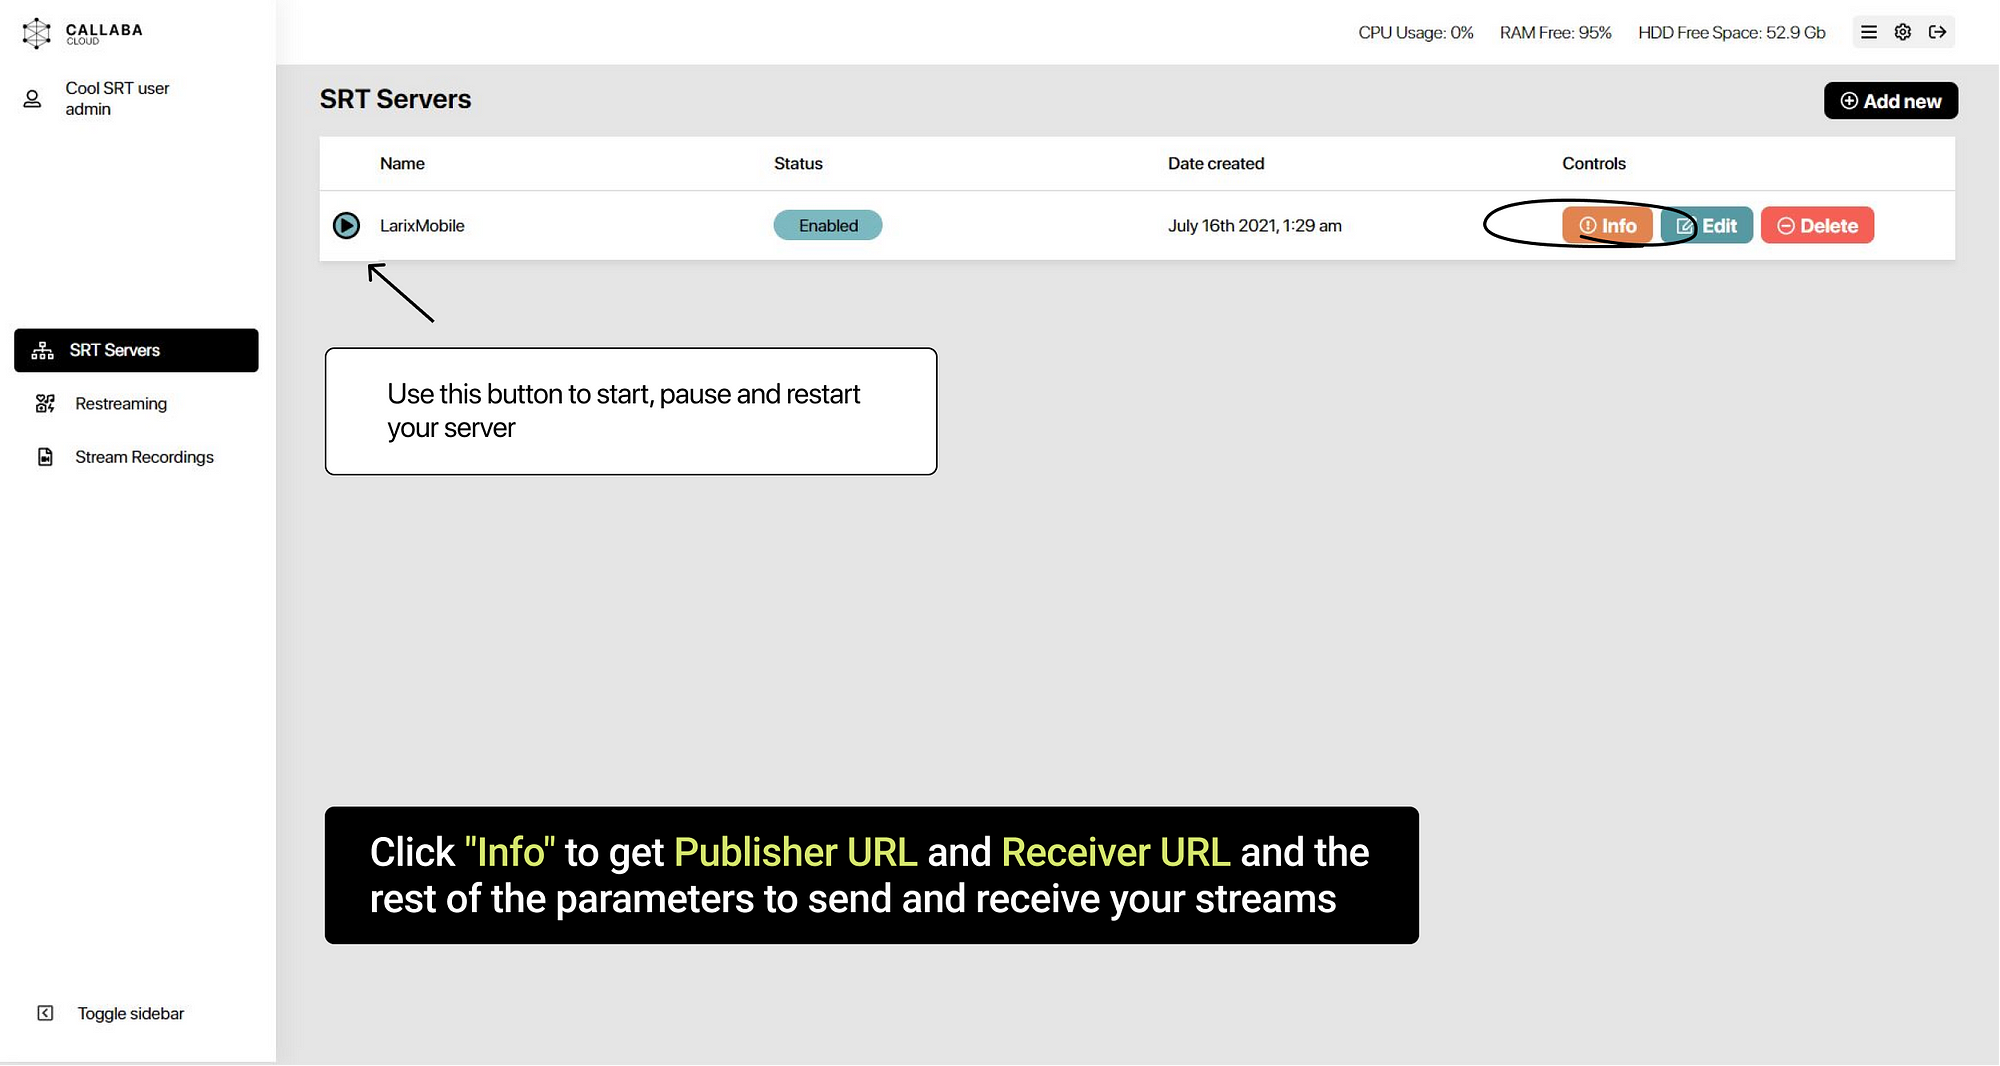
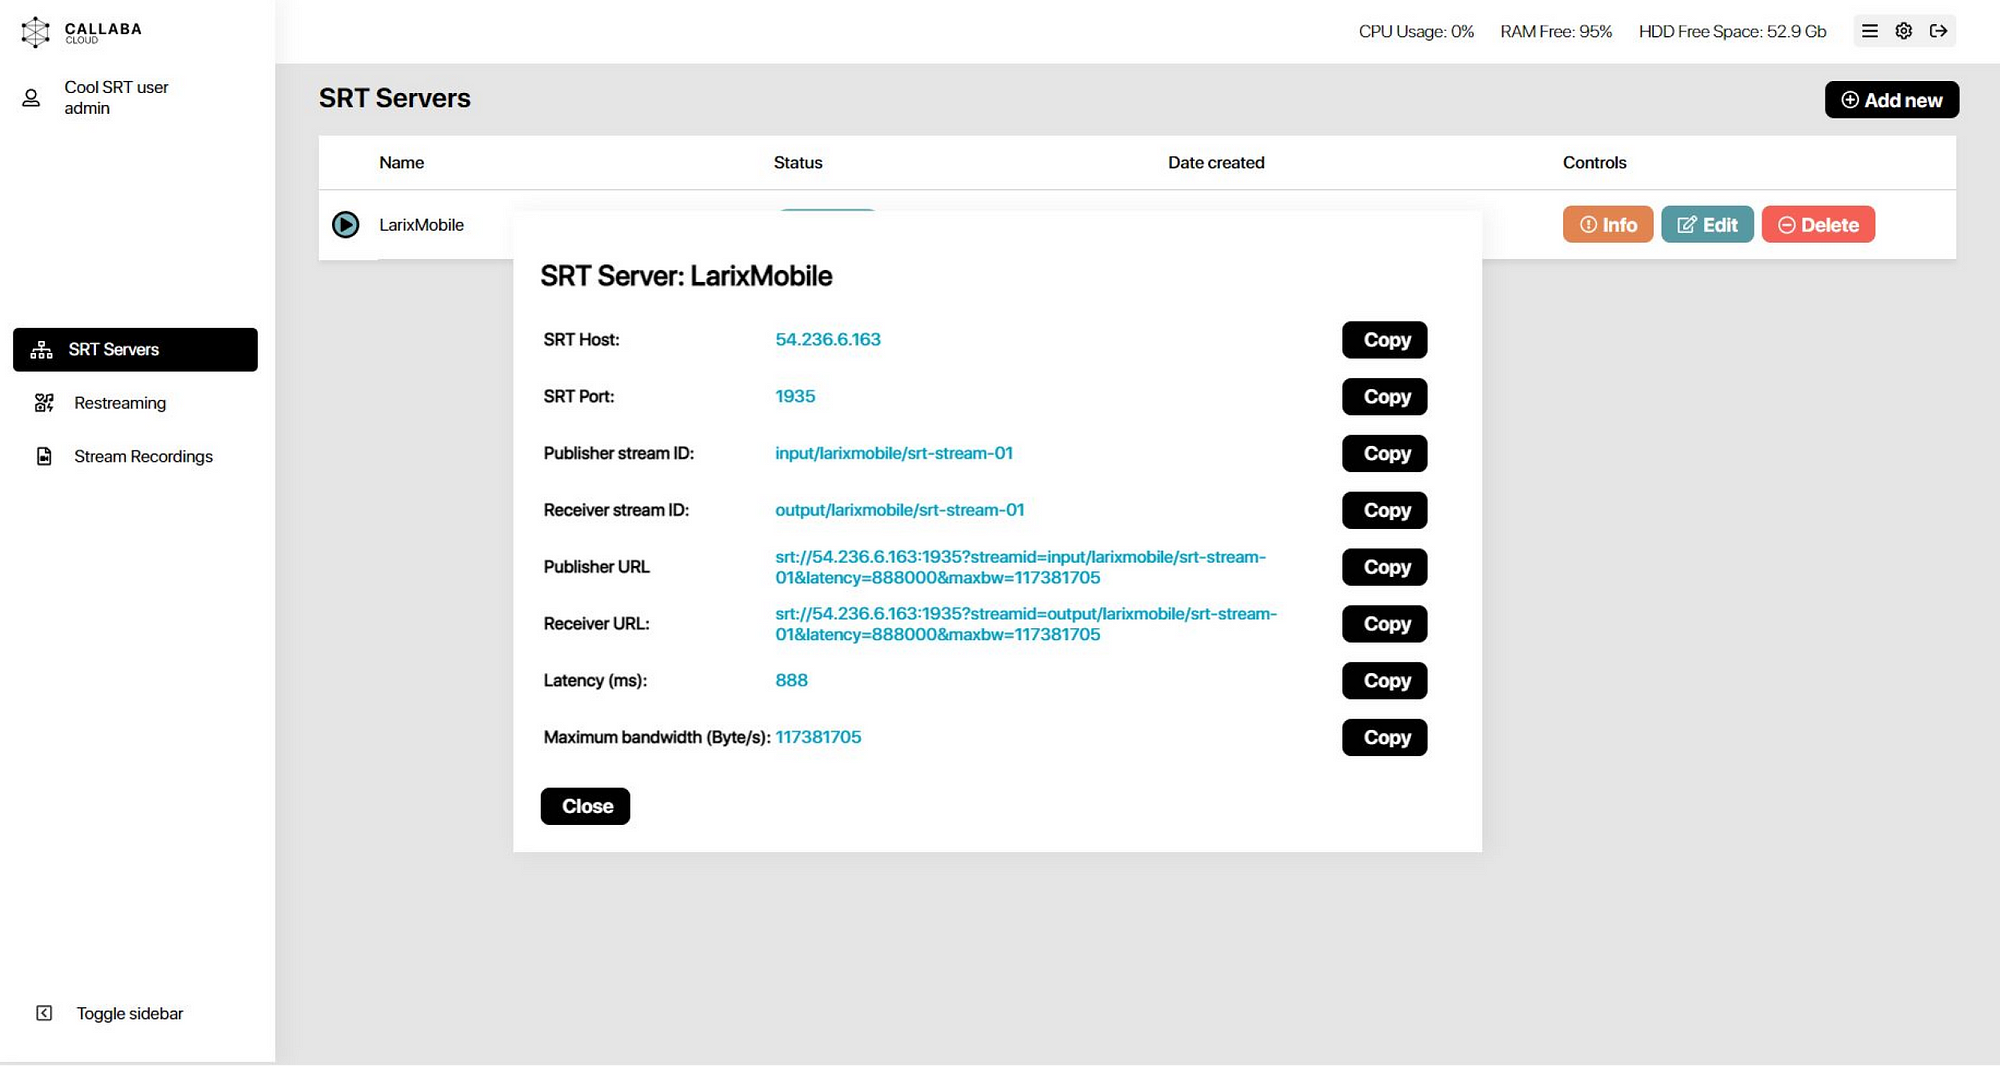
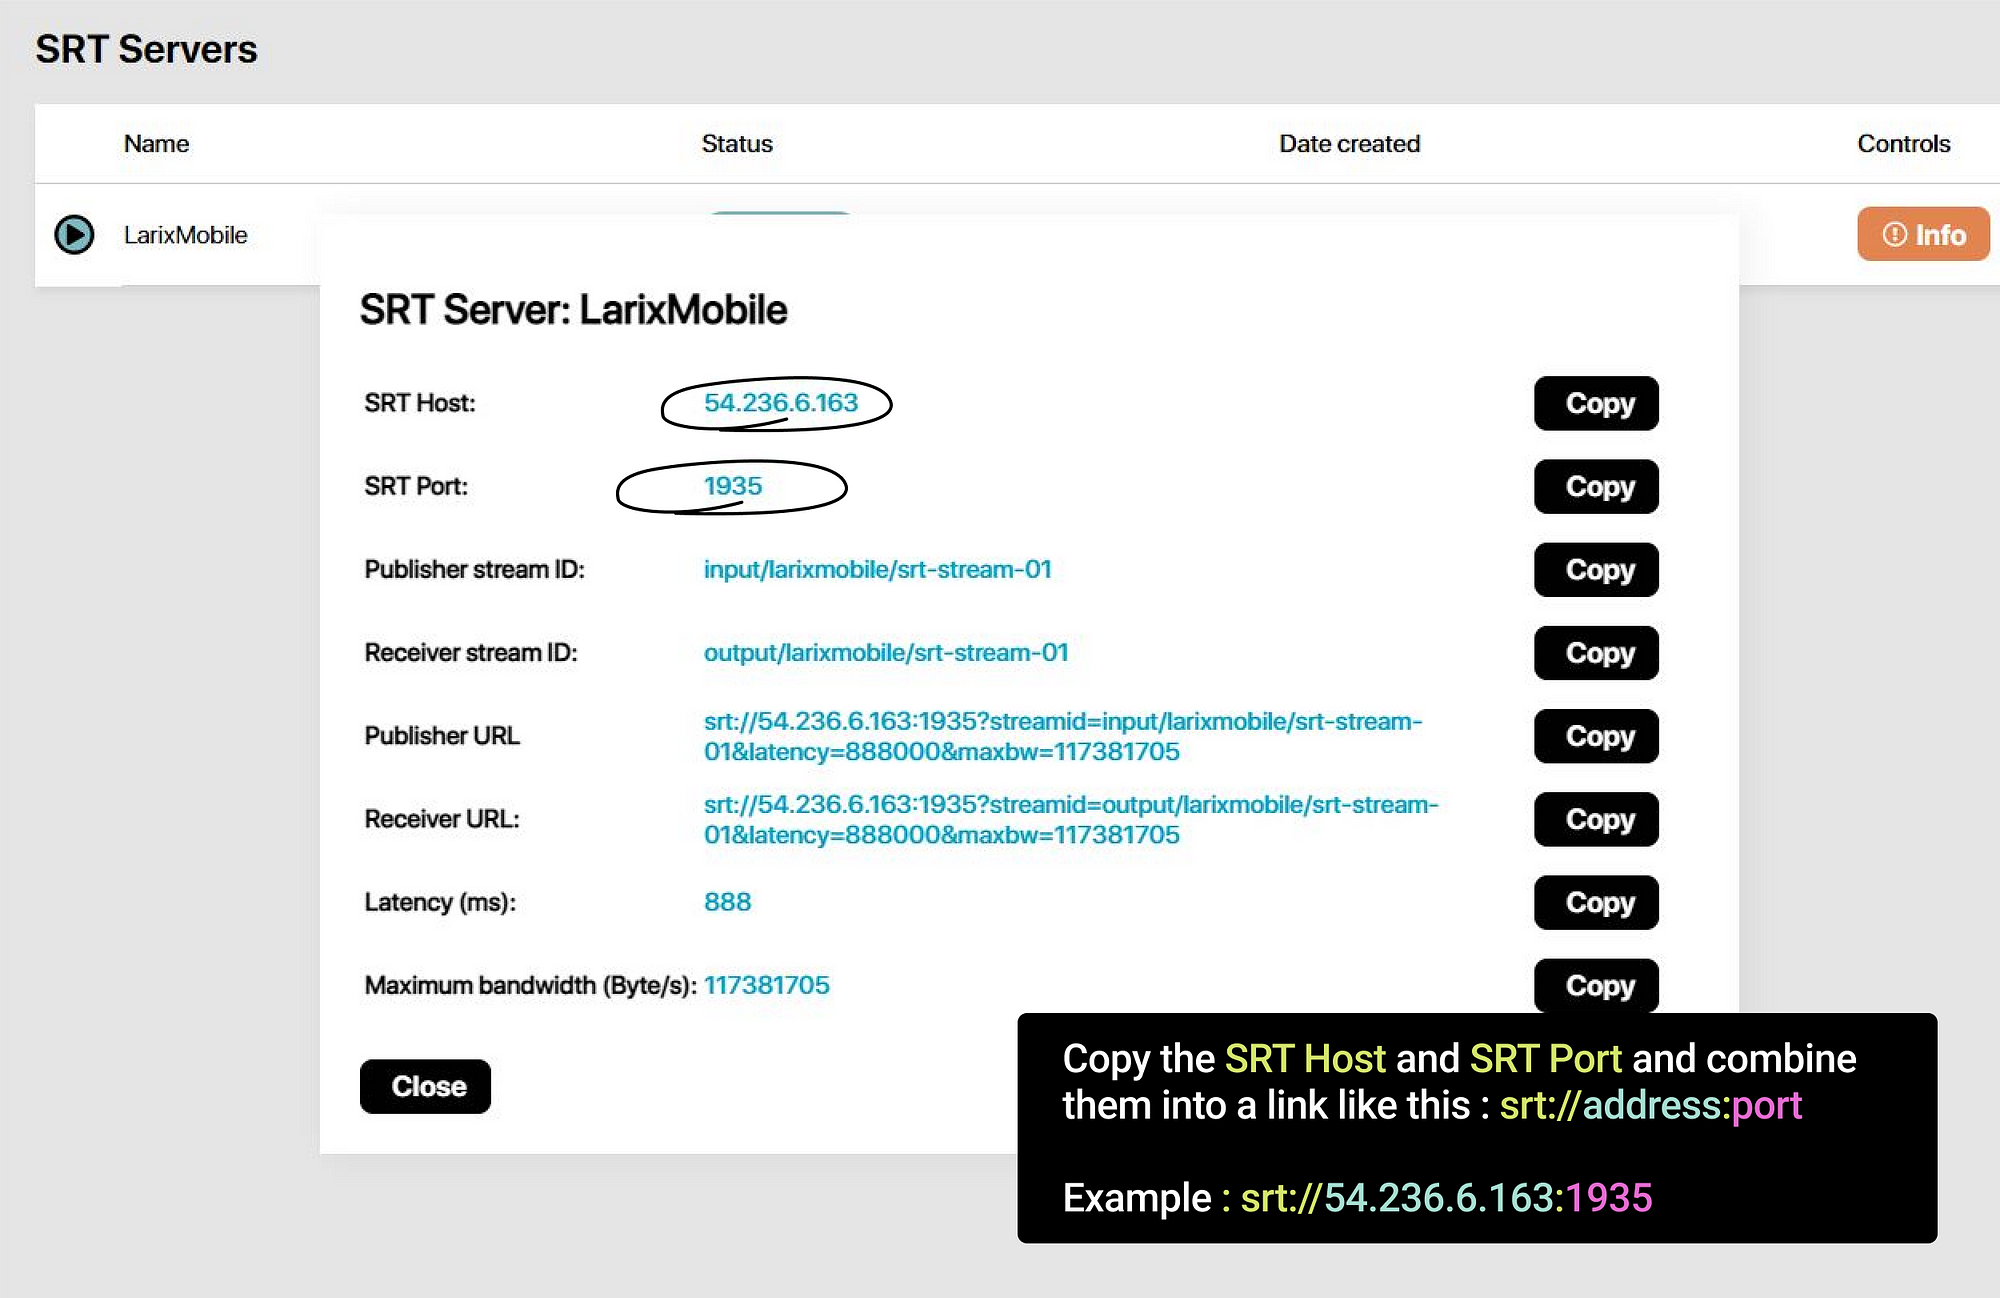
Click “Info” to open a window with parameters for sending and receiving a stream. Leave this window for now, we’ll come back to it later
5. Now let’s go to the Larix Broadcaster mobile app and configure the SRT stream.
Open Larix Broadcaster
Press the gear button to open the Settings menu
First, let’s configure the Video parameters:
Initial camera: camera selection
Resolution: resolution (we recommend Full HD 1920x1080)
Orientation: horizontal or vertical video
Stabilization mode: Larix allows you to use stabilization capabilities of your mobile device camera, which significantly improves the quality of broadcast in case of handheld shooting
Live rotation: change the orientation of the video on the fly (we recommend turning this option off if you are not sure if you need it)
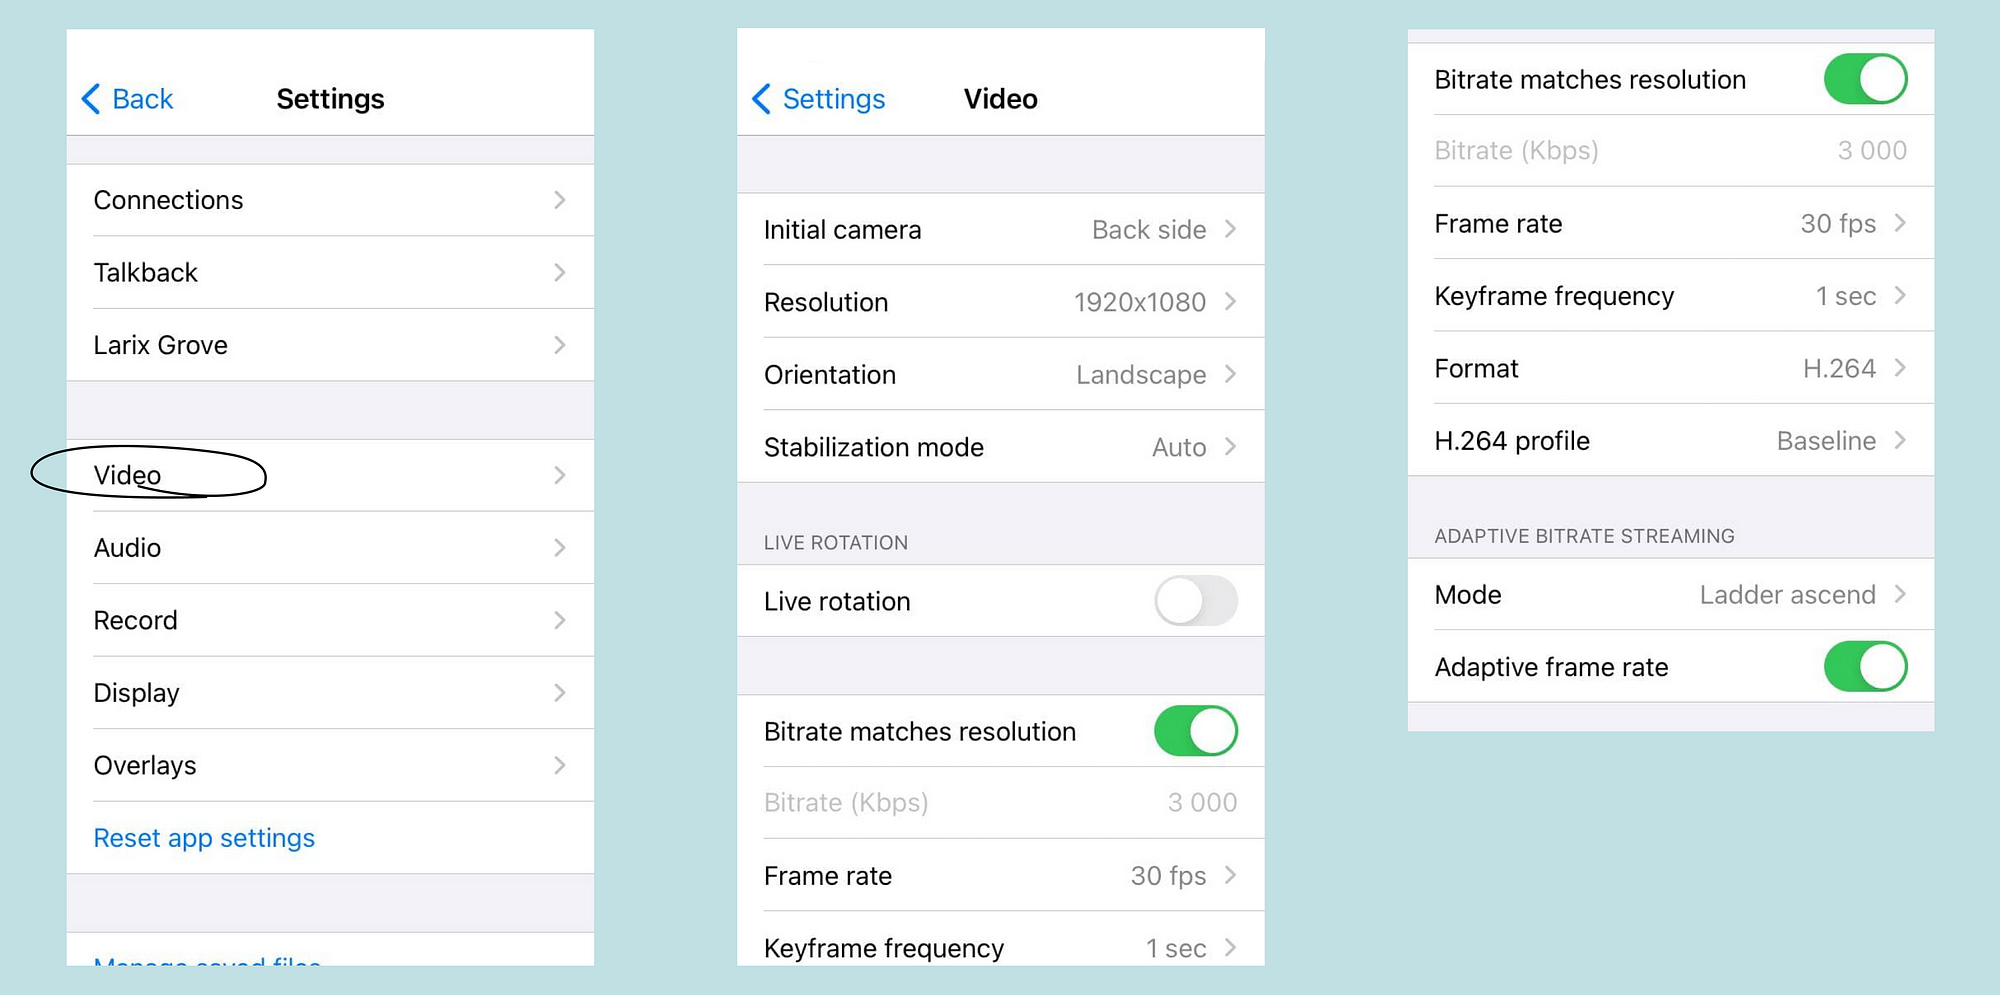
Now we’ll move to the video encoding settings
Bitrate matches resolution: auto-match bitrate based on resolution
Frame rate: frame rate, depends on your standard (Vmix project settings)
Keyframe frequency: keyframe frequency (usually 1 sec)
Format: select H.264 or HEVC codec
H.264 profile: codec profile (basic or high)
Adaptive Bitrate Streaming
Mode: ascend, descend and hybrid (the mixed type).
Activate this setting if you want to avoid data loss at the cost of automatic quality reduction in case of insufficient communication channel width
You can also customize the sound:
- select a microphone
- number of channels (stereo/mono)
- bitrate of the audio channel (by default it corresponds to the bitrate of your device
In the Record tab, you can configure the local recording of the livestream to your device
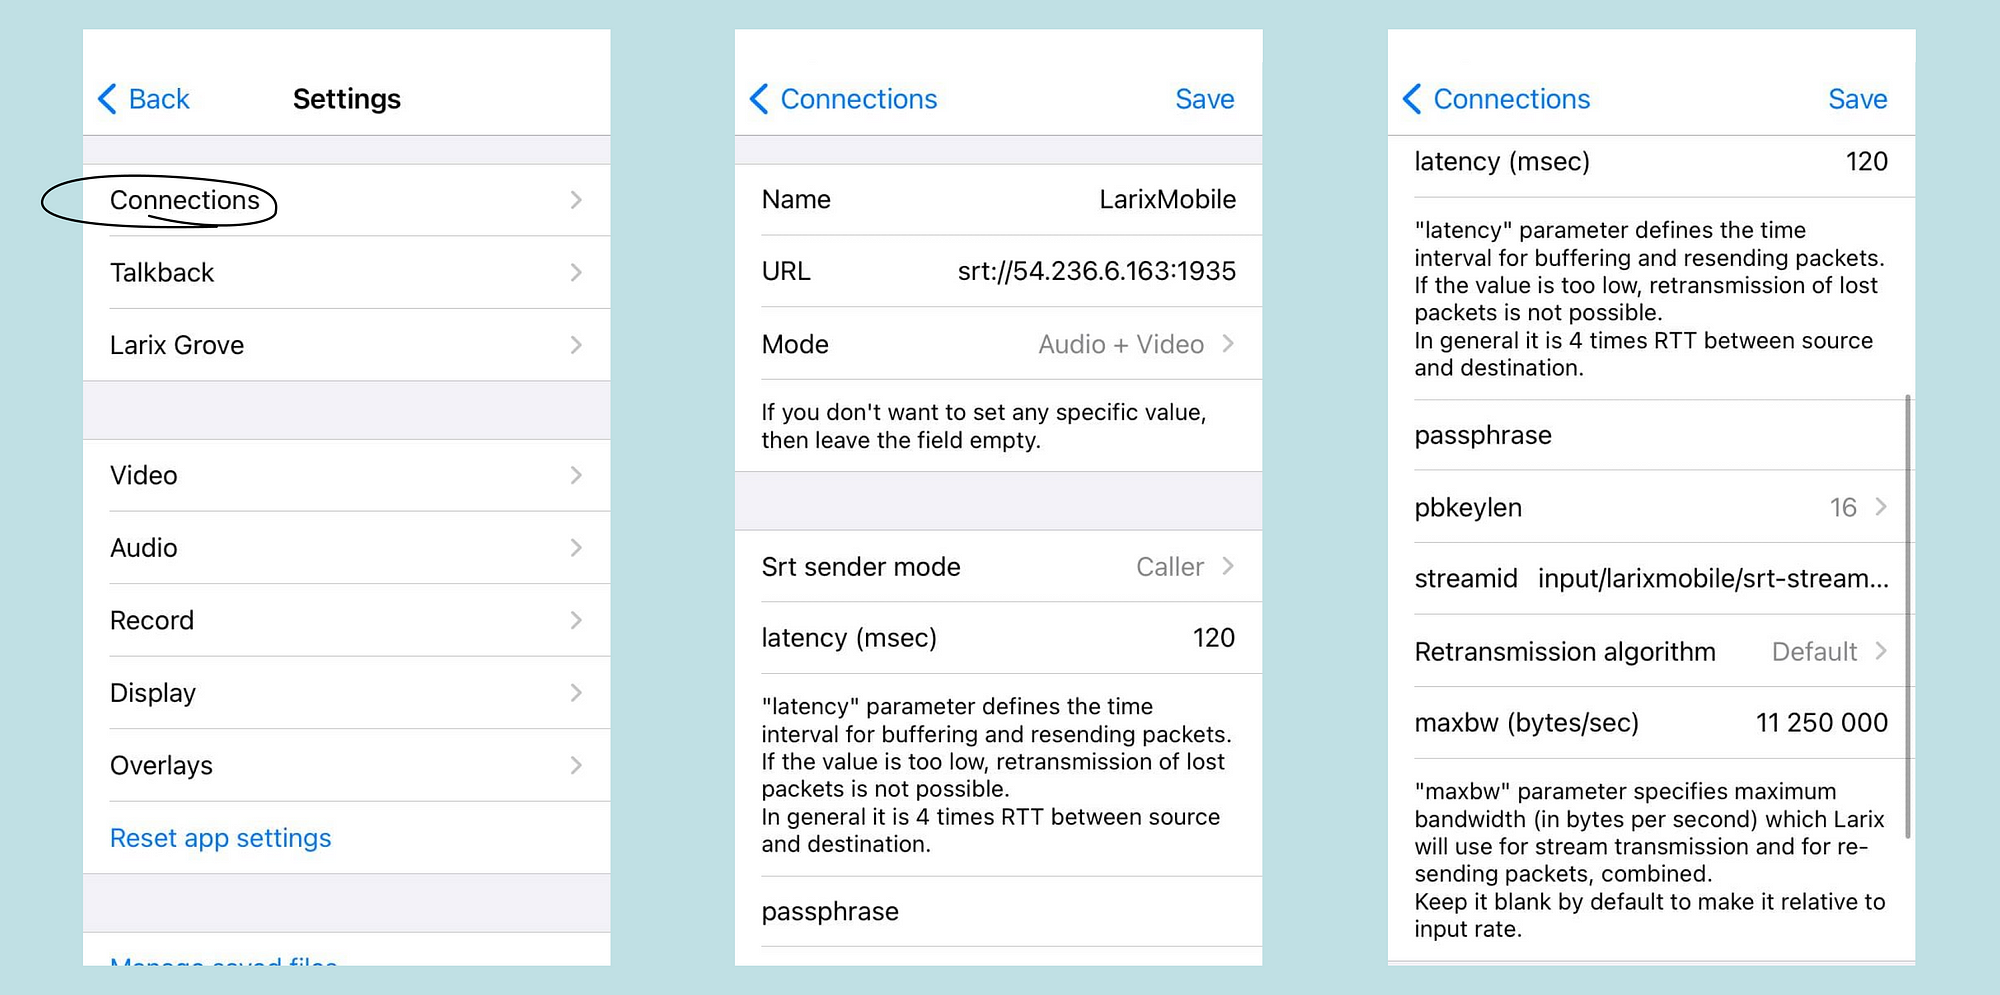
6. Let’s move on to the SRT broadcast settings.
Open the “Connections” menu item
Here you can manage existing connections and create new connections with the “+” button in the upper right corner. You can also use a tick to indicate up to three presets at the same time for the current broadcast.
When you open this page for the first time, the list is empty.
Create a new connection by clicking “+”.
Now we’ll have to dive in to some more settings. Exciting, isn’t it?
This is what our broadcast settings will look like when we’re done:
Larix Broadcaster supports many broadcasting protocols.
In the URL field, put srt://, then the fields for entering SRT broadcast parameters will appear.
URL:
Put a link formatted like this : srt://address:port
You can copy this data from the “Info” tab of your Сallaba Сloud server
SRT sender mode:
To connect to a remote SRT server use the “Caller” mode
Important!
For stable signal transmission, it is important to correctly set latency and maxbw (maximum bandwidth of your mobile communication channel).
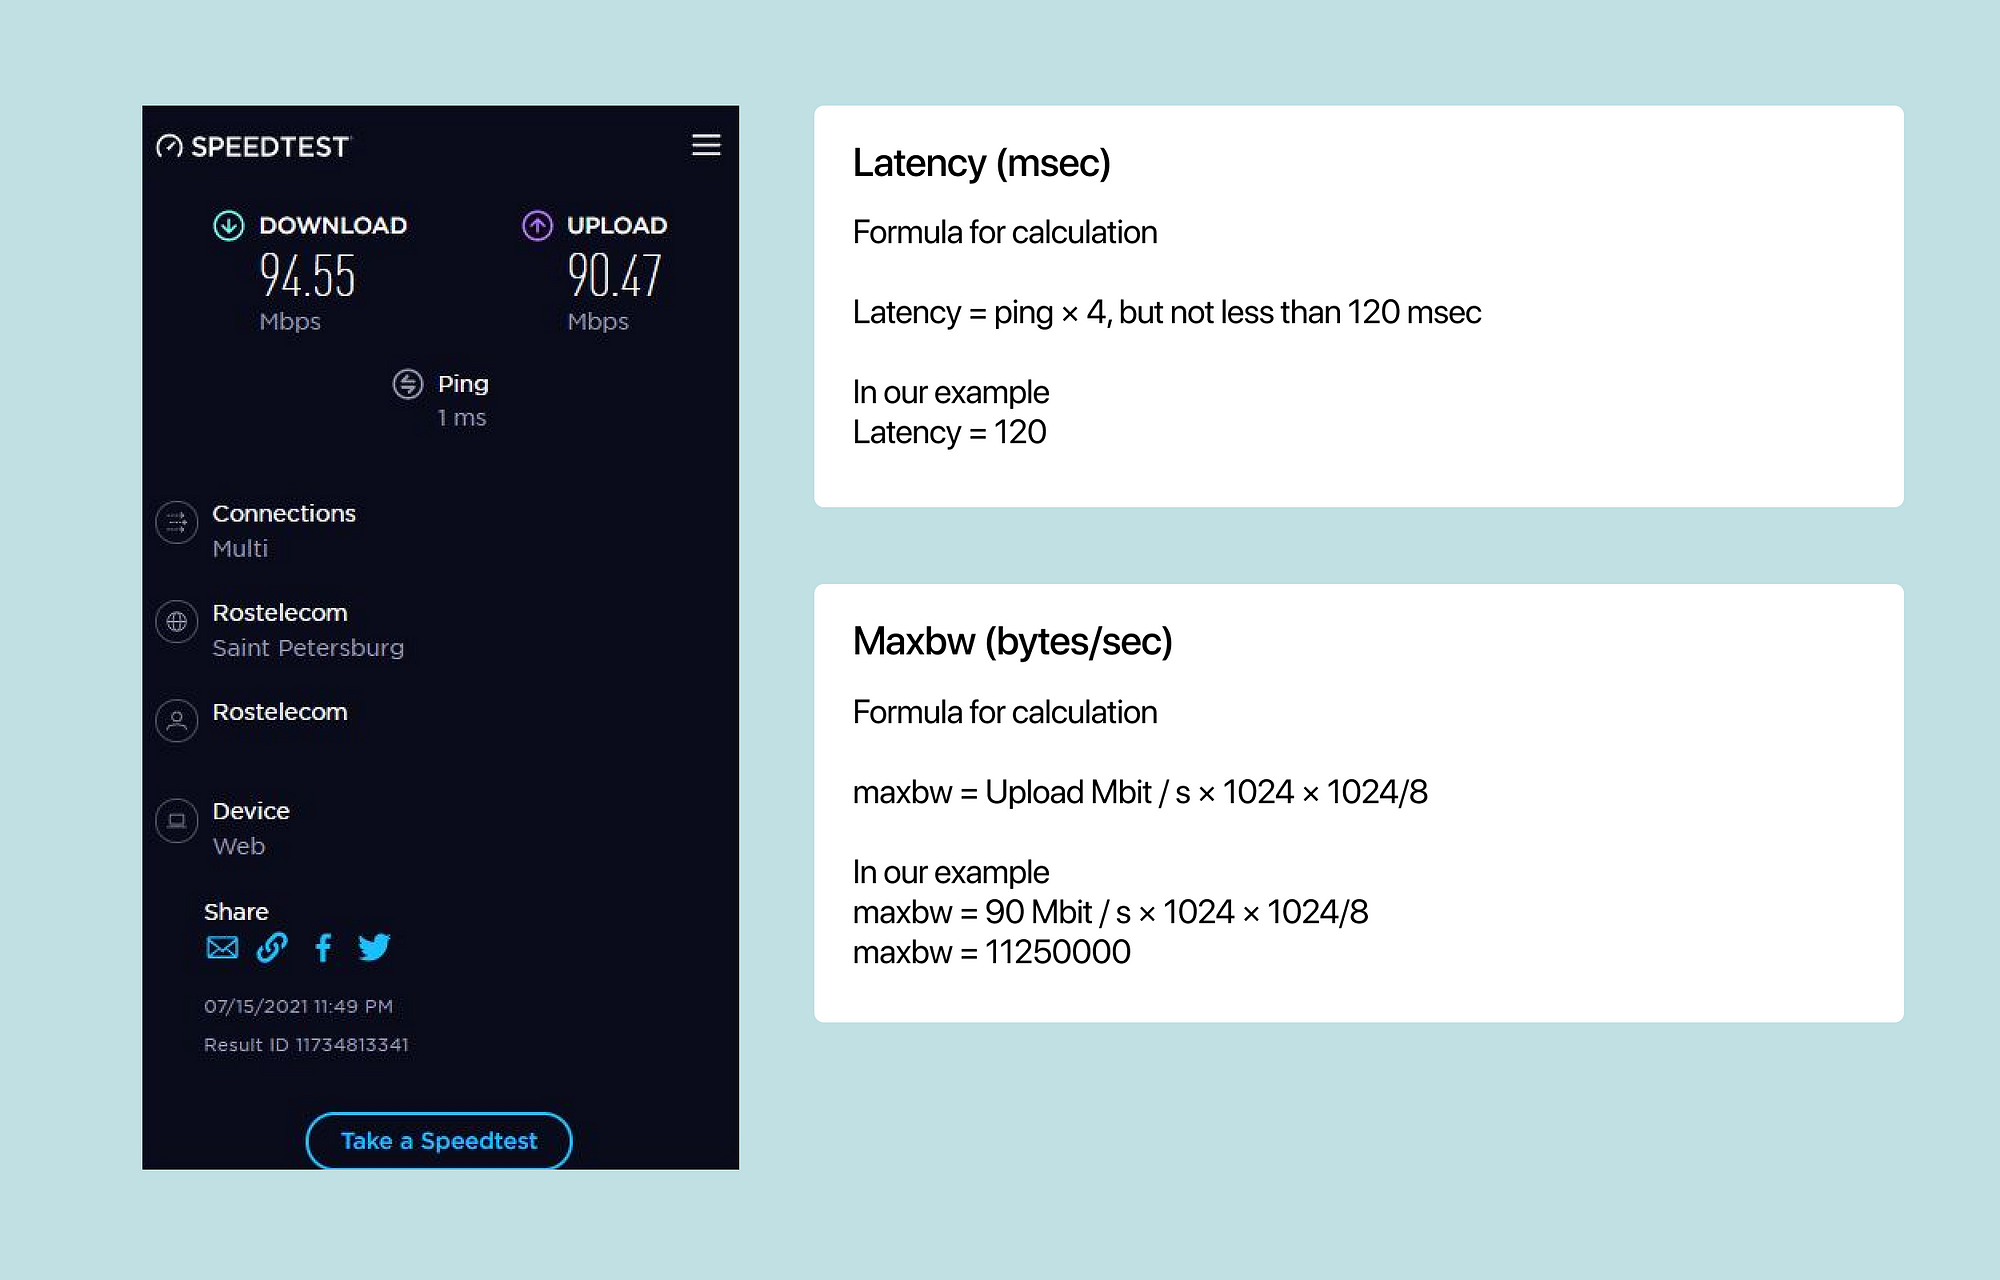
First, measure the outgoing speed and ping from your mobile device.
You can use any tool, for example speedtest.net
Latency (msec):
Formula for calculation
Latency = ping × 4, but not less than 120 msec
In our example
Latency = 120
Maxbw (bytes/sec):
Formula for calculation
maxbw = Upload Mbit / s × 1024 × 1024/8
In our example
maxbw = 90 Mbit / s × 1024 × 1024/8
maxbw = 11250000
In our example, the phone is connected via wifi. With upload speed above 15 Mbit/s, the bandwidth will be enough for almost any livestream, and the maxbw field can be left blank. But for low mobile Internet speeds, a correctly specified maxbw significantly increases the quality of the broadcast.
Streamid:
Specify streamid to unambiguously identify the SRT server (there can be quite a few of them in Сallaba Cloud) you want to stream to.
In our example, the streamid is input/larixmobile/srt-stream-01
Review the settings again to make sure nothing was missed.
Click “Save”
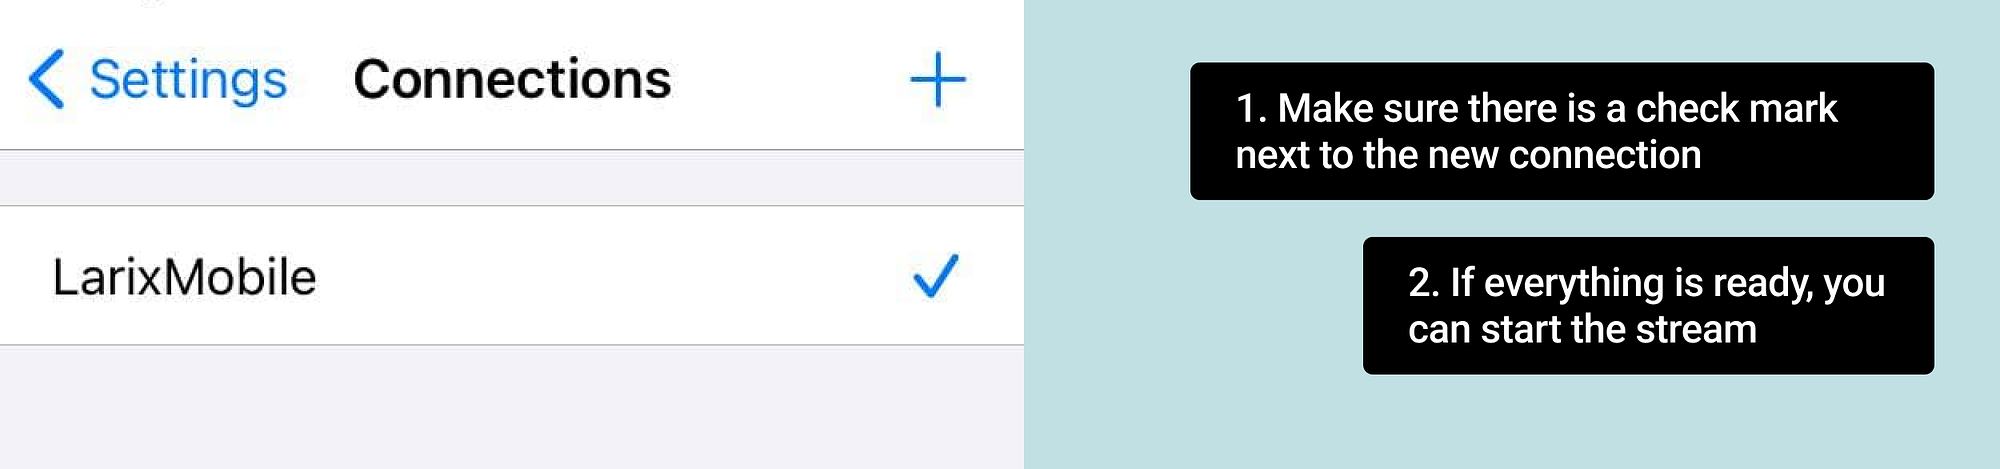
Make sure there is a check mark next to the new connection.
If everything is ready, you can start the broadcast
7. Go back to the camera mode “Settings” → “Back” and start the stream with the central button
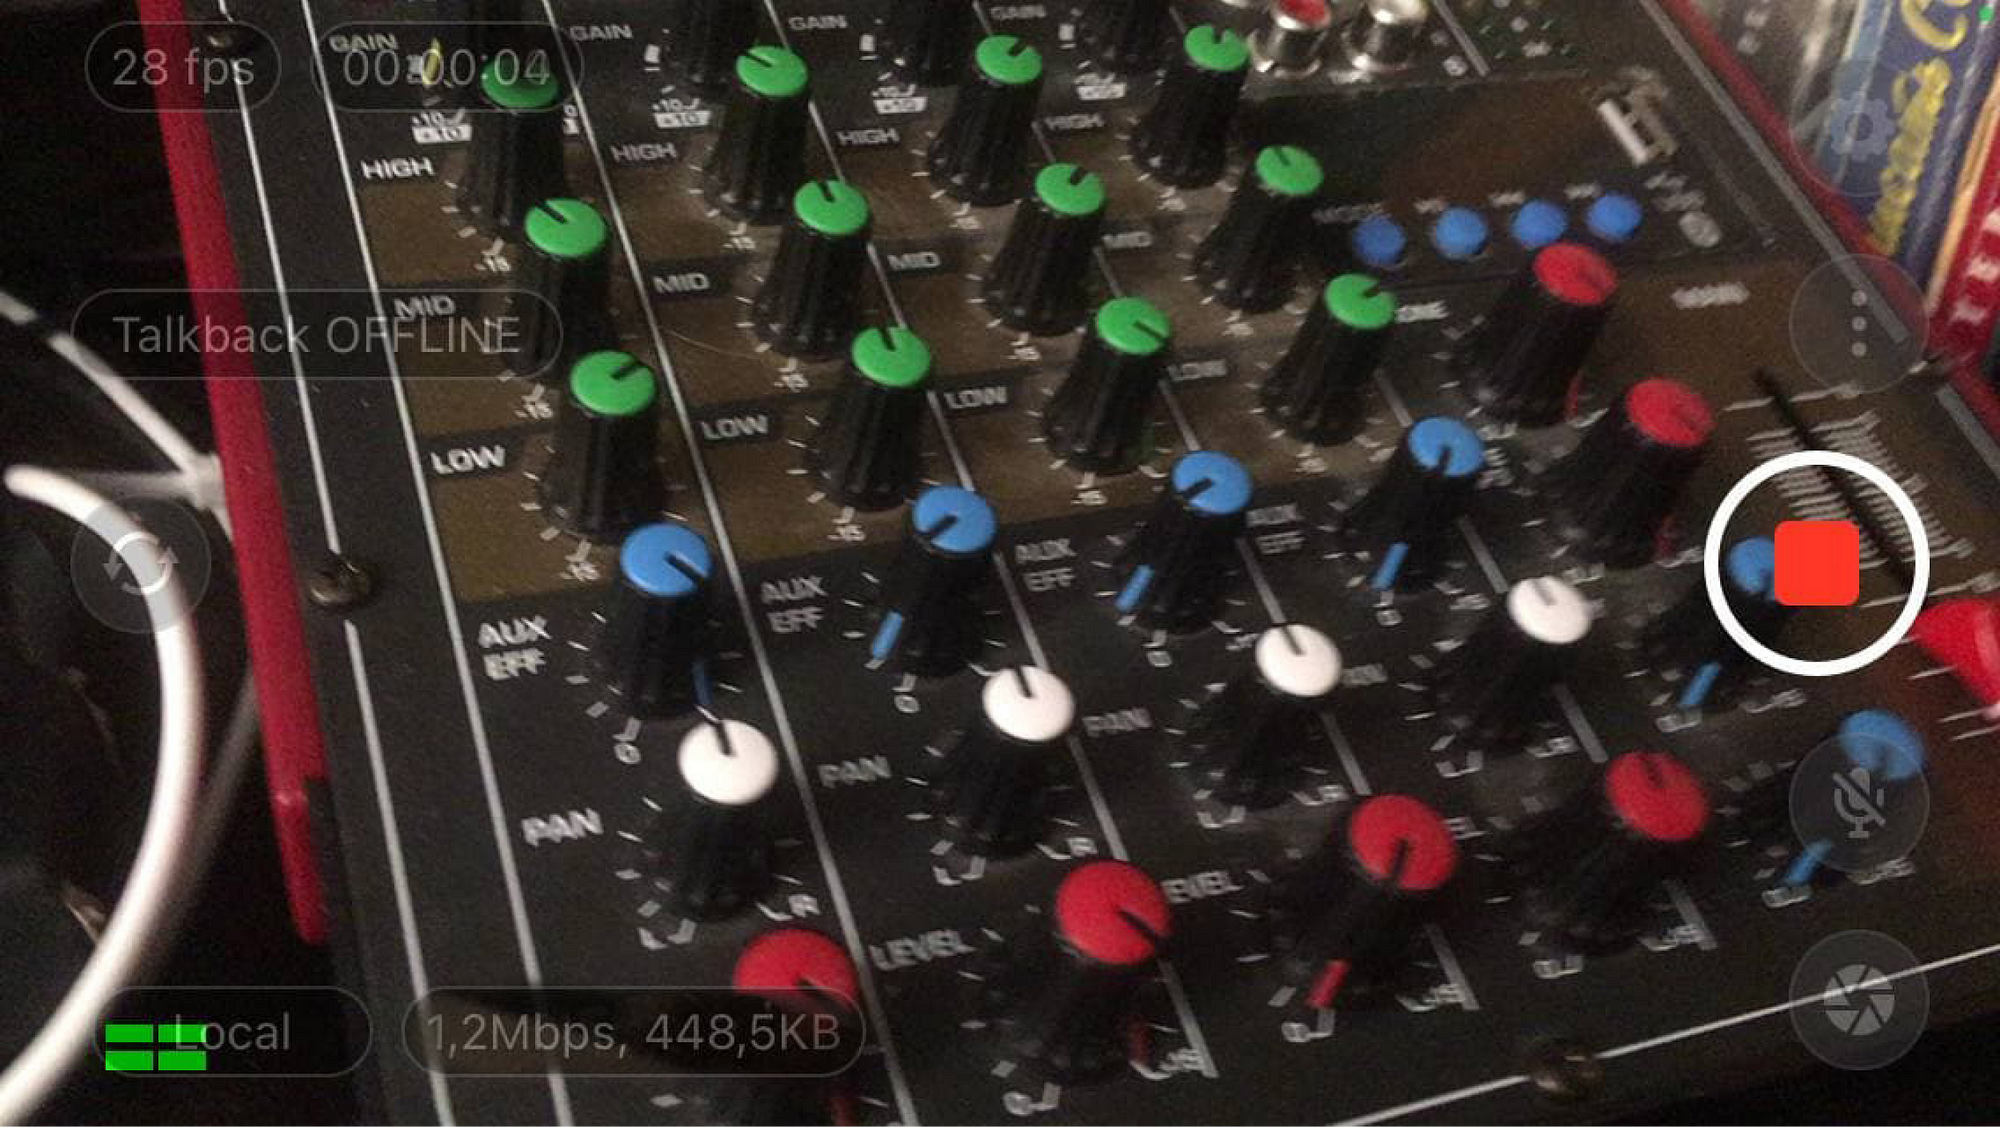
Turn your phone horizontally, unless you intend to stream vertical video.
Check that the audio indicator that the microphone is on.
Soon the fps will go up to 30, and the bitrate will go up to 3Mbps.
8. Let’s move on to the next part of the tutorial: now we will receive this stream in Vmix.
Start Vmix
Click “Add input”
In the window that opens, go to the Stream/SRT tab
Adjust the settings:
Stream type: SRT (Caller)
Hostname: IP address of your Сallaba Сloud server
Port: 1935 (port of your SRT server Сallaba Сloud)
Latency: 120 (similar to Larix settings)
Stream ID: output/larixmobile/srt-stream-01 (Receiver Stream ID of your Callaba Cloud SRT server)
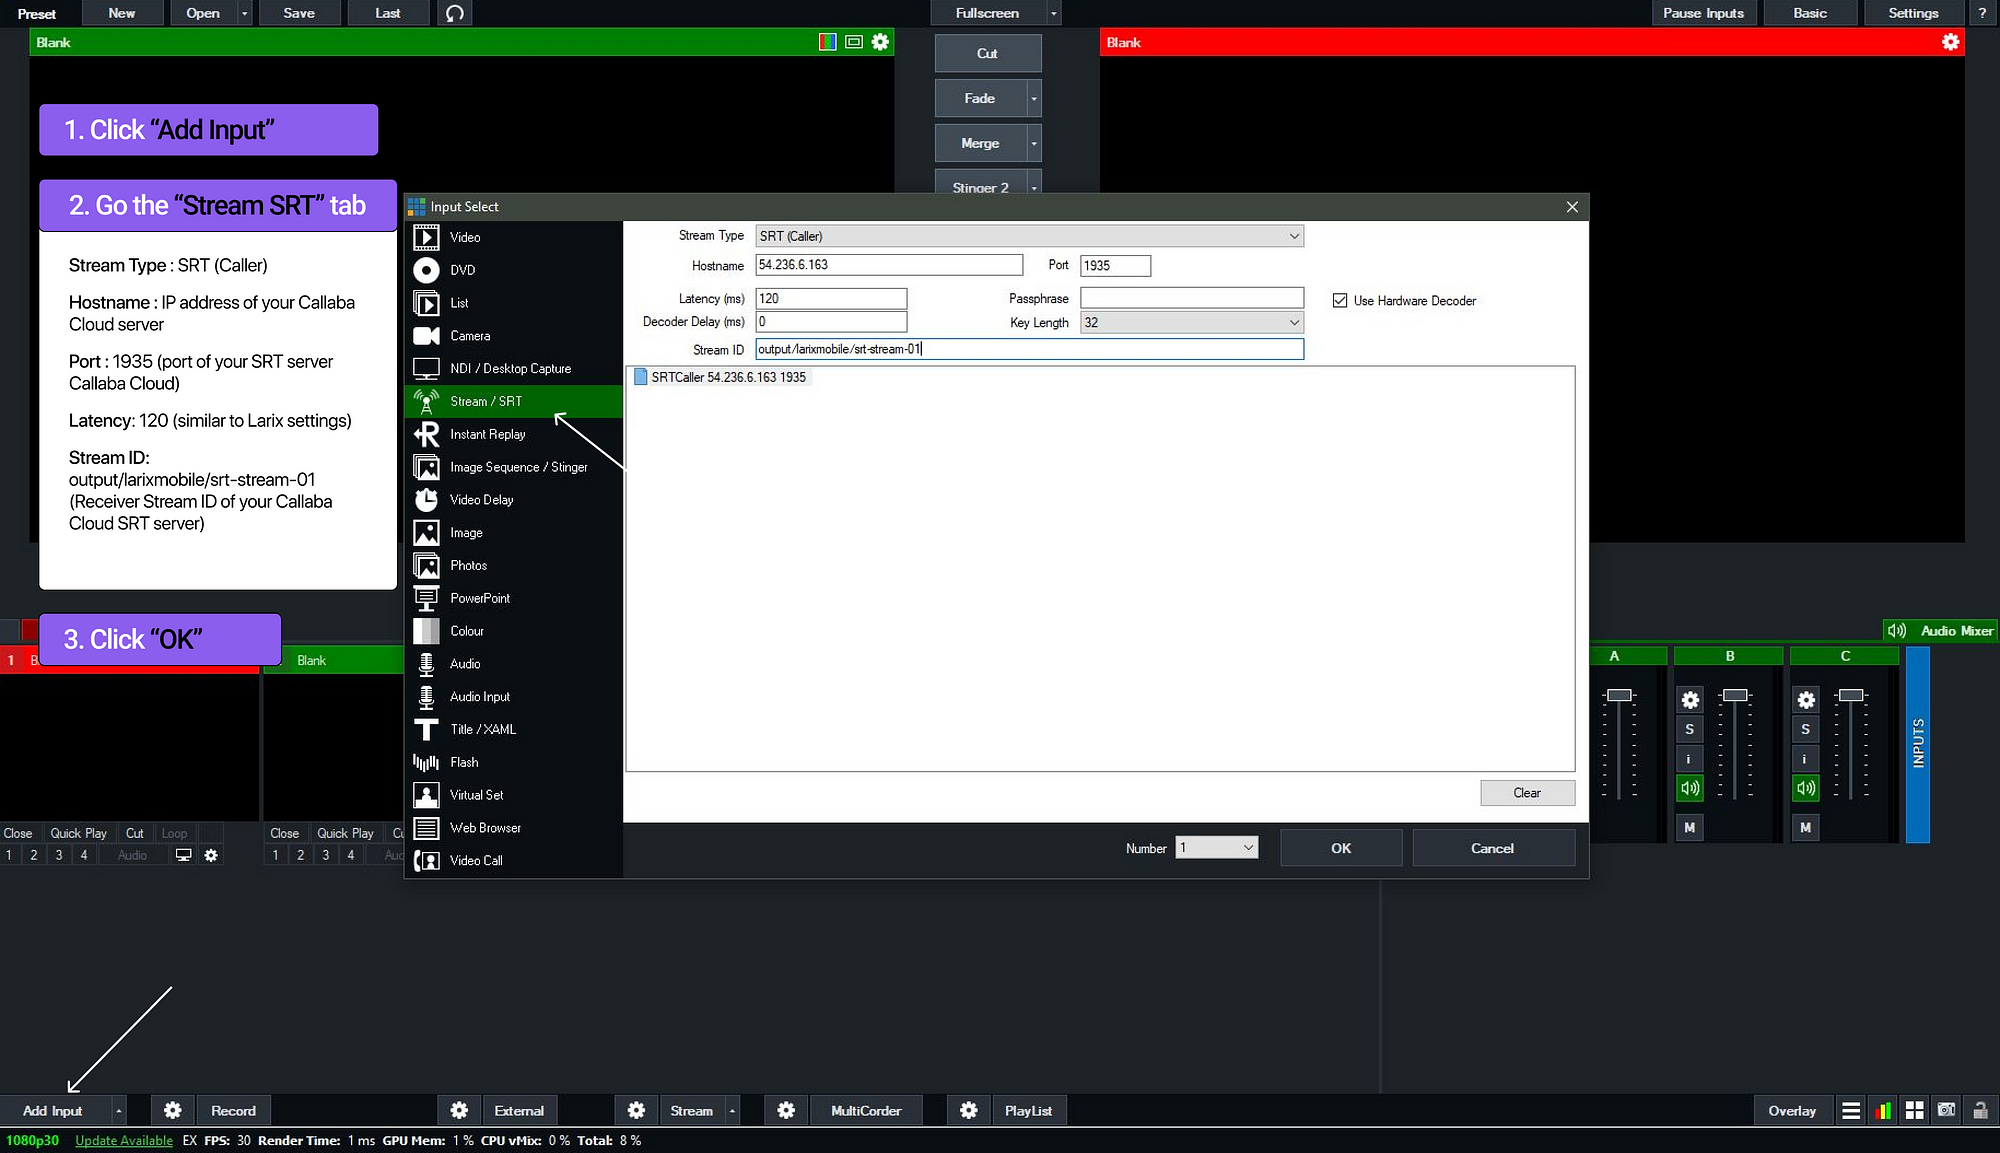
Click OK.
A new input will be added to Vmix and if all parameters are configured correctly, your stream will appear in a couple of seconds.
9. Adjust the sound to send the sound of this Input to the Master.
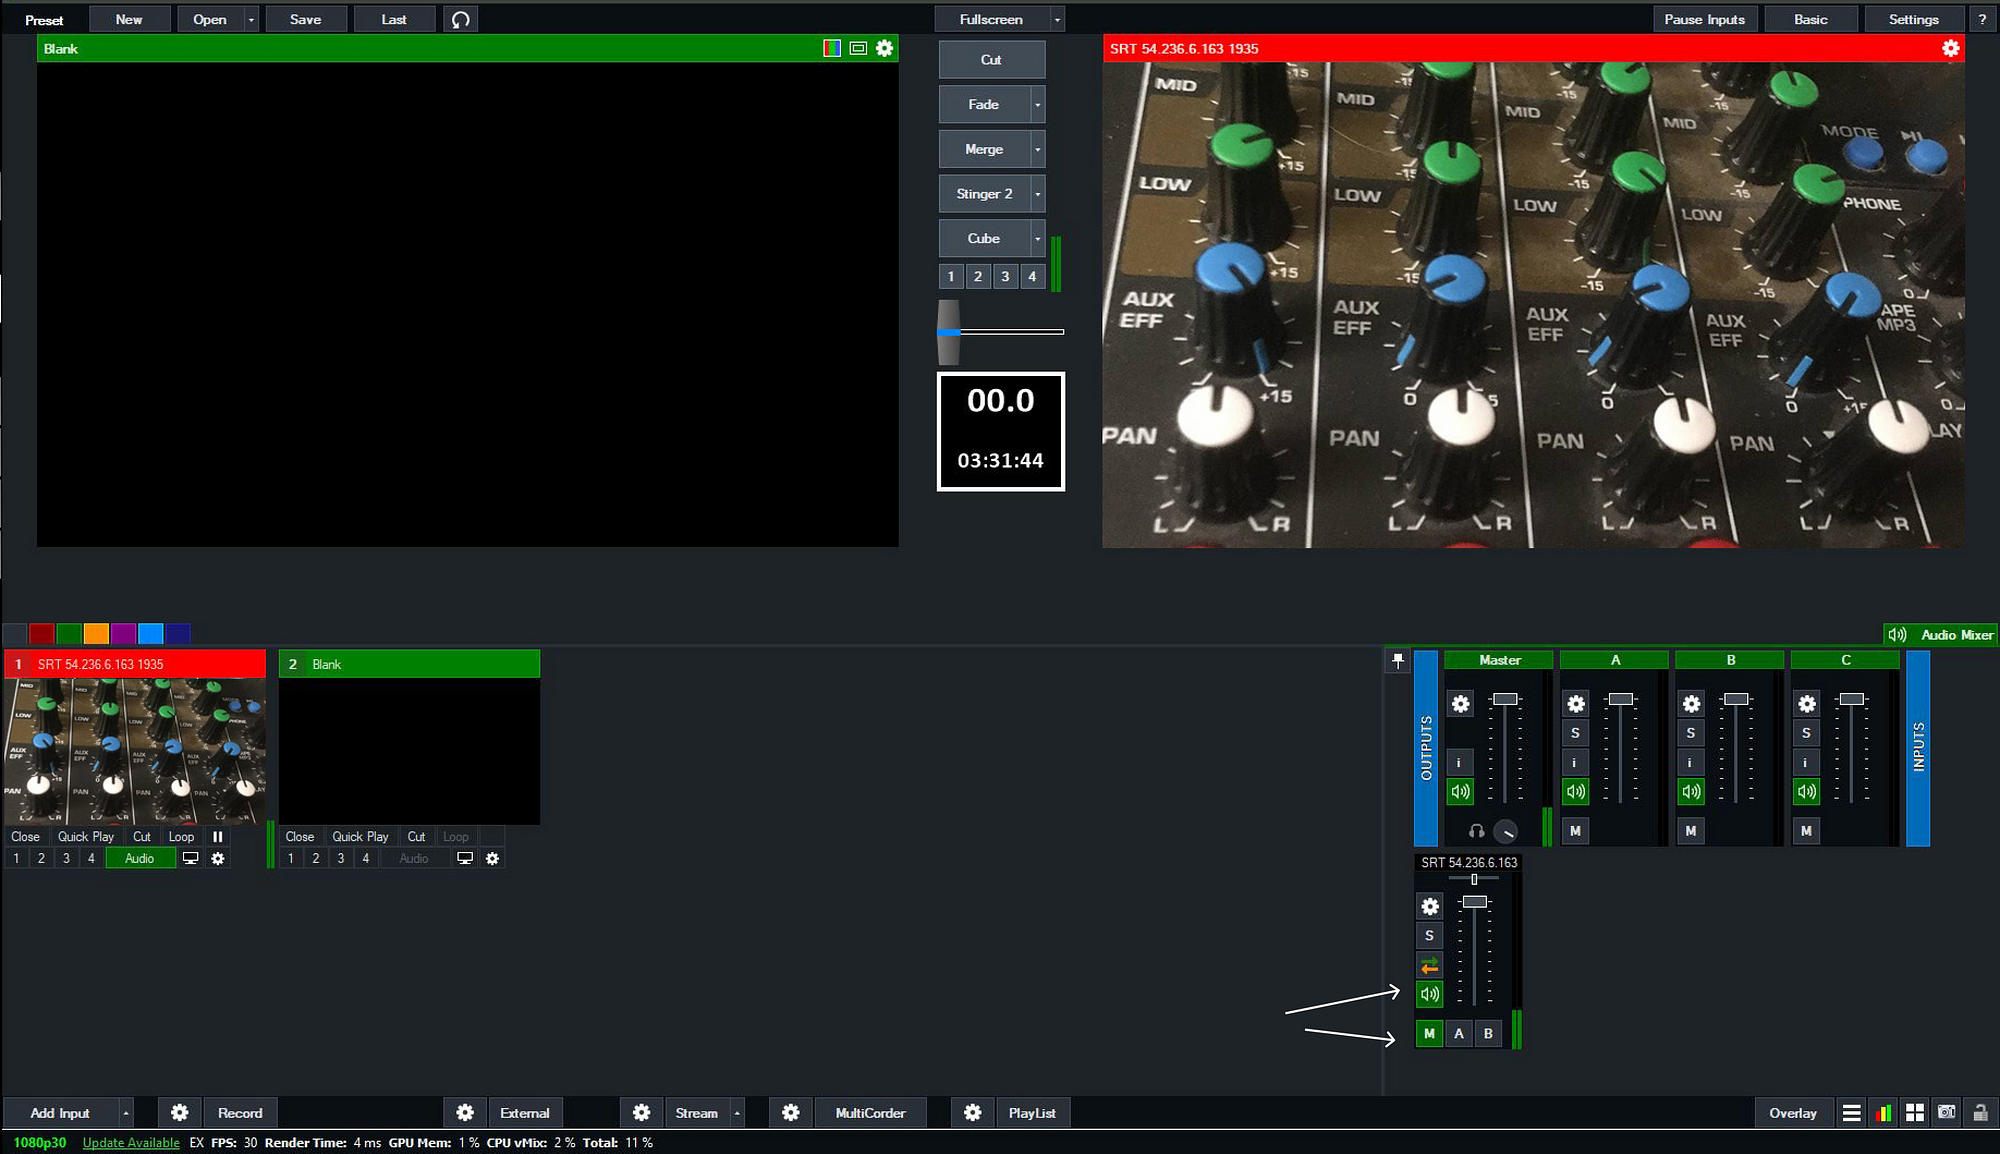
Congratulations, you can now use your mobile phone as a Vmix camera from anywhere in the world!
In some cases it might be helpful to use Larix Talkback.
Larix Talkback is a technology for communication between a director and a cameraman.
In essense, this is just another SRT stream going from Vmix back to Larix.
So when is this useful?
Communication between the director and the operator
The remote operator conducts a report and, during the broadcast, receives sound from the director’s microphone into the headphones. Something among these lines : we are preparing for the broadcast, broadcast, change the angle, zoom in, move, adjust the microphone, etc.
Communication between the presenter in the studio and the remote correspondent
The remote correspondent hears the signal from the studio and is able to communicate live directly with the presenter: answer questions, conduct a dialogue.
Let’s begin :
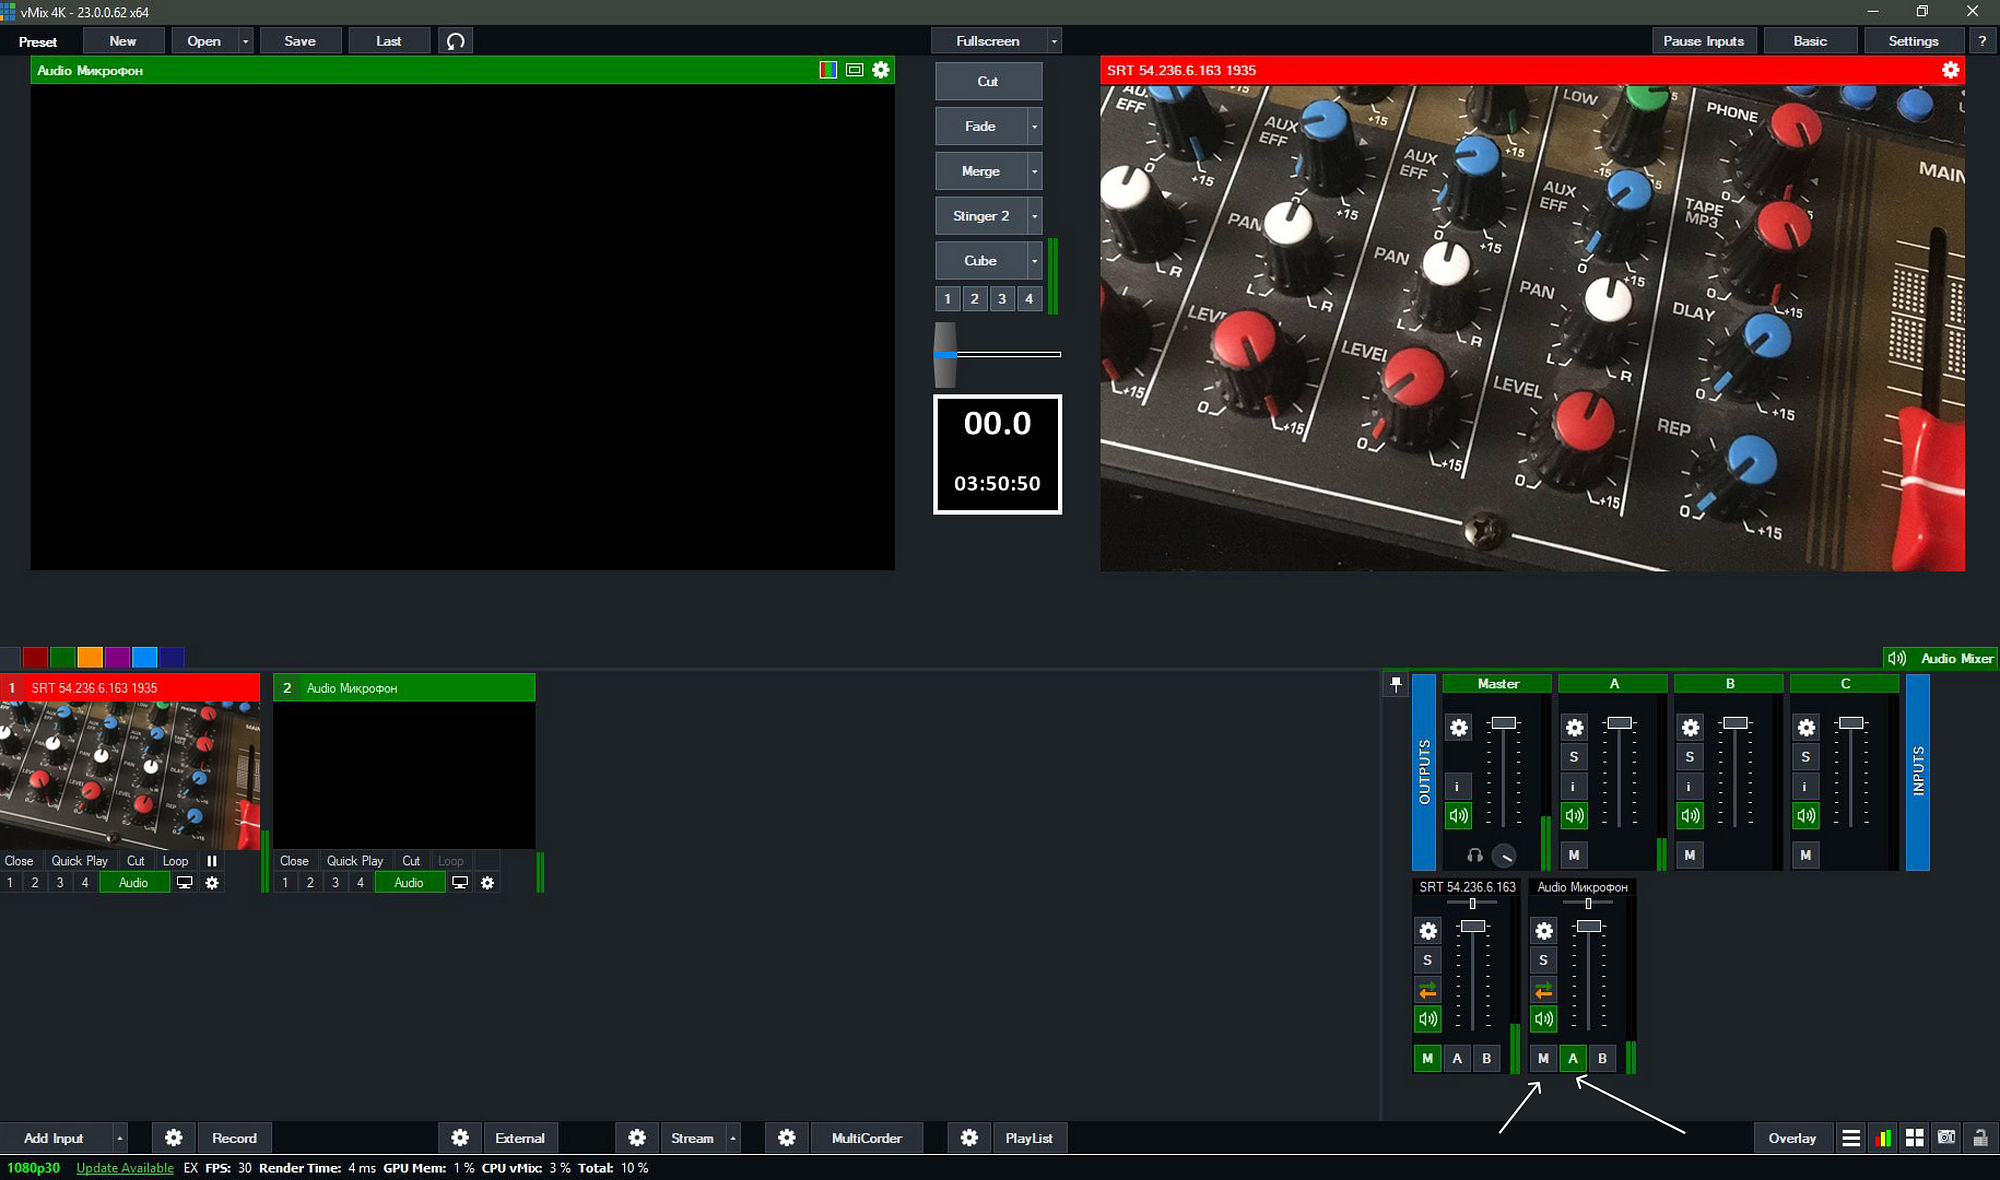
1. Bus A B C D and master (M) are used to send sound output to different audio devices as well as to different streams (stream/SRT/NDI).
First, check that bus A is active:
Settings → Audio Outputs → A: Enabled → OK
You may need to reboot the Vmix to change the audio configuration. Don’t worry, your preset will be saved and loaded automatically. (Preset is the current Vmix configuration with all settings and added inputs).
2. Connect the director’s microphone
Add input → Audio input → select the microphone connected to your computer

Unmute sound from this Input:
1 — turn off the Master (M), because the director’s voice should not be heard by the viewer
2 — enable bus A to transmit microphone sound via SRT to Larix
The sound of any other Input will also be transmitted to Larix when bus A is enabled on it. If you want the remote operator to hear the broadcast on your device, send the broadcast sound to bus A
3. To set up Larix Talckback, let’s create a second SRT Callaba Cloud server. It will be completely similar to our first server, give it a different name and specify a different port. For example, 1936
Click “Save”
4. Open the “Info” of the new server. We will use these parameters to create an SRT broadcast from Vmix to Larix.
Leave this window open for now, we will need it very soon.
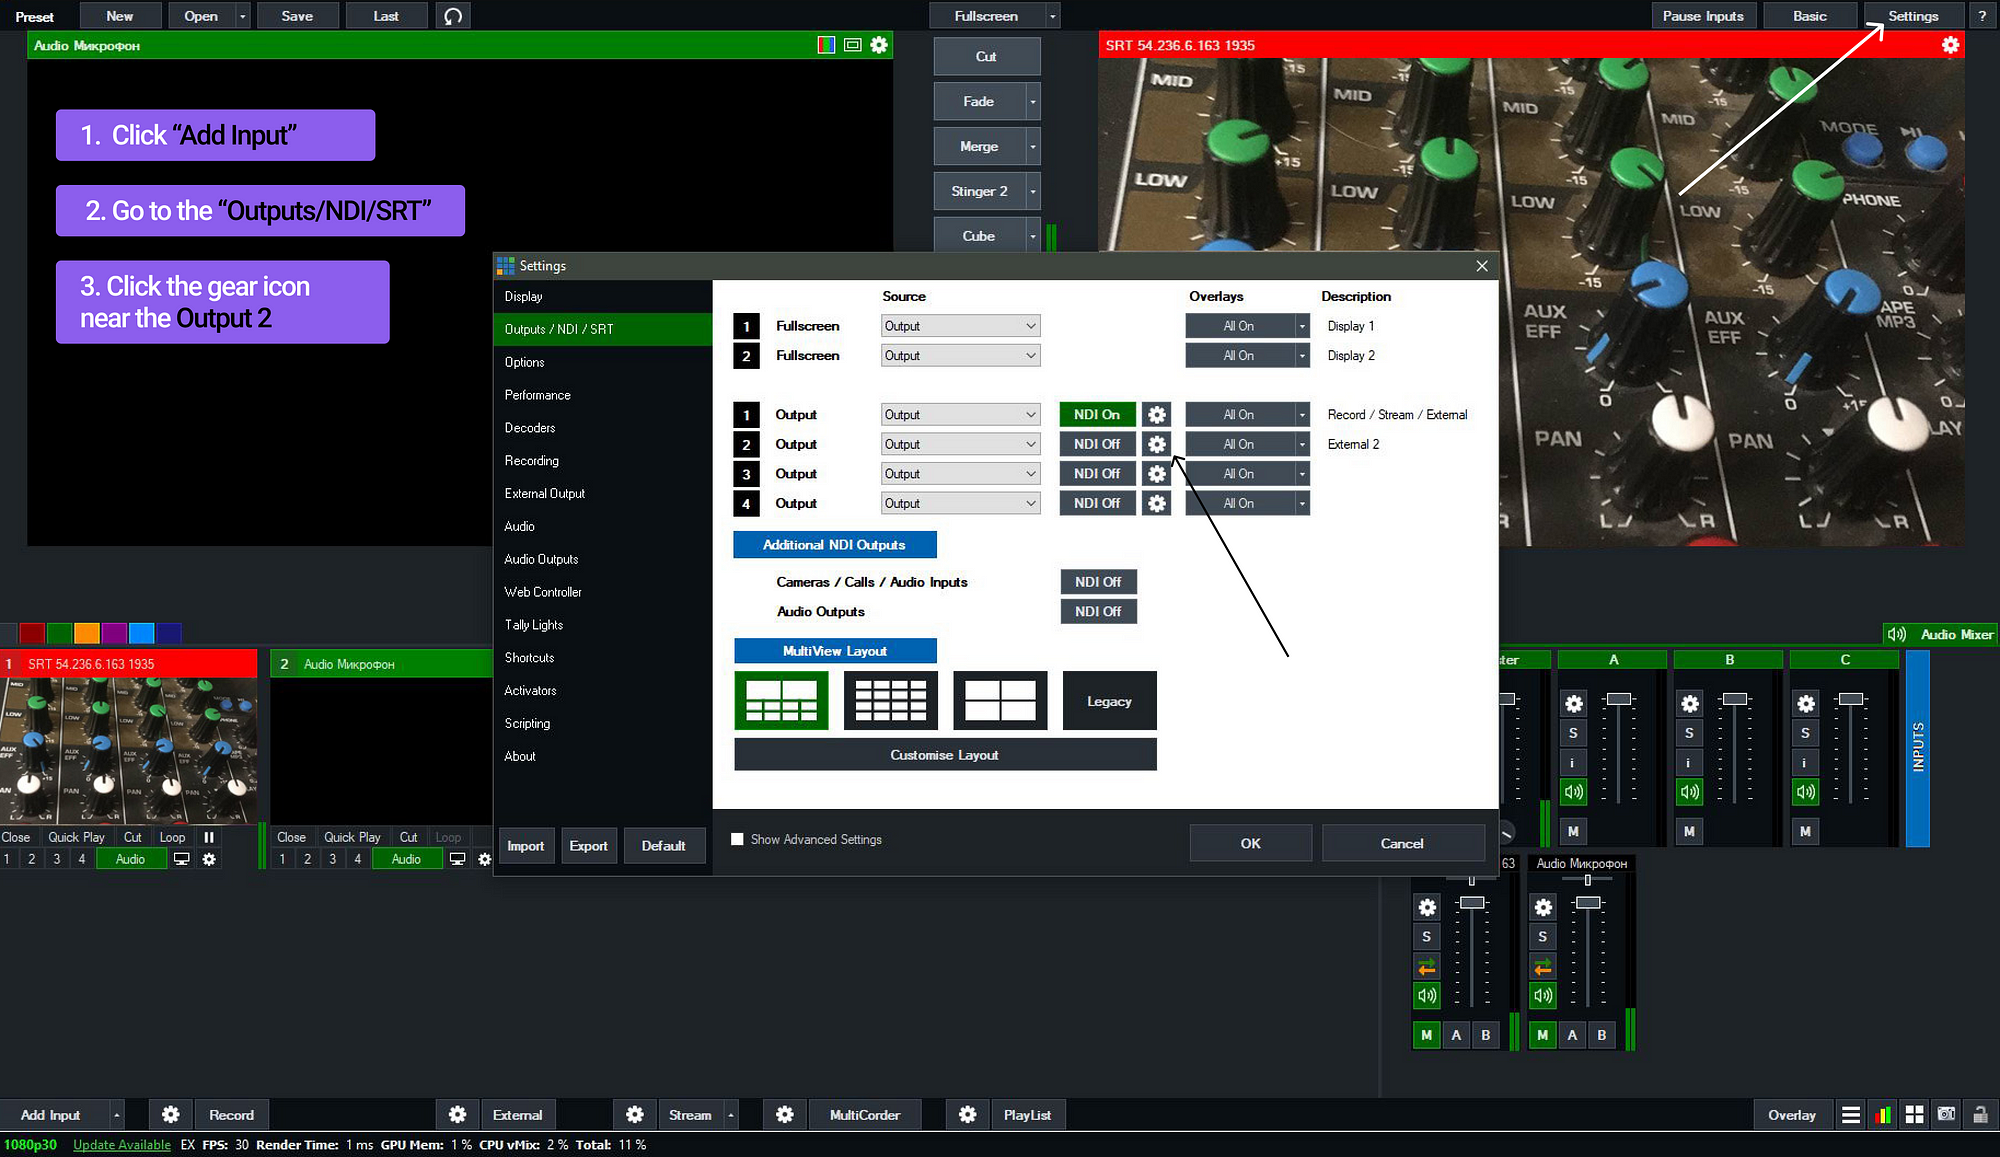
5. Open Vmix
Click Settings in the upper right corner
Go to the section output/NDI /SRT
For broadcasting to Larix, we will use output 2 (since the first is usually taken by the master broadcast).
The source value is not important, since only the audio stream will be sent back.
Click the gear icon to open Output 2 options
6. Let’s configure Output 2
Audio Channels: bus A (we will use bus A to broadcast the director’s microphone
Enable SRT: on
Type: Caller
Next, we will use the data of the second SRT Callaba Cloud server
Latency: 120 (your latency value)
Hostname: IP address of Callaba Cloud
Port: 1936
Stream ID: input/talkback/srt-stream-01 (publisher stream id of your SRT server)

By the way! You can always open the last used vmix preset with the Last button in the upper left corner
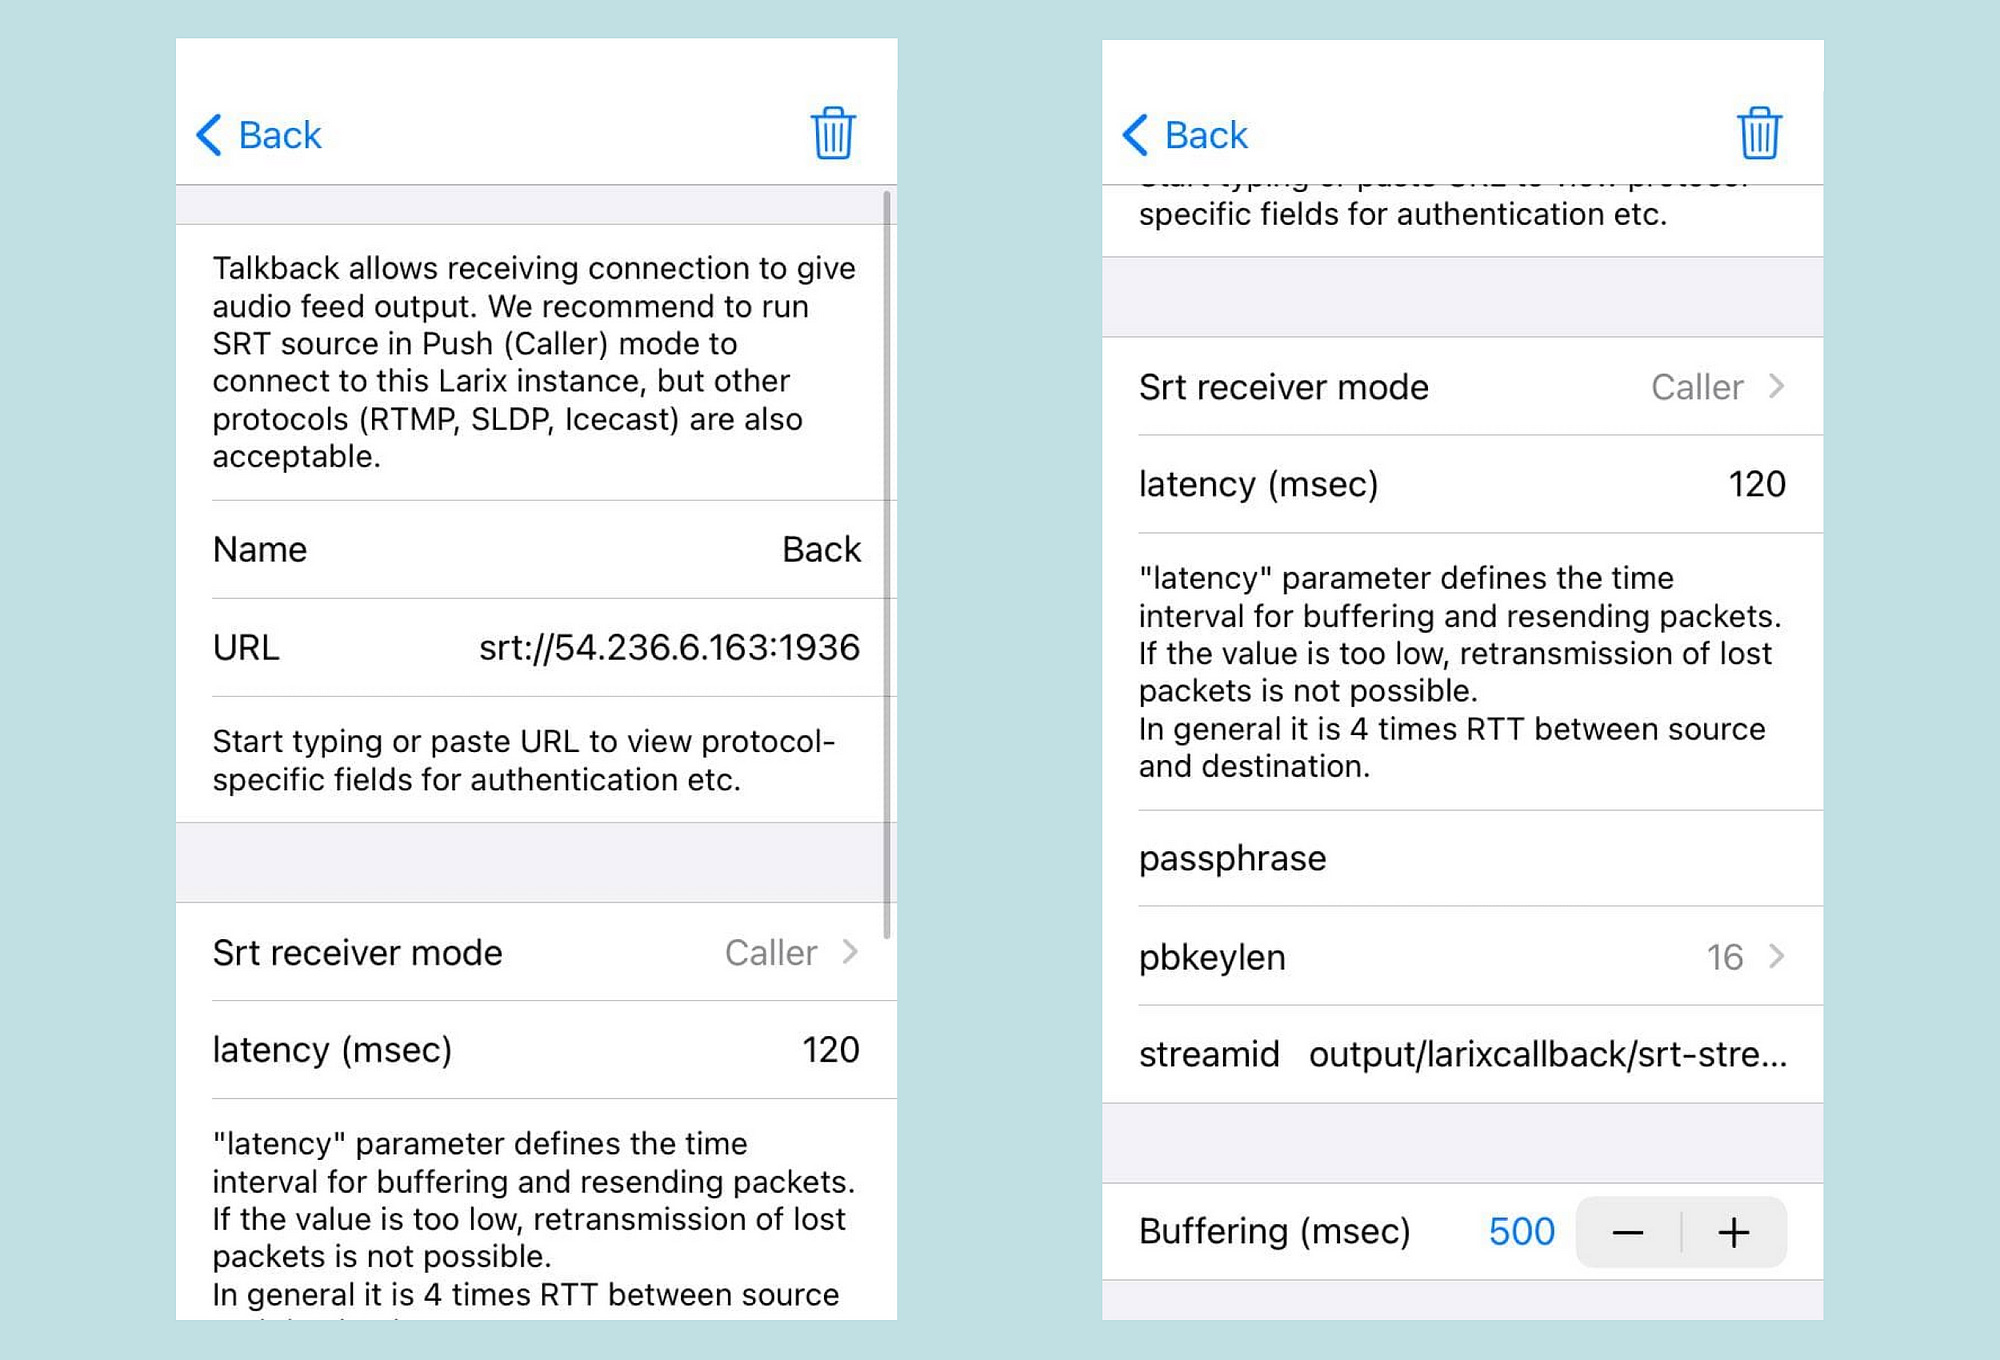
7. Now let’s move on to setting up Larix Talkback to get voice feedback from our studio. Let’s add a new connection:
Settings (gear icon) → Talkback → “+” icon
Create a name for this connection
URL: srt://adress:port of your server
Srt receiver mode: Caller
latency (msec): 120 (the value we calculated earlier)
streamid: output/talkback/srt-stream-01 (receiver stream id of your talkback SRT server)
Click “Save”
Make sure there is a check mark next to the new connection and return to camera mode “Settings” → “Back”
Check the status: “talkback ONLINE” means the connection is successful, the bus A sound from Vmix is transmitted to Larix and you can hear it on your mobile device.
That’s all! If you have any questions, please contact us at [email protected]. We will reply to you within 24 hours.
We wish you successful broadcasts, minimal latency and a wide communication channel!


![How to receive a feed from a CCTV camera in RTMP [Part 2]](https://api-update.callabacloud.com/upload/1665505619294-1-exdfoq-sduawtt61145bnq-png.png)
![How to transform UDP feed from a CCTV camera into RTMP [Part 1]](https://api-update.callabacloud.com/upload/1665505327856-1-14htgqn1jtviqiga-jjylg-png.png)


